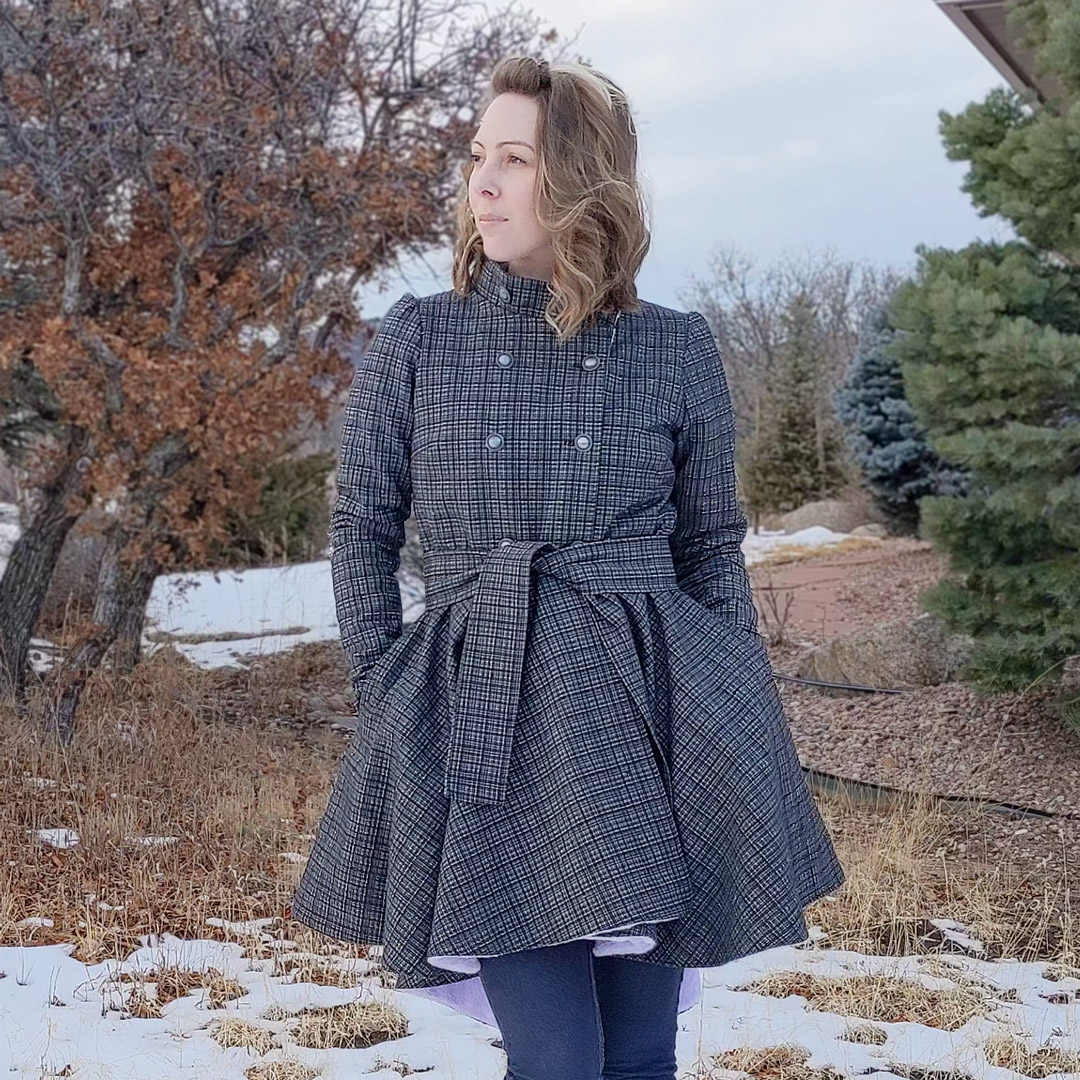
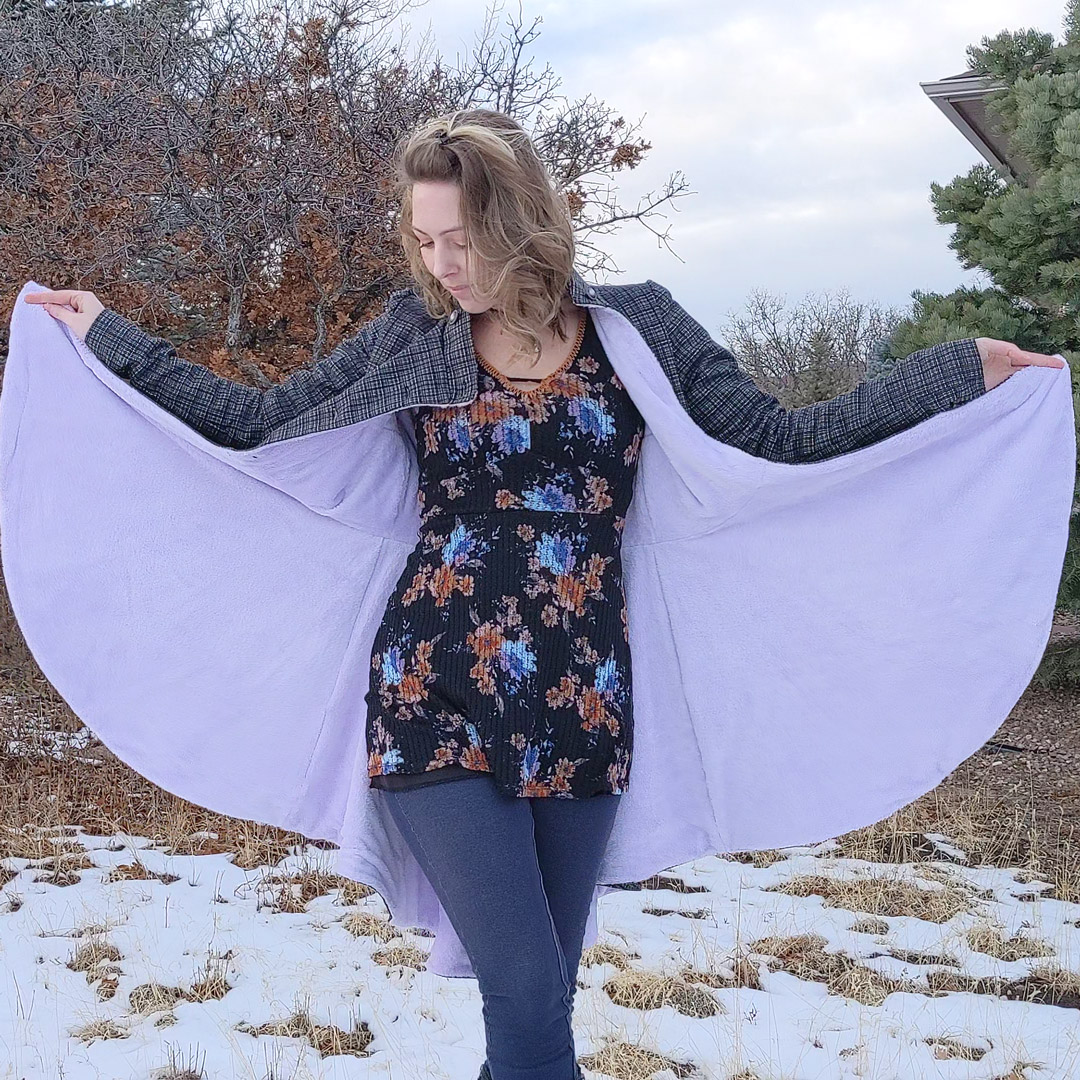
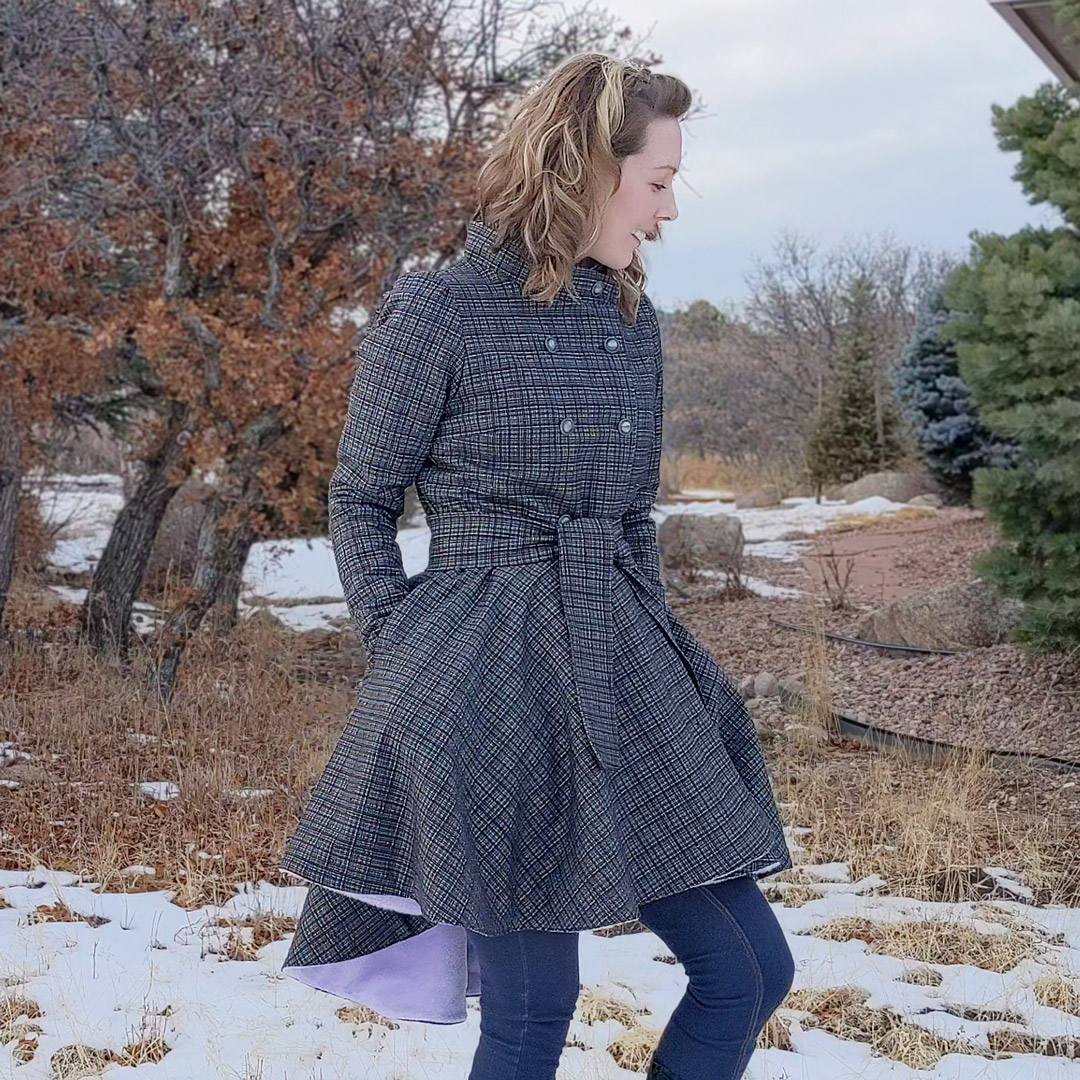
It’s one of those projects that I’m deeply proud of. This has been on my list for a lonnng time—well over a year (I actually ordered the main fabric in May 2020)—and it’s probably the most intensive make I’ve ever done.

First, there was the intimidation. I knew it would be a challenge: all that fabric and all that tailoring and fully lined and fitting…
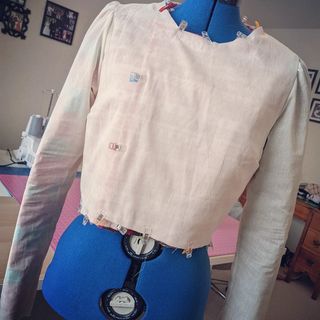
And then the uber delay as I debated the lining I wanted to use. Something light and silky? Or something warm and soft? A warm, minky lining would be more difficult to fit. I would definitely have to make a toile. I dragged my feet until finally ordering some muslin fabric last month. This after I had already purchased that minky lavender lining fabric. But before committing to the minky lining, a toile was definitely necessary. I pieced together some fleece scraps for the bodice lining, and whipped up the bodice shell out of muslin, clipped the two together, tried it on, and was shocked to find it fit wonderfully.
About This Make
- Size M
- +2″ to the sleeves
- +1″ to the bodice
Why This Was So Intense
- There is a deceptively large amount of fabric, even for just one layer, and in the end this jacket is fully lined, so you’re cutting everything twice.
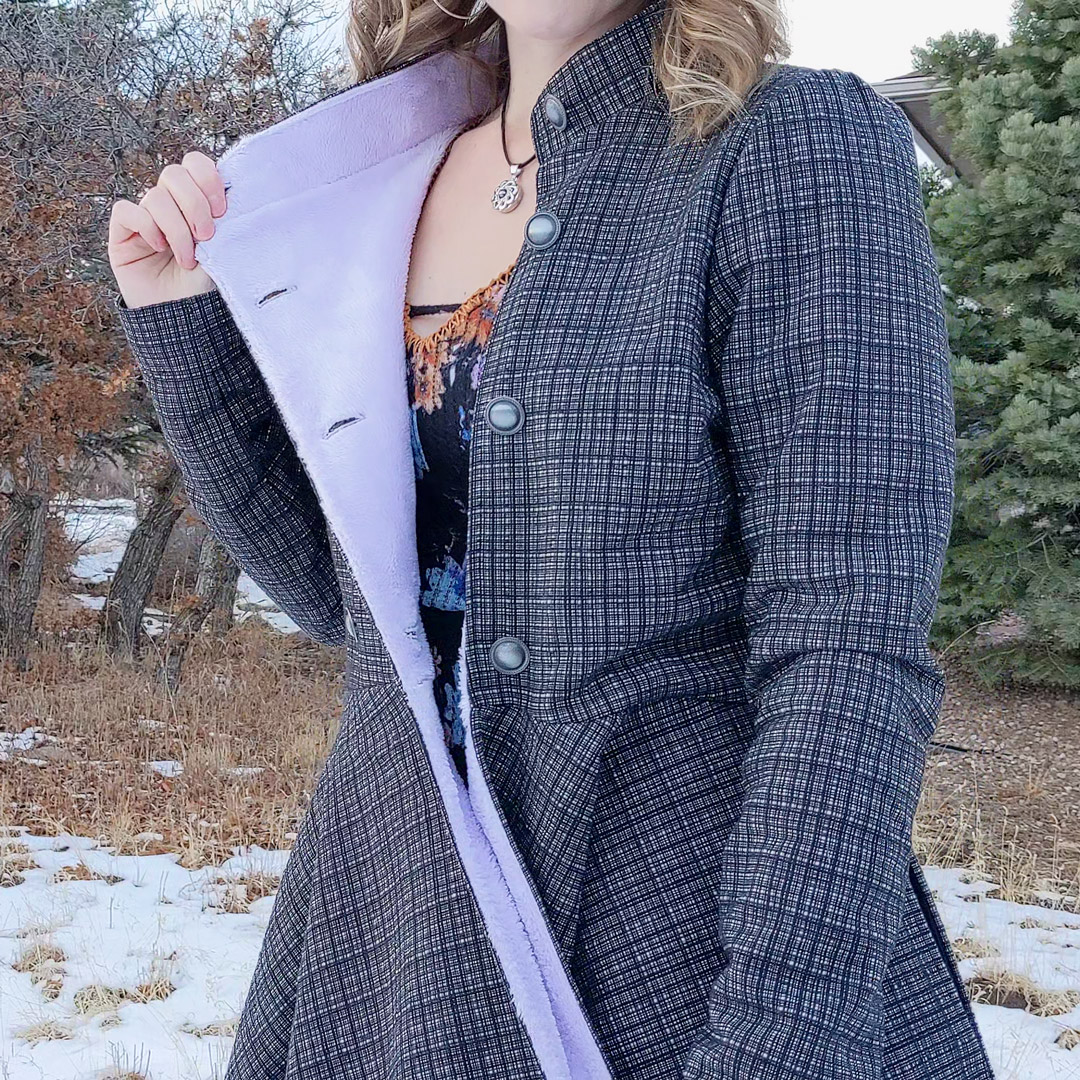
- It’s imperative to constantly pay attention to the orientation of the lining in relation to the shell. You can choose to overlap the front on either side, but once you commit to a side, you have to keep that in mind at all times. It was a little easier for me because my lining has no clear face/back. Once you sew the darts, though, you’re committed, so I can’t overstate: double-check and visualize how everything will line up before sewing it together.
- The shedding. Woven fabrics fray. And minky fleece, when cut, turns into an explosion of little hairy fibers from the edges. A lint roller helped mitigate the apocalyptic reign of mink, but still…you should have seen me exit my sewing room the past few nights. Mink in my eyelashes, my hair, and covering my black pants like a layer of fur.
- Serging minky fabric can be a little finicky. I had to be diligent to make sure each seam would start evenly. Lowering the pressure on my presser foot helped.
- Lots of switching between sewing machine and serger, depending on what I was doing.
- Maneuvering that amount of fabric around any sewing machine is kind of irritating. And pressing that amount of fabric…
- Two of my buttonholes spazzed out, meaning I had to unpick them. Unpicking a buttonhole might make you want to chair someone in the face to begin with, but unpicking it from minky fabric? You’ll want to chair someone in the face and follow up with a bazooka just because.
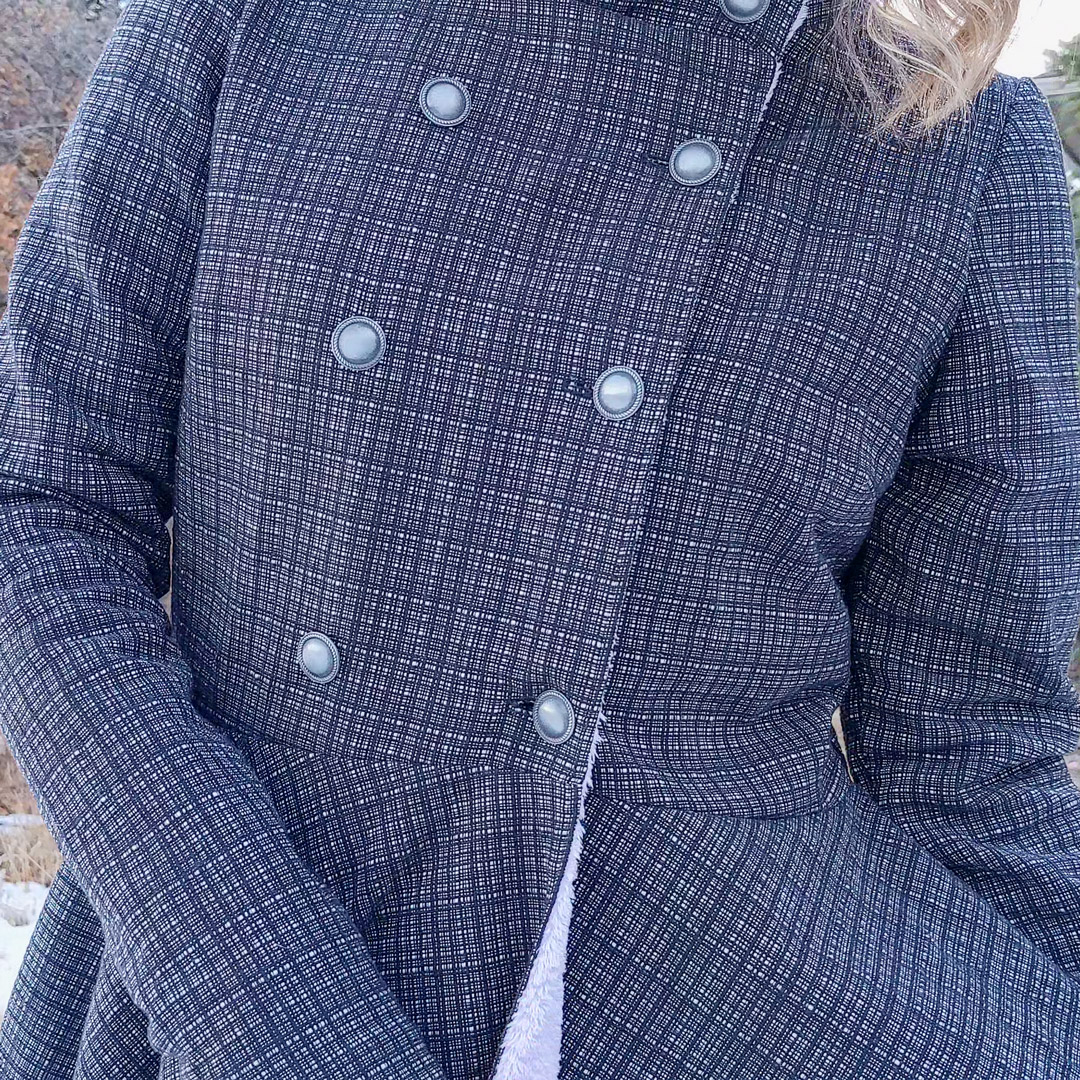
- The buttons I originally ordered from Mood just didn’t have the right vibe. So this morning, I went to Hobby Lobby and fell in love with some pewter shank buttons. But shank buttons must be hand-sewn. Right on, Deb. Make it even more involved.
- Lining up the buttons / buttonholes. Yes, they’re marked on the pattern, but by the time I reached the button point, all my chalk marks had rubbed off. I was also debating if I wanted a more snug fit or not. I erred on the side of caution and just followed the pattern markings for the first line of buttons. Then I stood in front of the mirror wearing the jacket, marked the center-point of my body, and measured the space between center and buttons in order to mark the 2nd row evenly. (The pattern instructions do give you a guide on where to place them, but I was more interested in visual balance on my particular body than sticking with an arbitrary measurement from the pattern.)
- It’s always a little more intense the first time you go through a pattern, and having only made the bodice for my toile, the rest of the pattern instructions were new to me (and a bit frustrating to follow at times. More on that below.)
About the Fabric
Shell: x4 yards Black & White Hatching. Basketweave Woven Fabric from Boho Fabrics
- Weight: 12.5 oz.
- Stretch: 0%
- Contents: Cotton/Poly Blend
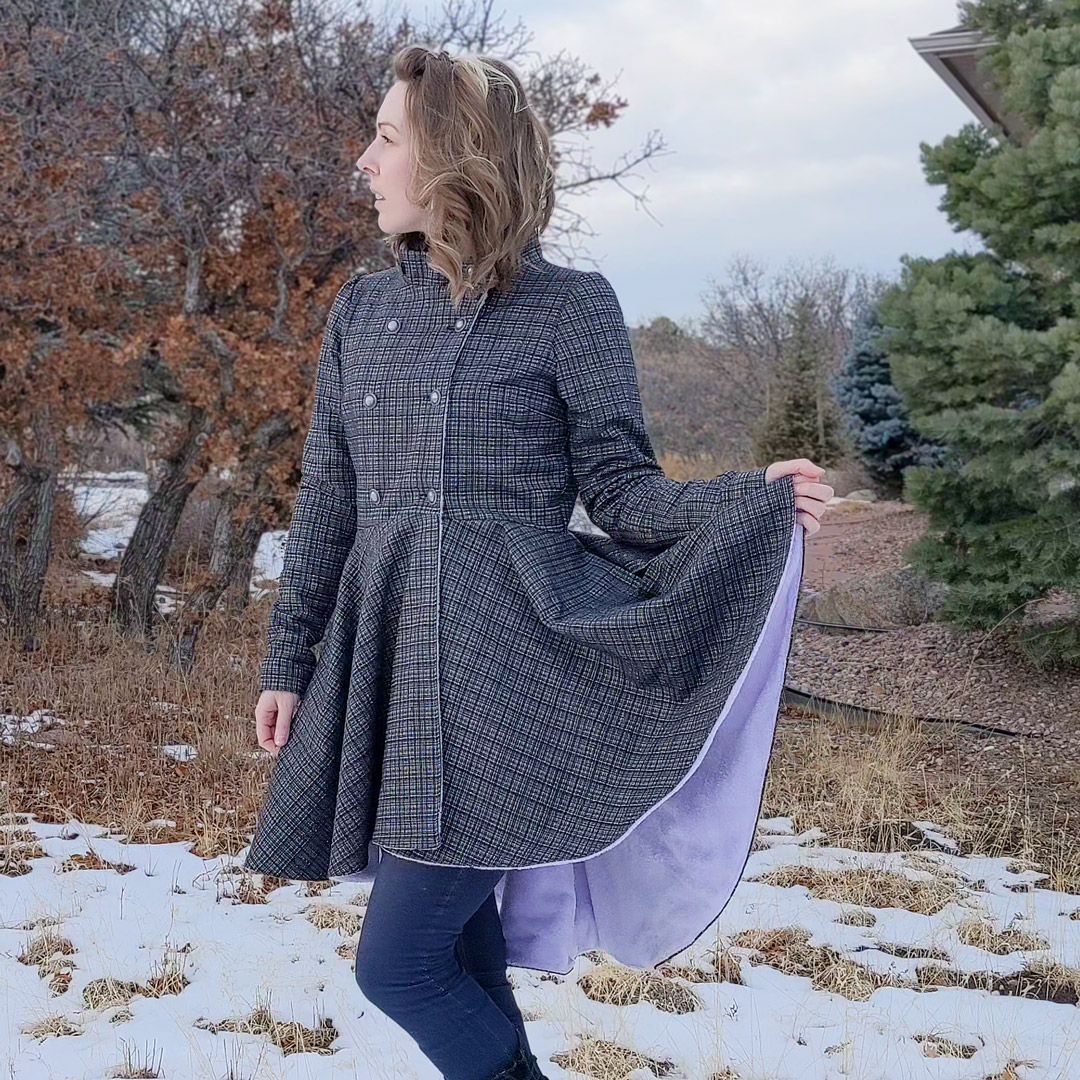
Lining: x3 yards Lavender Minky Solid from Cali Fabrics
- FABRIC CONTENT: Polyester
- WEIGHT: Midweight
- STRETCH: none
About the Pattern
As I said, the instructions were a little frustrating at times.
Pockets: The instructions tell you to line up the pockets using the “pattern pocket placement guide.” If that’s supposed to mean the “pocket placement guide located on the pattern,” I don’t know why it doesn’t just say that. Also, it’s less of a guide and more of a sentence on the back skirt piece saying “pocket placement 1/2″ down from top of skirt.” But then the instructions show a photo with the pockets placed 1″ down from the raw edge. Also, that pocket instruction is only on the back skirt piece. You need to mark both front skirt pieces, too. And only on the main/outer/shell fabric. That whole step for pocket placement is a mess.
Clarity—or lack thereof: Between pages 20 and 21, you suddenly go from working on the outer fabric to the lining with no mention of sewing the two skirt back pieces together for the lining. I’m assuming it was implied with the photo that shows the shell fabric—or one of the shell fabrics… The varying fabrics shown in the photos make it easy to get lost. I had to flip back and forth so many times to try to orient myself. And some of the photos are just not helpful at all, like the one that accompanies the “outer bodice/outer skirt” seam. I still don’t know what the heck is going on there.
Pattern markings and inconsistent terminology: “Self” is an industry-standard term for the main fabric used in a garment. Self = main = outer = shell. I’m not super nitpicky about which term a pattern designer uses, but it bothers me when they’re inconsistent. On this pattern, the designer mixes her terms, using both “inner” and “liner” to refer to the lining. Also, using “inner” to refer to both the fabric and one of the cut lines on the pattern… Unnecessary ambiguity.
All that said, I’ve seen way worse patterns. I’ve also seen way better. And you might take my critique with a grain of salt; I’m a stickler for clear, concise, and well-designed pattern instructions. Not everyone has a graphic designer brain giving them a wedgie every time they look at something.
What I Did Differently
- Putting aside the confusing instructions, I placed the pockets 1″ down from the top of the skirt.
- I didn’t stay-stitch anything, even in spite of the dire warnings about how important that step is and do not skip it! I skipped. And it’s a good thing I did, because I actually had to stretch the neckline a little bit to allow for the extra 1/4″ on each side of the collar.
- If stay-stitching the skirt waistline was the solution to avoiding that extra 1.5″ I had to cut off of both the shell and the lining, well, it came too late in the instructions to make a difference. If the culprit for that extra fabric was stretching, stay-stitching at the time it told me to stay-stitch wouldn’t have prevented it.
- I sewed at the regular 1/4″ seam allowance. The instructions advise a 3/8″ seam allowance if using a thicker fabric.
- The recommended 2″ to 4″ gap for turning right-side-out is a little skimpy. I went with 5″ and even that was tight.
- I left the gap for turning on the belt along one of the short ends, then pressed the raw edges inward and topstitched all around the belt.
- I did not use any interfacing on the belt. I felt like it would be too stiff.
- I used a keyhole buttonhole—suitable for medium to heavy fabrics and thicker buttons—and punched out the rounded end with my leather punch before slicing the buttonhole.
- Added belt loops.
Adding Belt Loops
I’m perplexed as to why there are no belt loops included on a jacket pattern that comes with a belt, as if I’m going to carry around a loose belt whenever I take off the jacket or whenever I need to unbutton it. That makes no sense.
Self-drafted belt loops for Duchess Jacket
So I drafted and attached my own. Here’s how:
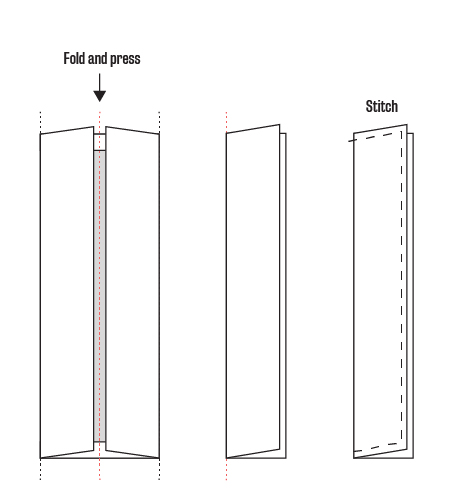
- Decide how wide you want your belt loop. I originally thought I’d like a thicker loop around 1″, but as I eyeballed it against the coat, I liked how 1/2″ looked better. So my belt loops are 1/2″ thick.
- My pattern piece was 2″ x 4.75″. That gave me a final belt loop 1/2″ wide with an overlap of 5/8″ on the top and bottom for anchoring to the jacket.
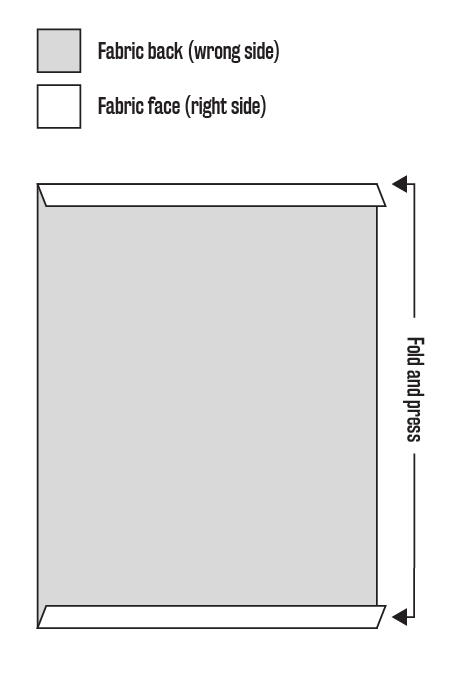
- I folded the belt loop wrong sides together 1/4″ at the top and 1/4″ at the bottom and pressed. That encases the top and bottom raw edge.
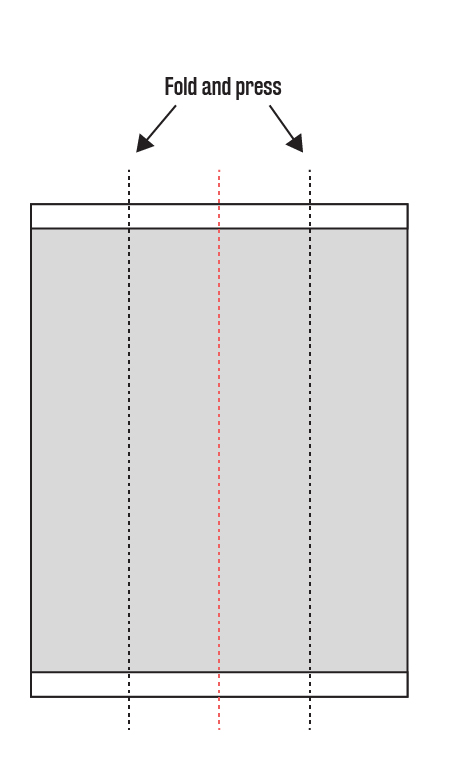
- I folded both side edges in 1/2″ and pressed. Then I folded in half one more time and pressed. All raw edges should be enclosed after doing this.
- I topstitched the folded edges.
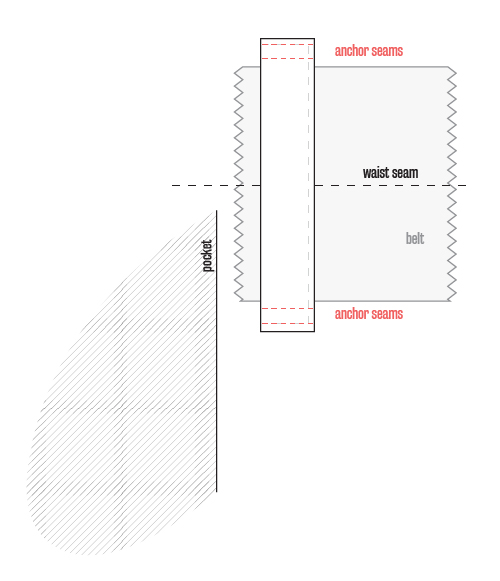
- I laid the belt loop over the belt and marked two horizontal lines on the loop where the belt edges were.
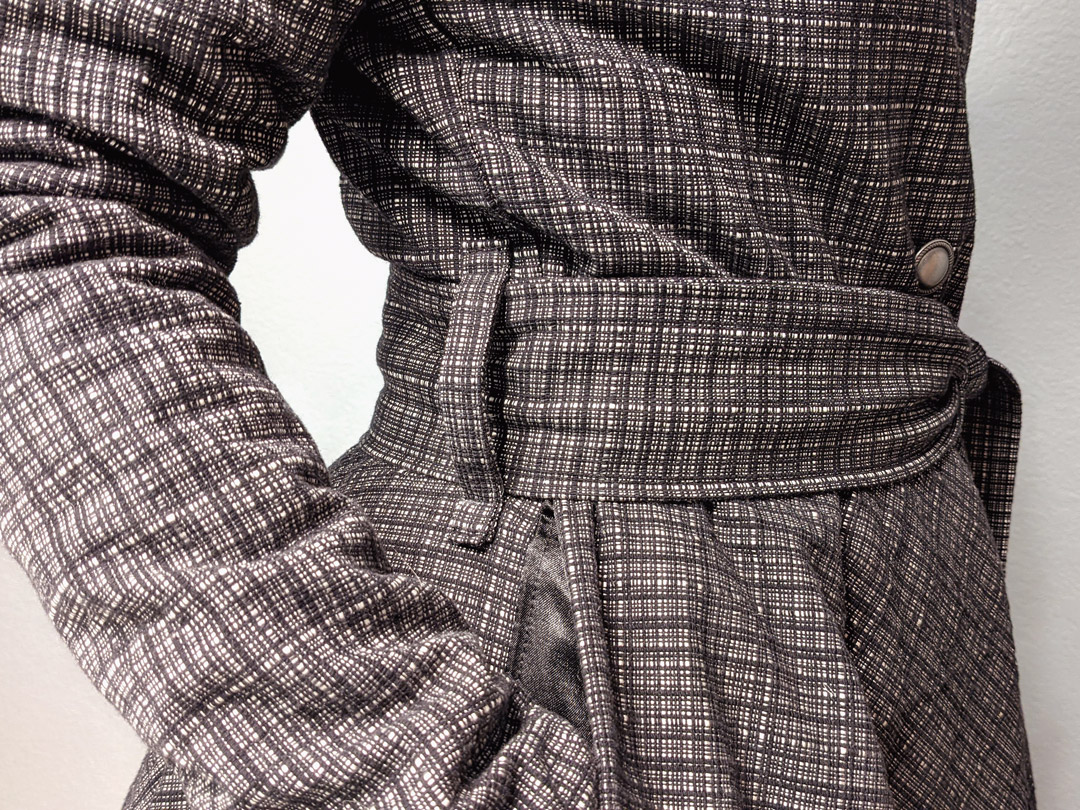
- I centered the belt loops over the waist seam of the jacket, about a half inch behind the side seams. I pinned the pockets forward to make sure they wouldn’t get shifted and caught in my belt loop seams.
- I used Wonder Tape to anchor the top and bottom 5/8″ where my anchor seams were going to be.
- I sewed (very carefully) 4 seams on each belt loop: 2 at the top and 2 at the bottom. It helped to not cut the threads after each seam. I just shifted the jacket around to the next seam and cut all the connecting threads after completely attaching the belt loop. Wrestling that much fabric in and out from under the presser foot is annoying and time-consuming, so this was a nice shortcut.
Ideally, you would add these to the shell before attaching the lining, but I didn’t even think of it until I was done, so my loops are sewn through all layers of my fabric. Using matching thread in my bobbin kept the visual impact on the lining to a minimum, though.
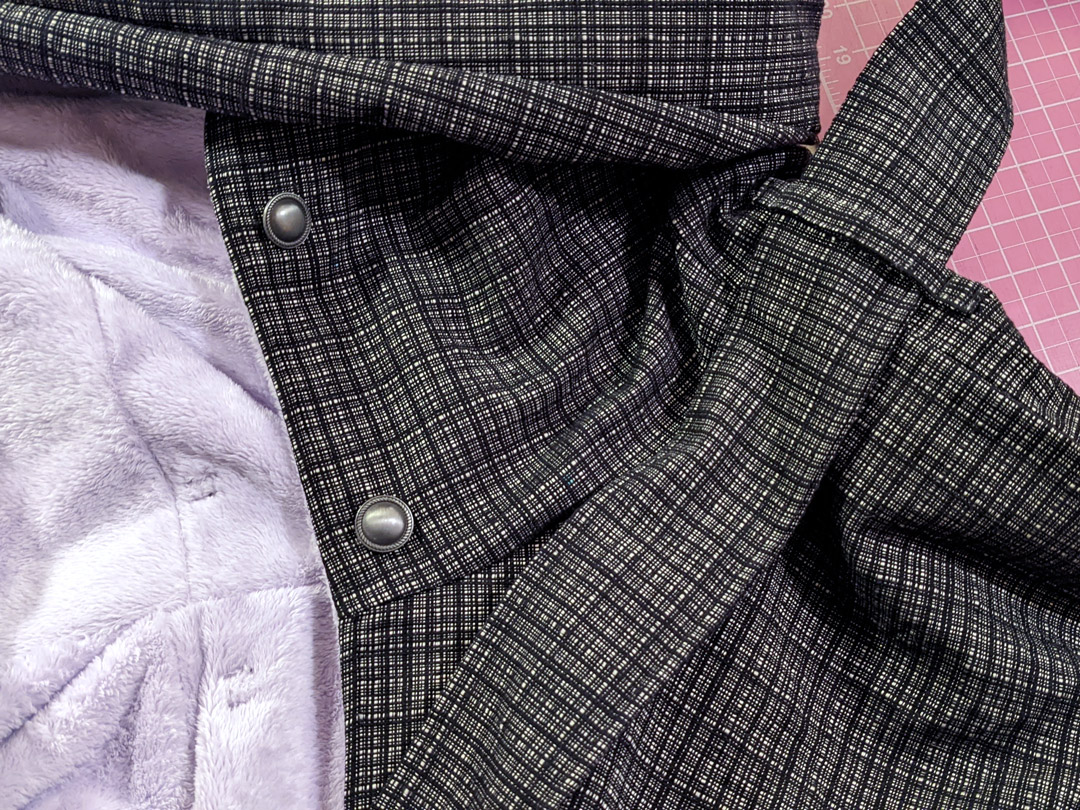
Lower left: coordinating bobbin thread with the lining helps blend the seams.
Serge vs. Machine
I used my serger and my sewing machine in equal measure during this project. Some steps would be a nightmare to serge, such as attaching the lining to the shell at the sleeves. I have to say, though, that serging woven fabric is so satisfying. Trimming those frayed edges and enclosing them in thread in one fell swoop for a super tidy and sturdy finish…yes, please!
Serger |
Sewing Machine |
|---|---|
|
|
Notes for Next Time
I really don’t know that there will be a next time, even though I’d love a lighter version of this jacket. And maybe the second time around will be easier. I don’t know, but in case I do subject myself to this again:
- Make and attach belt loops to the shell before attaching the lining.
- Basting the collar in place is really helpful. Highly recommend that.
- I folded over and pinned the corners of the collar out of the way when attaching the lining and shell. Highly recommend that, too, so the collar doesn’t get caught in that seam.

Project Settings
Sewing Machine
Needle |
Foot |
Top Thread Tension |
Stitch # |
Width |
Length |
Application |
|---|---|---|---|---|---|---|
90/14 |
applique (F) |
4 |
1 |
3.5 |
3.5 |
darts |
90/14 |
standard zig-zag (A) |
4 |
0 |
3.5 |
5 |
baste |
90/14 |
standard zig-zag (A) |
4 |
1 |
3.5 |
3.5 |
seams |
90/14 |
standard zig-zag (A) |
4 |
2 |
3.5 |
3.5 |
pocket understitch |
90/14 |
overedge (C) |
4 |
6 |
5 |
3 |
edge finish |
90/14 |
1/4″ |
4 |
1 |
3.5 |
3.5 |
collar topstitch |
90/14 |
adjustable edge (SE) #8 |
4 |
1 |
3.5 |
3.5 |
bodice/skirt topstitch |
110/18 |
button foot (R) |
4 |
21 |
7 |
4 |
button holes |
110/18 |
overedge (C) |
4 |
2 |
3.5 |
3.5 |
belt loops |
110/18 |
applique (F) |
4 |
2 |
3.5 |
3.5 |
belt loop attach |
Serger
*Lower presser foot pressure to 1 for minky fabric.
Stitch |
Needles |
Finger |
Threads |
Tension LN |
Tension RN |
Tension UL |
Tension LL |
Cut Width |
Stitch Width |
Differential |
|---|---|---|---|---|---|---|---|---|---|---|
overlock |
R, L |
A |
4 |
4 |
4 |
4 |
4 |
6 |
2.5 |
1 |
Leave a Reply