My Sewing Kit
Machine, thread, scissors, ruler, what else, where to go, do I really need so much stuff?!
The first week I started sewing, I was practically living at the fabric store. I would tote some supplies home and start working through some project in a book only to find out I need something else. That would often involve learning what exactly the thing I was missing is and what it did and what brand worked well and so on.
Consider this my attempt to help you walk into the store once and know exactly what you’re looking for and if you really need it. (BTW, I’m assuming you have a sewing machine already. If not, here’s a little help in picking one out.)
The Definitely-Get-Its
- Thread. What brand is good? you ask. I asked that same question and actually had to dig around a lot for some reason. So here I am giving you the quick answer: Gutermann, and Coats and Clark. Here’s what I bought to get me started: Gutermann 26 Spool Thread Box. Nice variety there, nice all-purpose thread, plenty on each spool to get you started, and doesn’t cost an arm and leg. I haven’t had any problems with it, and I saw this set stocked at Joann’s, too. Does it really matter what thread I use? I have a whole pile that’s been sitting around for decades. Yes, it matters. Would you go zip-lining using ropes that have been sitting around for decades? Stuff ages, so set yourself up to win and get some new thread.
- Bobbins. You’ll be winding lots of those with each different color thread you use. Make sure they’re compatible with your particular sewing machine. Sometimes they come in a storage case. I’d say go for it; then you have a place to keep all those wound-up bobbins.
- Fabric. The remnant bin is your friend when you start. A good 50% discount on stuff we’re likely to screw up anyway is a pretty nice deal. If you’re not sure what kinds of things you want to sew, woven cotton is a good option to start with; it’s easier to learn the basics with that. Stretchy fabric (knits) are more difficult to control and require some additional tools to make the whole experience easier. Knits are commonly used for clothing and are generally more comfortable and forgiving when it comes to fit. However, wovens are also used in clothing. It basically boils down to the question: how brave do you feel? I do think you’ll be less frustrated starting with wovens, though.
- Iron. Uhg, I have to iron? Yep. (Be warned: sewing involves a LOT of stuff that isn’t actual sewing.) Get one that makes steam and has the ability to make NO steam. I got this: Chi Steam Iron (Got a Target nearby? They might have it for the same price. That’s where I got mine so I didn’t have to wait for it to ship.) You may hear namedrops like Rowenta from people who sew way more and way better than I do, but comparatively they didn’t get better reviews so I skipped the pricetag. And I like the Chi.
- Ironing board if you don’t have one. They also make wool pressing mats if you need a space-saving option.
- Straight pins. Definitely get pins. Maybe get some that are all metal or have glass heads and no plastic; they won’t melt if they meet your iron.
- Seam ripper. There’s a good chance one of these was included with your sewing machine. If not, they’re inexpensive and a definite must-have for ripping out seams, and also really handy for slicing buttonholes.
- Dritz Disappearing Ink Marking Pen, Purple (I found a fine-point version of this at Wal-Mart, which is great for precision, but the one I linked is less pen-y and more marker-y and I found it glides over fabric a lot better.) Does the ink *really* disappear? you ask. It really does. Sometimes a little too quickly before I can finish cutting. Also worth noting, if you iron AFTER marking, the ink will show back up. They say the heat will permanently set it but that hasn’t been my experience. A wet cloth may rub it right off again; if that doesn’t work, wait a little while and it will disappear again. Test it on your fabric before marking away though. Better safe than full of random purple lines. I also have a double-tipped version that has disappearing ink on one end, and water soluble ink on the other. I use the water-soluble most often. The marks stay until you rub them off with a wet cloth. What about chalk? you ask. I’m not a huge fan of tailor’s chalk since I find the triangle kind to be imprecise and difficult to make accurate marks with. I do really love my chalk cartridge pencil though. I use it when I need my marks to last longer. There are also Chaco chalk liner pens, which (for me) are hit and miss. They don’t work great on stretchy fabric because they like to pull on it. Also, the chalk powder doesn’t feed very well. I constantly have to tap it to get it to produce a nice line.
- People say buy a whole bunch of different rulers. If I were you, I’d just start with a decent square, something like this. I have this set, and I love them. I did a lot of my first projects without a square. I’m not a quilter; I actually have ZERO interest in quilting, and even though these are called “quilter’s rulers”, they have become invaluable to me for quickly and accurately cutting out pieces for any kind of project. They have a little height to them so you can butt your rotary cutter against them (versus having to mark a line, and then switch to a thicker ruler to make the cut.) They save me so much time!
- Scissors. Chances are you have some of these laying around and they’ve cut all sorts of things under the sun, which have likely made them more dull than you think. You can get a dedicated pair of scissors for fabric only, but I wouldn’t drop a lot of money on them to start. If you’re looking for the name to get, I think it’s Gingher, but they come with a price tag. I have a pair of Fiskars that work just fine for me. I also do most of my cutting with a rotary cutter + pattern weights + cutting mat (explained in the Nice-to-Haves below). Note: bent scissors might be the better bet here (where the blade is parallel to your cutting surface. There is a whole world of scissors you could get lost in, so don’t spend a ton of money up front before you know what features you really crave.)
- Hand-sewing needles. Get a variety pack. They’re not expensive.
- A wooden dowel. These aren’t even a dollar. Most craft stores have them. Mine is 0.25″ diameter and I use it for helping turn things inside out, poking corners to make them nice and defined, rolling the elastic when I make pencil cases, helps me grab the loop of thread behind the needle when I’m threading my machine, neatly punches through stickers on the ends of spools of thread, and who knows what else.
- That Purple Sewing Thang. I began with a tiny version of this plastic do-dad that came with my sewing machine. It had a tapered point on one end and a bristled brush on the other for cleaning. And I used the living daylights out of it to the point it got all chewed up by the presser foot and the white plastic was lookin’ a little dingy from slowly accumulating fabric dye. Why do I put this in the Definitely-Get-Its? Because it’s cheap and it’s invaluable for feeding fabric evenly, for manipulating fabric in the tight spaces around your presser foot, for quickly picking threads out of the way, for sewing over bulky seams, and much more. I keep mine tucked into my wrist pin cushion since I am always reaching for it.
The Nice-to-Haves and Time-Savers
- Rotary cutter. I do 95% of my cutting with a rotary cutter. It’s so much faster than using scissors. No, it’s not ideal for tight corners, but you can do the longer bits with the rotary cutter and snip the tight spots with scissors. Rotary cutters come in different sizes. 45mm is probably the most common, but I almost always use my 28mm cutter for maneuverability around curvy patterns.
- Self-healing cutting mat. You can pass with an 18×24 mat if you don’t have the space or budget for a larger one. That’s the size I made do with in the beginning, but my husband did get me a huge one (36×48) for Christmas, and I LOVE it.
- Tube Turner Set. If you’re looking to upgrade your cheap dowel and drastically save time turning tubes right side out, get this. I’m tempted to put this in the definitely get section because it is THAT impressive. You’ll know it the first time you spend less than a minute turning a tiny tube right side out when it used to take you 30 minutes.
- As an alternative to pins, there are clips. Some people rave about them and they’re nice in certain situations (slippery fabrics, bulky fabrics, gauging fit without stabbing yourself with pins, etc.), but I find pins to be way more useful.
- Stabilizer. This is one of those things to have in your arsenal to try when things just aren’t behaving. Fabric tunneling when you’re trying to do applique? Fabric edges getting pushed into the throat plate by the needle? Knit edges getting all stretched out no matter what you do? Enter stabilizer. There are wash-away varieties and tear-away varieties. You can also use tissue paper in a pinch.
- Weights. I’ve come to prefer using weights to hold down patterns and fabric for cutting rather than pins. You can get made-specifically-for-sewing pattern weights, or you can use found objects around your home (dishes, rocks, paper weights, glass tea light holders, pretty much anything really.)
-
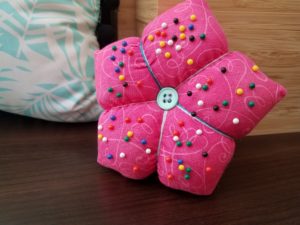
Behold: Pin cushion. Fun to make.
I’d say get a pin cushion, but those are pretty fun to make (photo included to entice you.) So get batting (stuffing, no need for anything fancy) instead and find a tutorial to make a pin cushion. (The one in the book I’m working through uses embroidery floss and a button to dress it up. You can get a bag of random buttons for 99 cents at Joann’s.)
- Pressing cloth. A yard or two of unbleached muslin is handy for layering over/under fabric to protect your iron and ironing board.
- Pinking Shears. These are basically zig-zag or scalloped scissors used as a quick way to finish woven seams to keep them from unraveling. There are also pinking rotary blades which work a lot better than you’d expect and are so much faster than shears.
The Going-All-Ins
- Wonder Tape. A nice little tool to have in your kit to hold things in place when pins just won’t do. I like to use it on velcro, finicky hems, tiny details, narrow straps, and more. It’s pretty awesome.
- Needle varieties. That needle that came in your machine isn’t made for every situation. There are needles especially made for knit/stretch fabric (sometimes called ballpoint as they’re designed to slide between the fibers of knit fabric rather than pierce them.) There are also twin needles, which come in a universal variety and a knit/stretch variety. Twin needles are interesting because they convert your basic straight stitch (normally not stretchy) into a stretchy stitch. Needles also come in different sizes, each size tailored to handle different materials ranging from lightweight to medium to heavy.
- Interfacing. If you’re at all serious about making things that look finished, you’ll need to learn about and buy interfacing. It’s everywhere. It’s used on bags, clothing, pretty much anything that needs reinforcing or some weight added to it. It comes in all sorts of varieties: fusible, sew-in, knit, nonwoven, sheer, lightweight, midweight, heavyweight, kinds I’m not even aware of yet. I give a little run-down on the basics of using interfacing here.
- Presser foot set. Sewing machines typically come with a few presser feet to get you going, but you’ll be amazed by the world of presser feet out there. Overcast/overedge, applique, open toe, bias binding, rolled hem, flat fell seam, invisible zipper, cording, rolling, blind stitch, braiding, beading, non-stick, darning…the list goes on. Do you need all those feet to do all those different things? Probably not, but when you use a foot designed to do a specific thing, it definitely makes it easier. So far, the ones I use most are the edge joining (stitch in the ditch) foot, applique foot, overcast/overedge foot, adjustable bias binding foot, button foot, zipper foot, and of course a standard or zig-zag foot. A lot of people swear by a walking foot when working with knits. I personally found it created more problems than it solved so I never use a walking foot, and 95% of the stuff I sew is made out of knits.
- Bias Tape / Bias Tape Makers. Comes in single-fold and double-fold varieties at all kinds of different widths. Double-fold is the most useful. You can make your own out of any fabric or purchase some at a fabric store. Gives a really nice finished edge to all sorts of things (bags, clothes, boxes, glasses case, etc.)
- Steam a Seam. A permanent, fusible version of Wonder Tape. I use it to attach bias tape around the tops of my mini fabric boxes since sewing the tape on isn’t feasible.
- Fusible Web. A must-have if you’re getting into applique. It’s basically adhesive that you apply to fabric, let it cool, cut out the shapes you want, and then iron the shapes onto other fabric to hold them in place for sewing. It comes with and without paper backing (some paper-backed varieties can be run through an ink-jet printer.)
- Buttons / Zippers / Grommets / Eyelets / Snaps. Buttons come in an endless array of shapes and sizes. Zippers also come in a wide array of styles and materials and lengths: plastic, metal, invisible, heavy duty…the list goes on. Better to err on the longer side; you can always make a too-long zipper shorter. Grommets and eyelets are similar to each other; a grommet is typically a larger variety whereas eyelets are smaller. Snaps also vary widely, as do the methods of applying them. There are metal and plastic snaps, snaps that are sewn-on, snaps that are hammered on using a tiny anvil, there are press tools to fasten them, and so forth. This is another world you can easily become lost in.
- Tailor’s ham and sausage (seam roll). Comes in handy if you need to iron curved seams. You could also make your own.