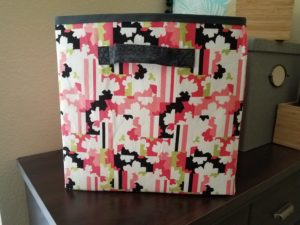
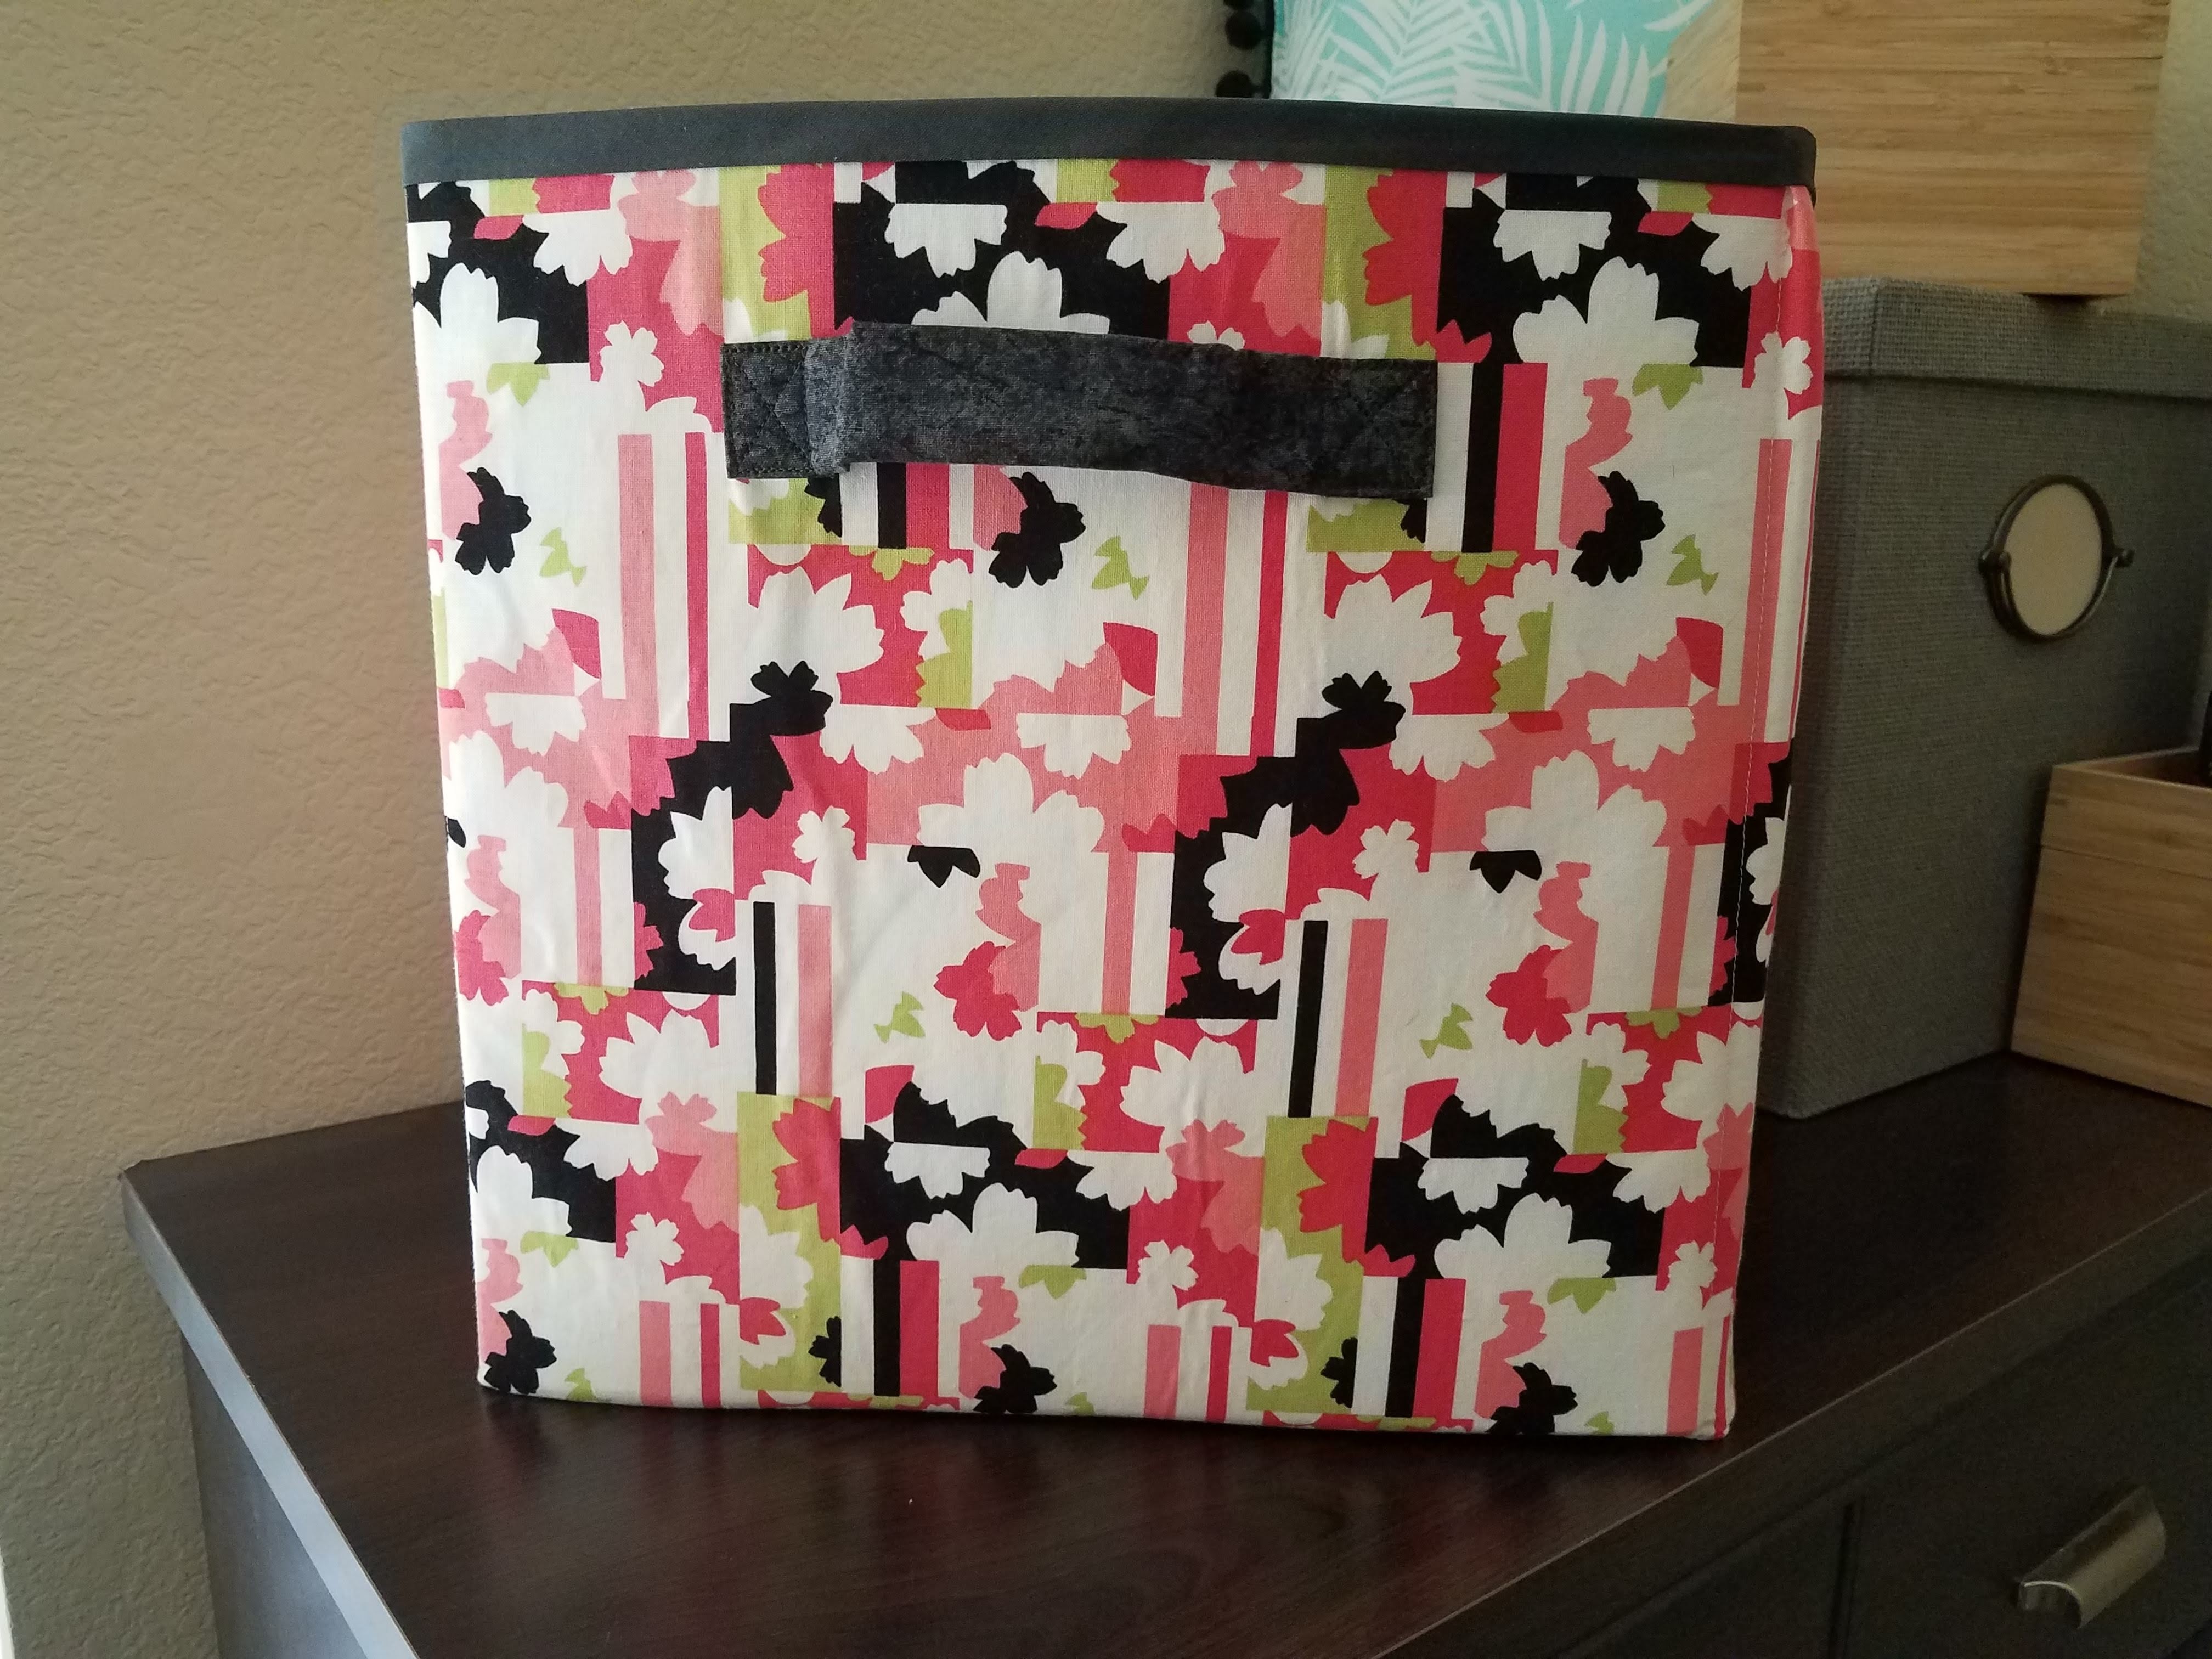
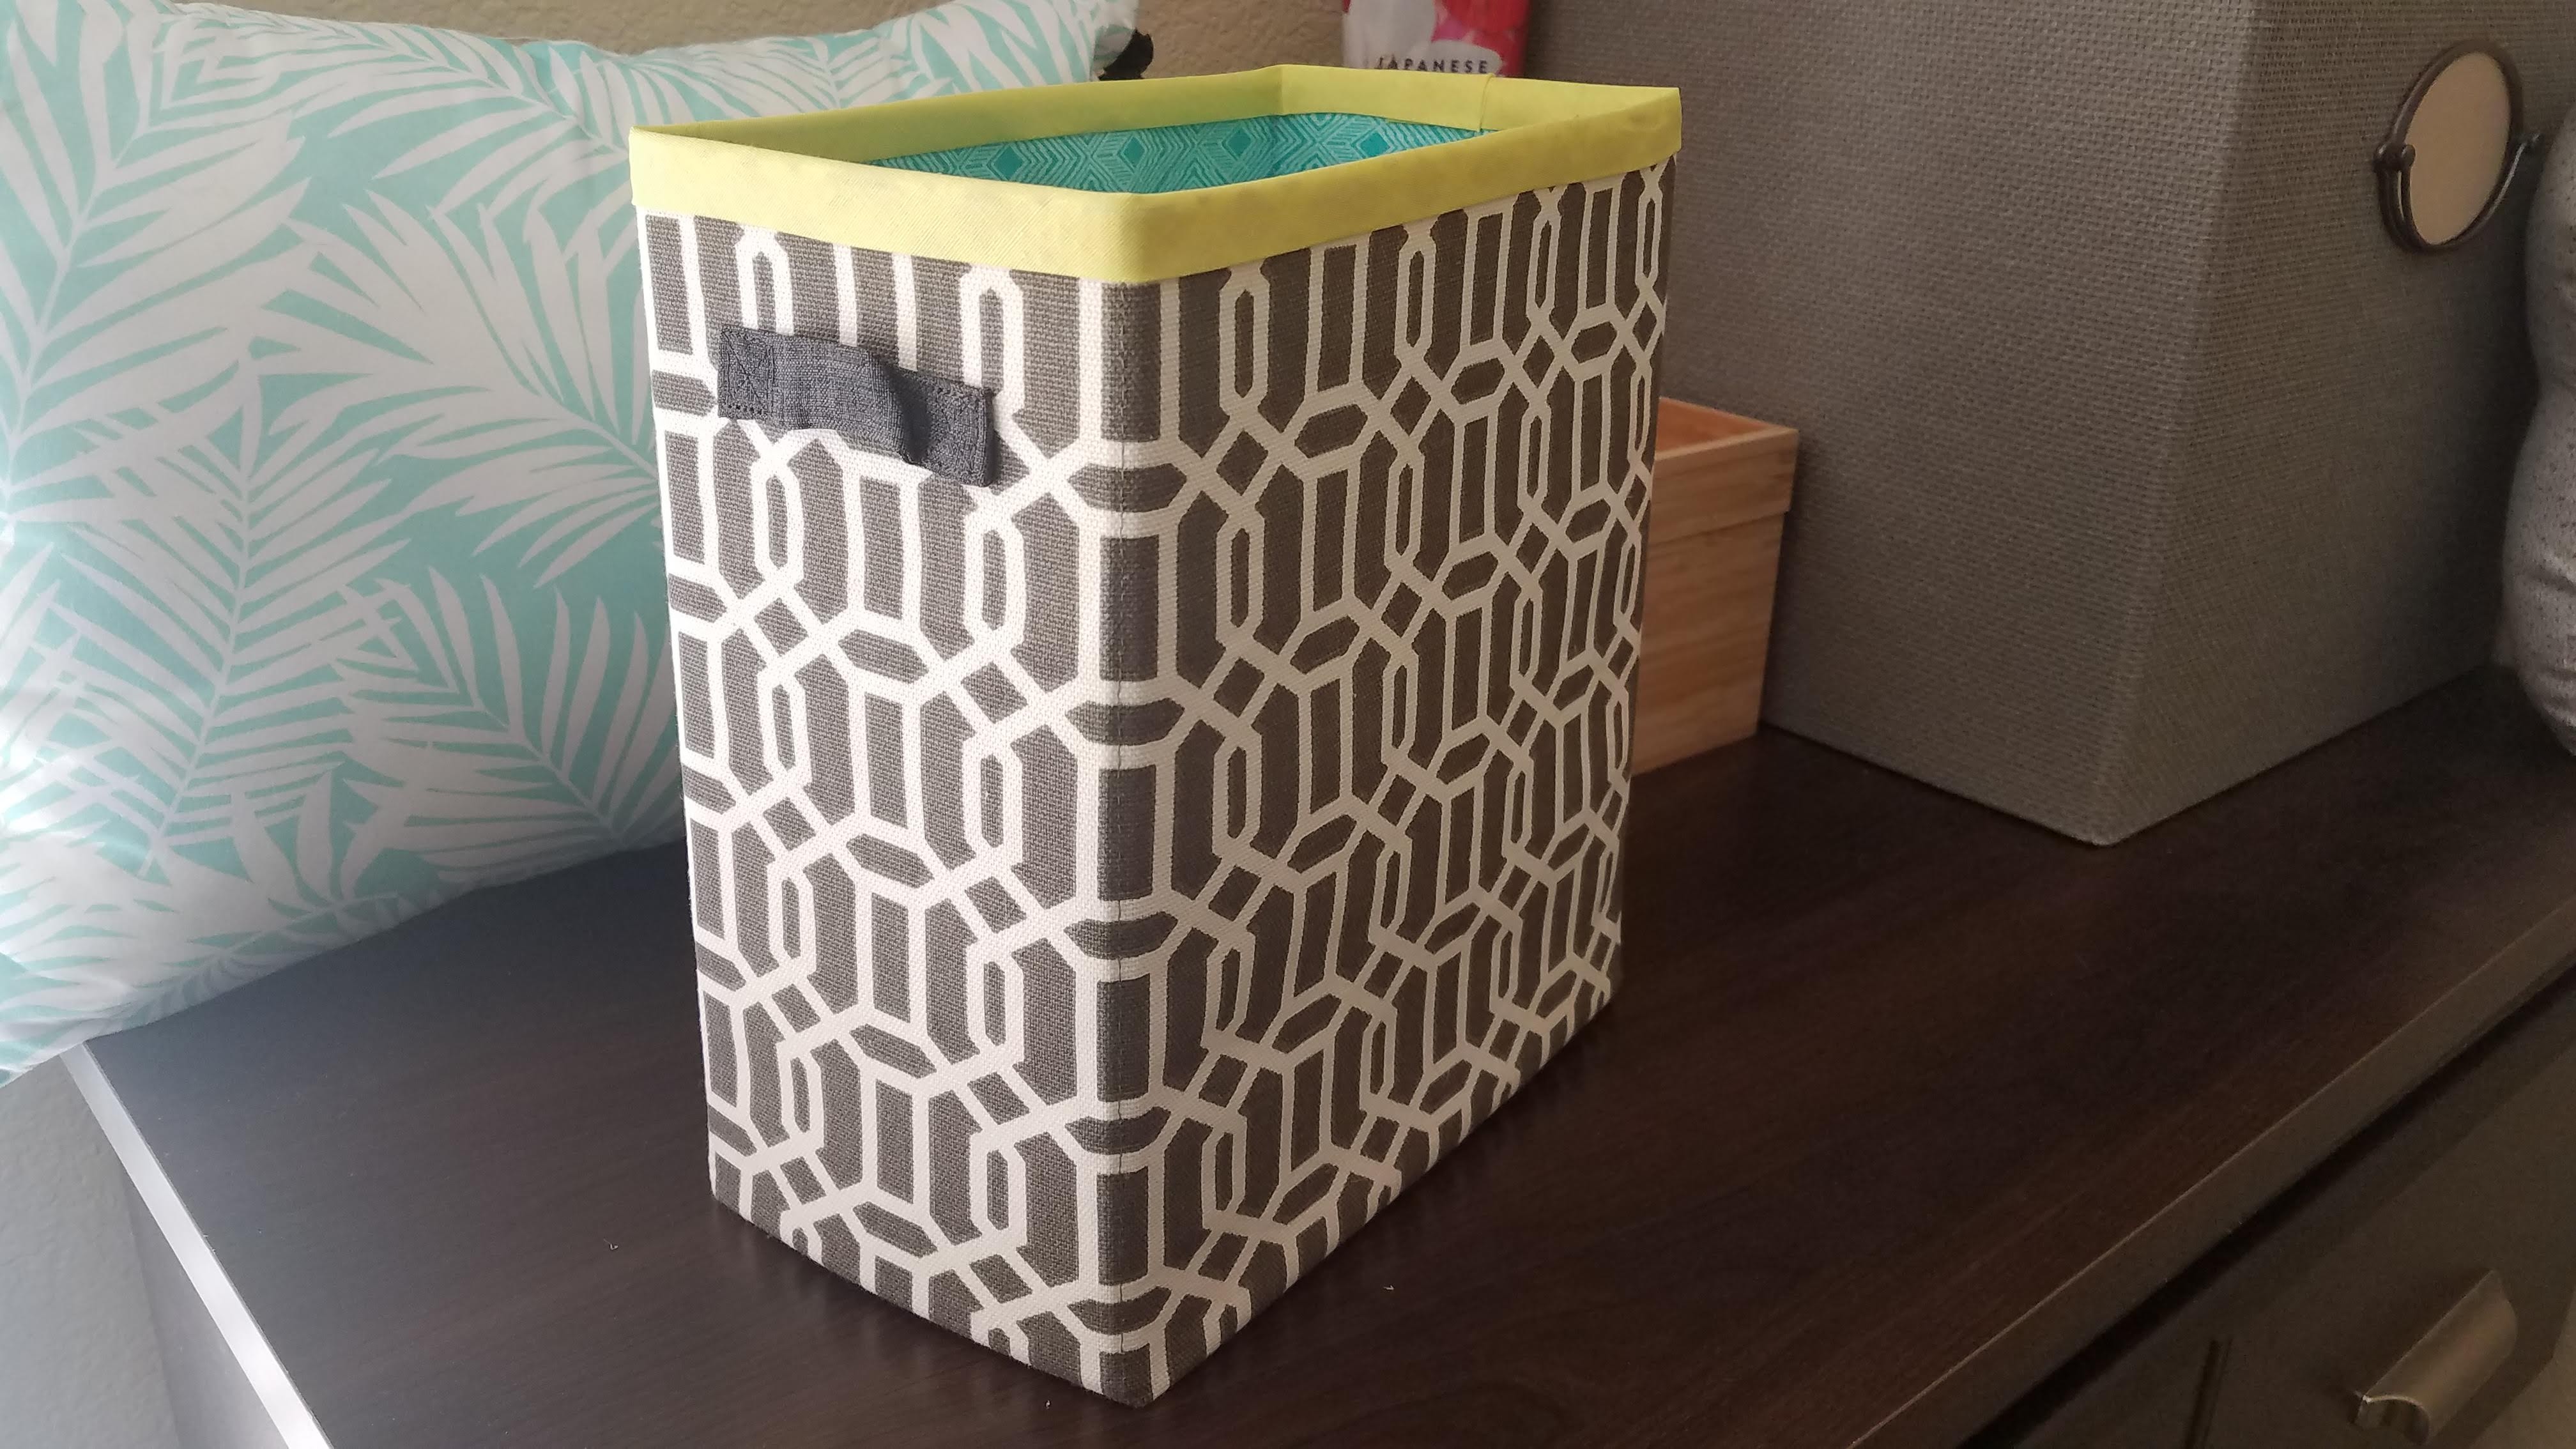
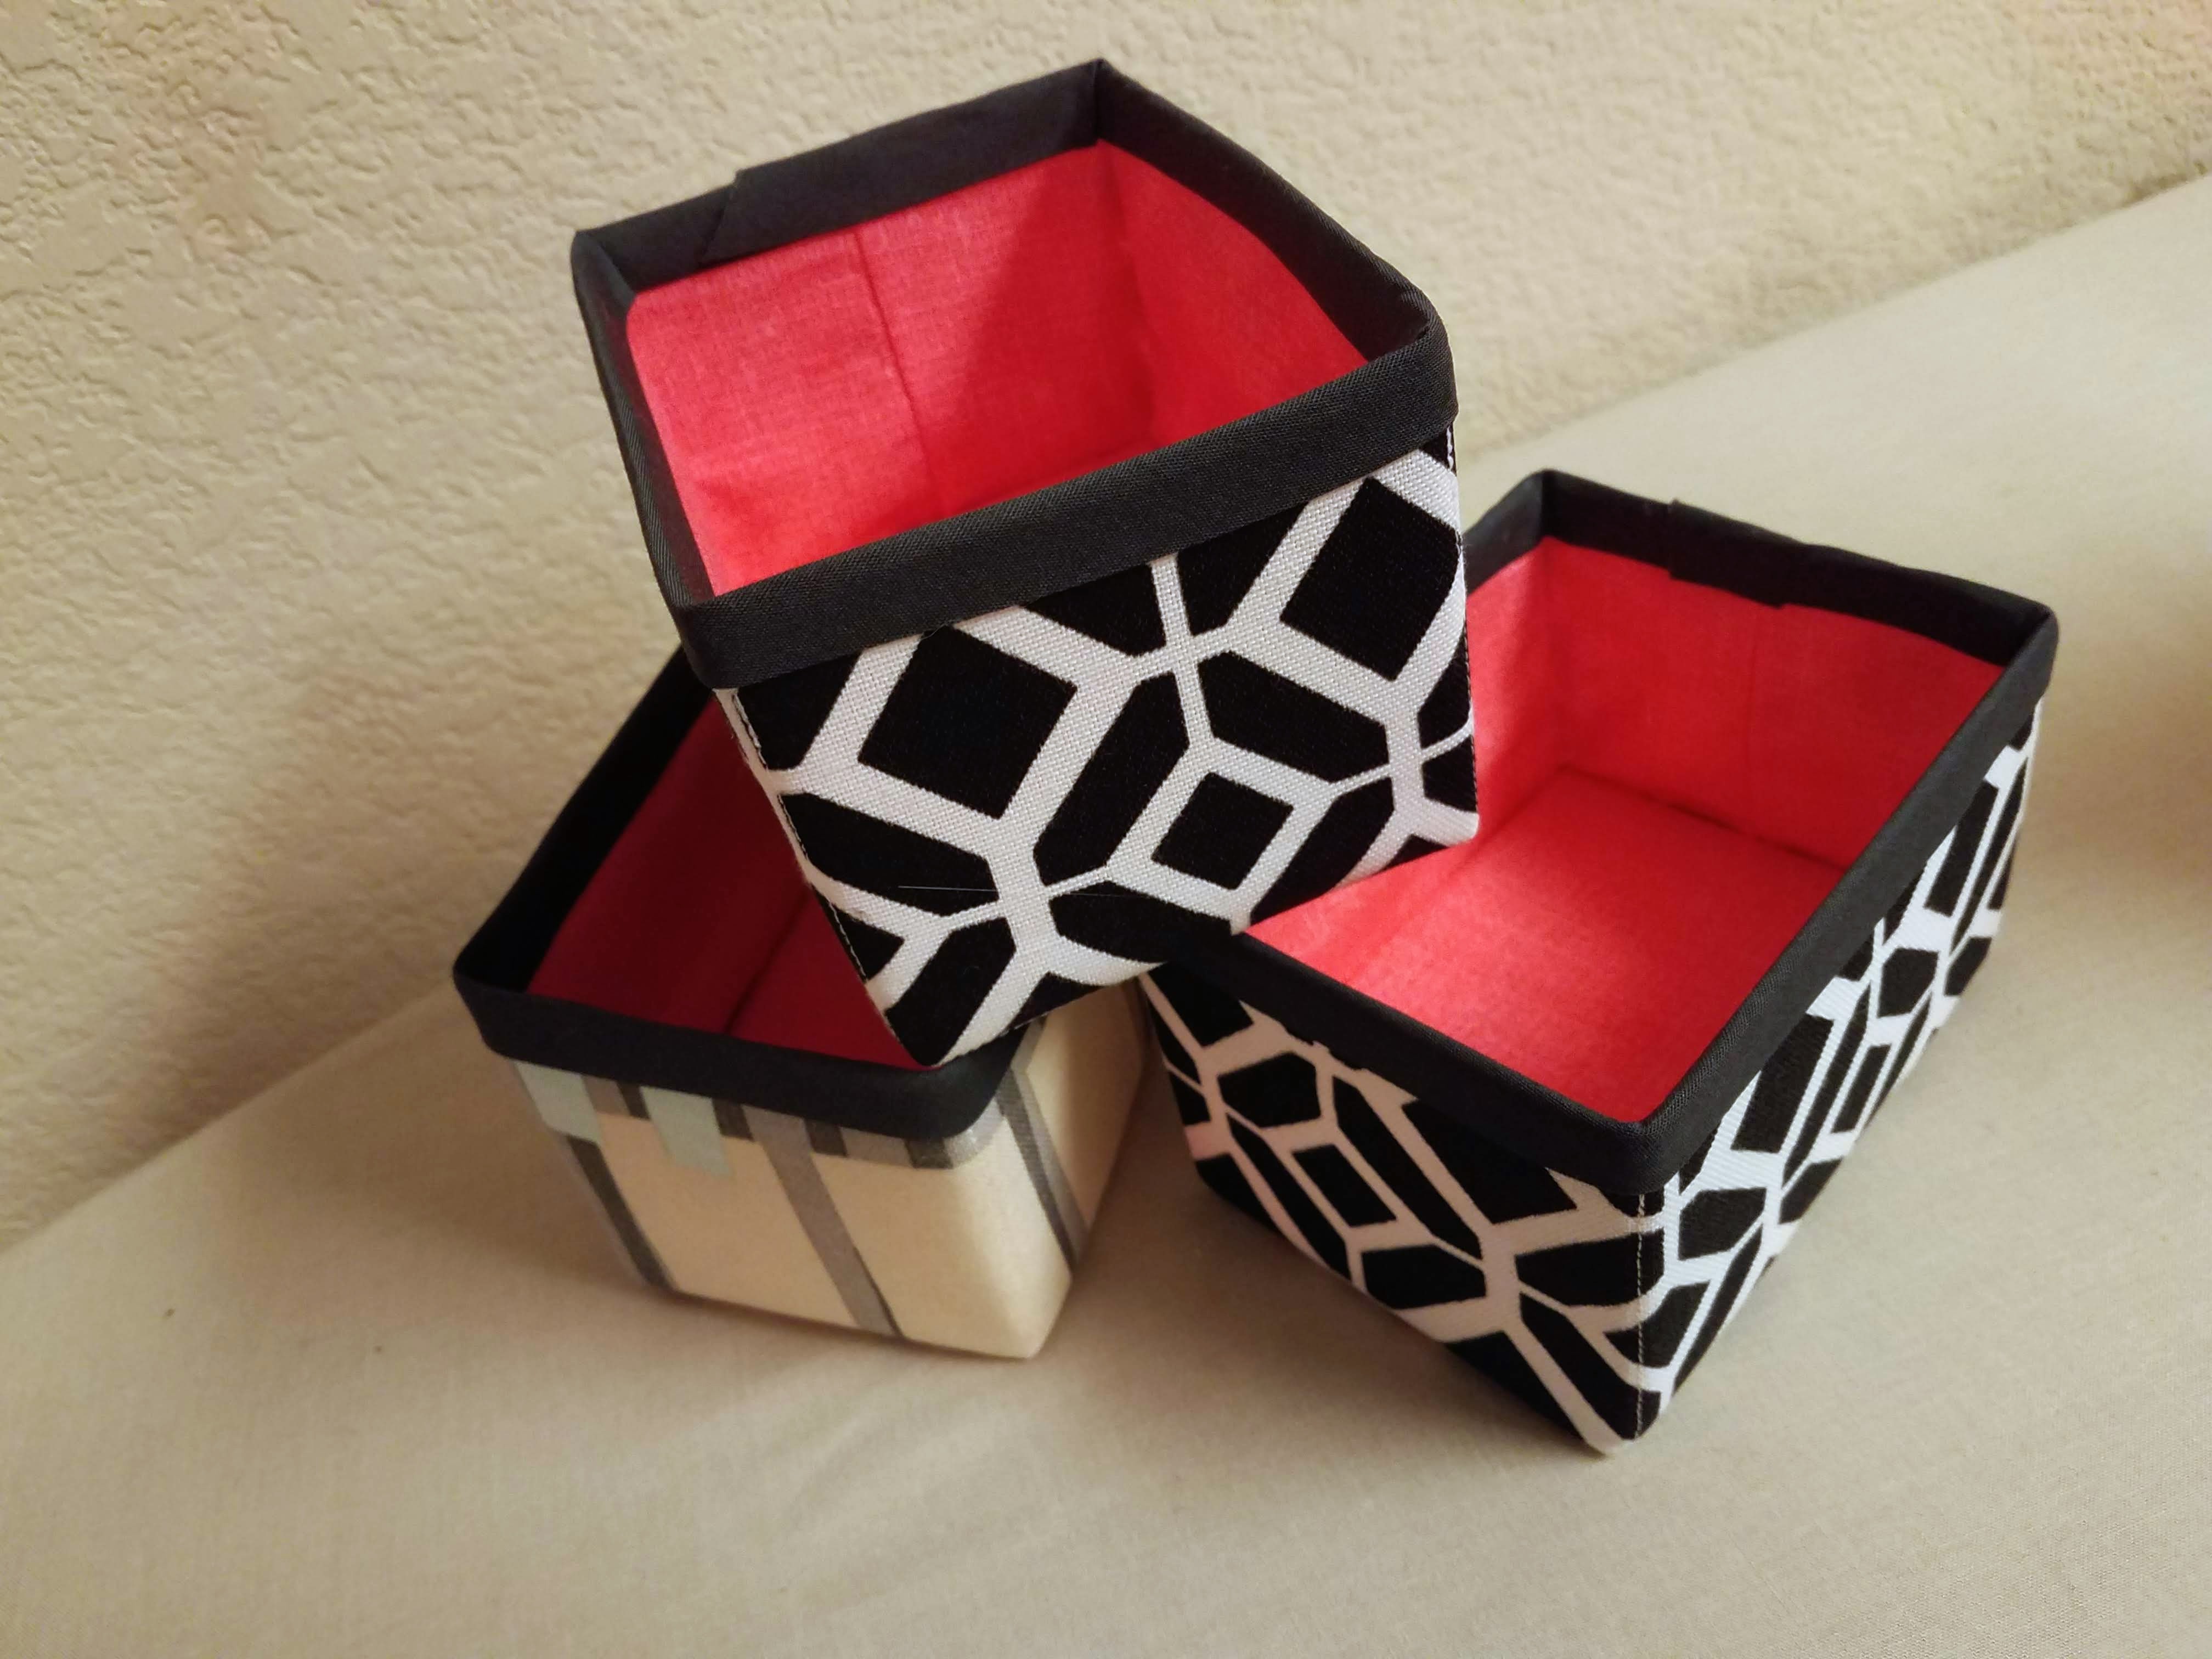
If you’re anything like me after being bitten by the sewing bug, you want to dive right into making useful things. And who doesn’t love a storage box?
Of course, you can hit up your nearest Ikea or Target or Walmart or craft store for all kinds of storage boxes you don’t have to make, but what happens when you need a very specific size and you just can’t find it? That’s what happened to me.
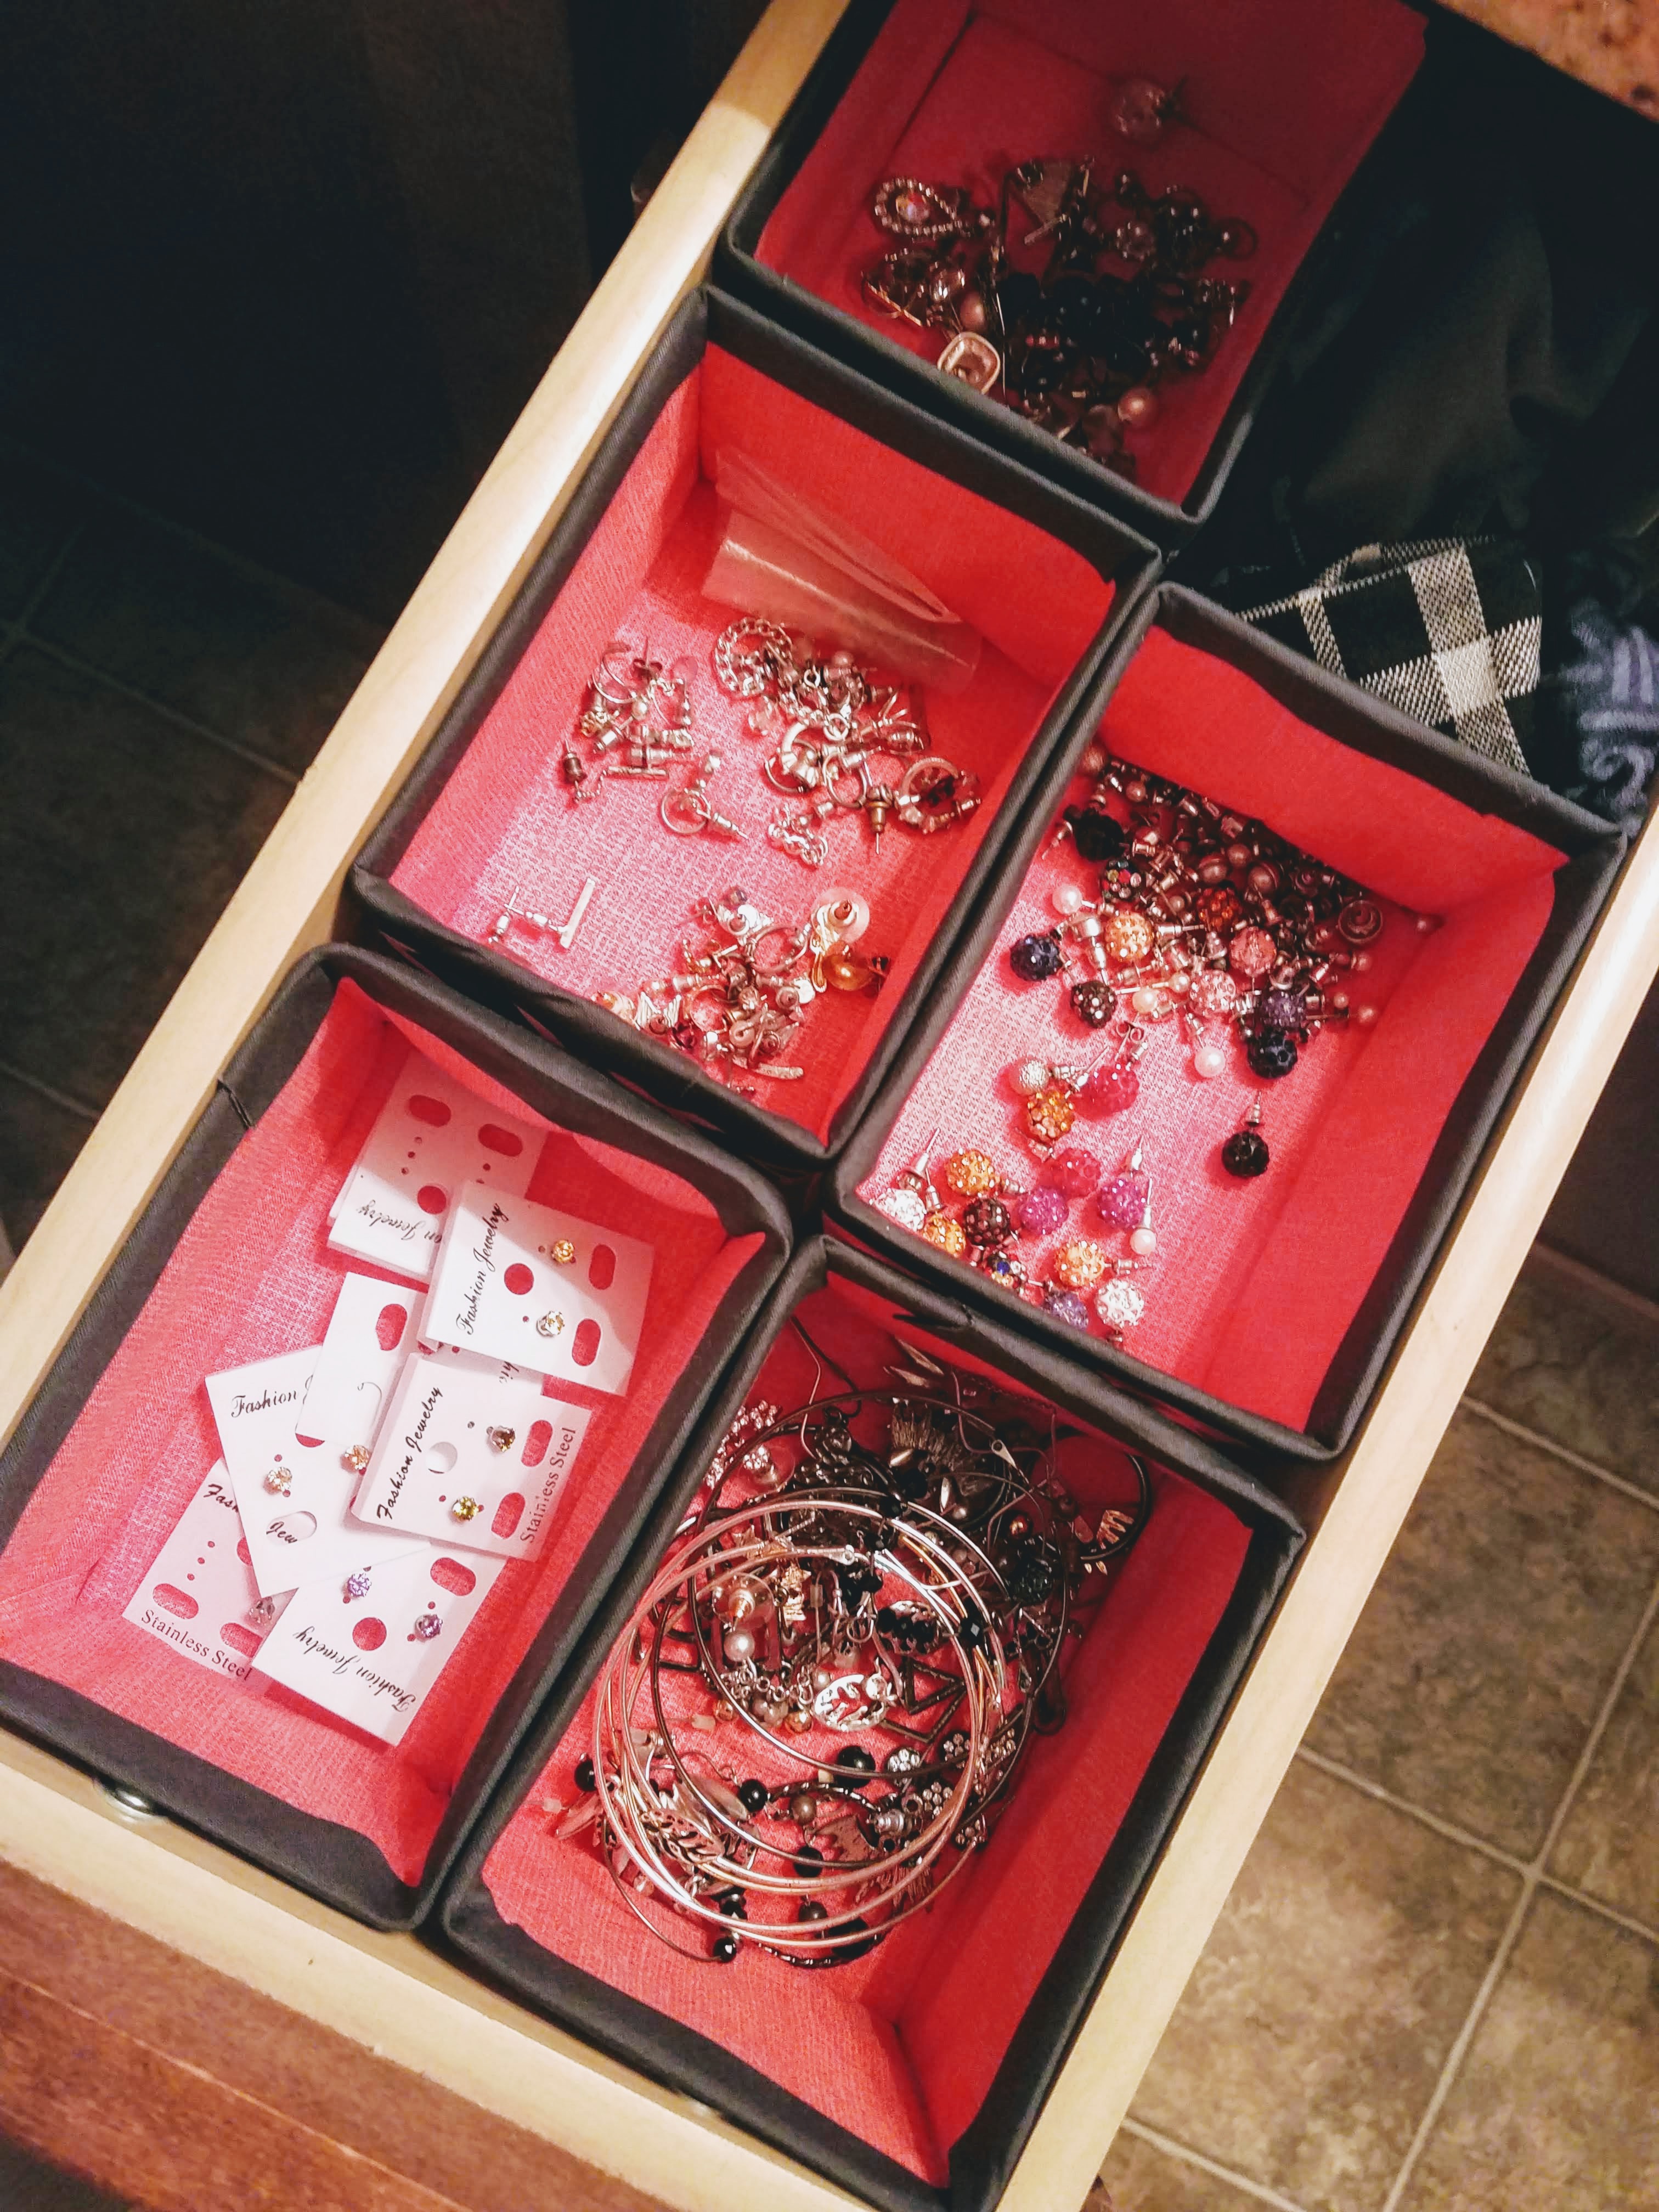 This all began with a bathroom drawer and a collection of earrings. A somewhat shallow and narrow bathroom drawer that I’ve been itching to divide into compartments using little storage boxes. And when you can’t find the size you need, you make it.
Enough with the annoying intro. Let’s get to it.
(FYI, any products I link to are strictly to give you an idea of what to look for. I don’t get anything if you get the same stuff I have, although that would be nice. Maybe someday.)
What you’re gonna need…
- Maybe this is obvious, but a sewing machine. Here’s some thoughts I had about getting one of those.
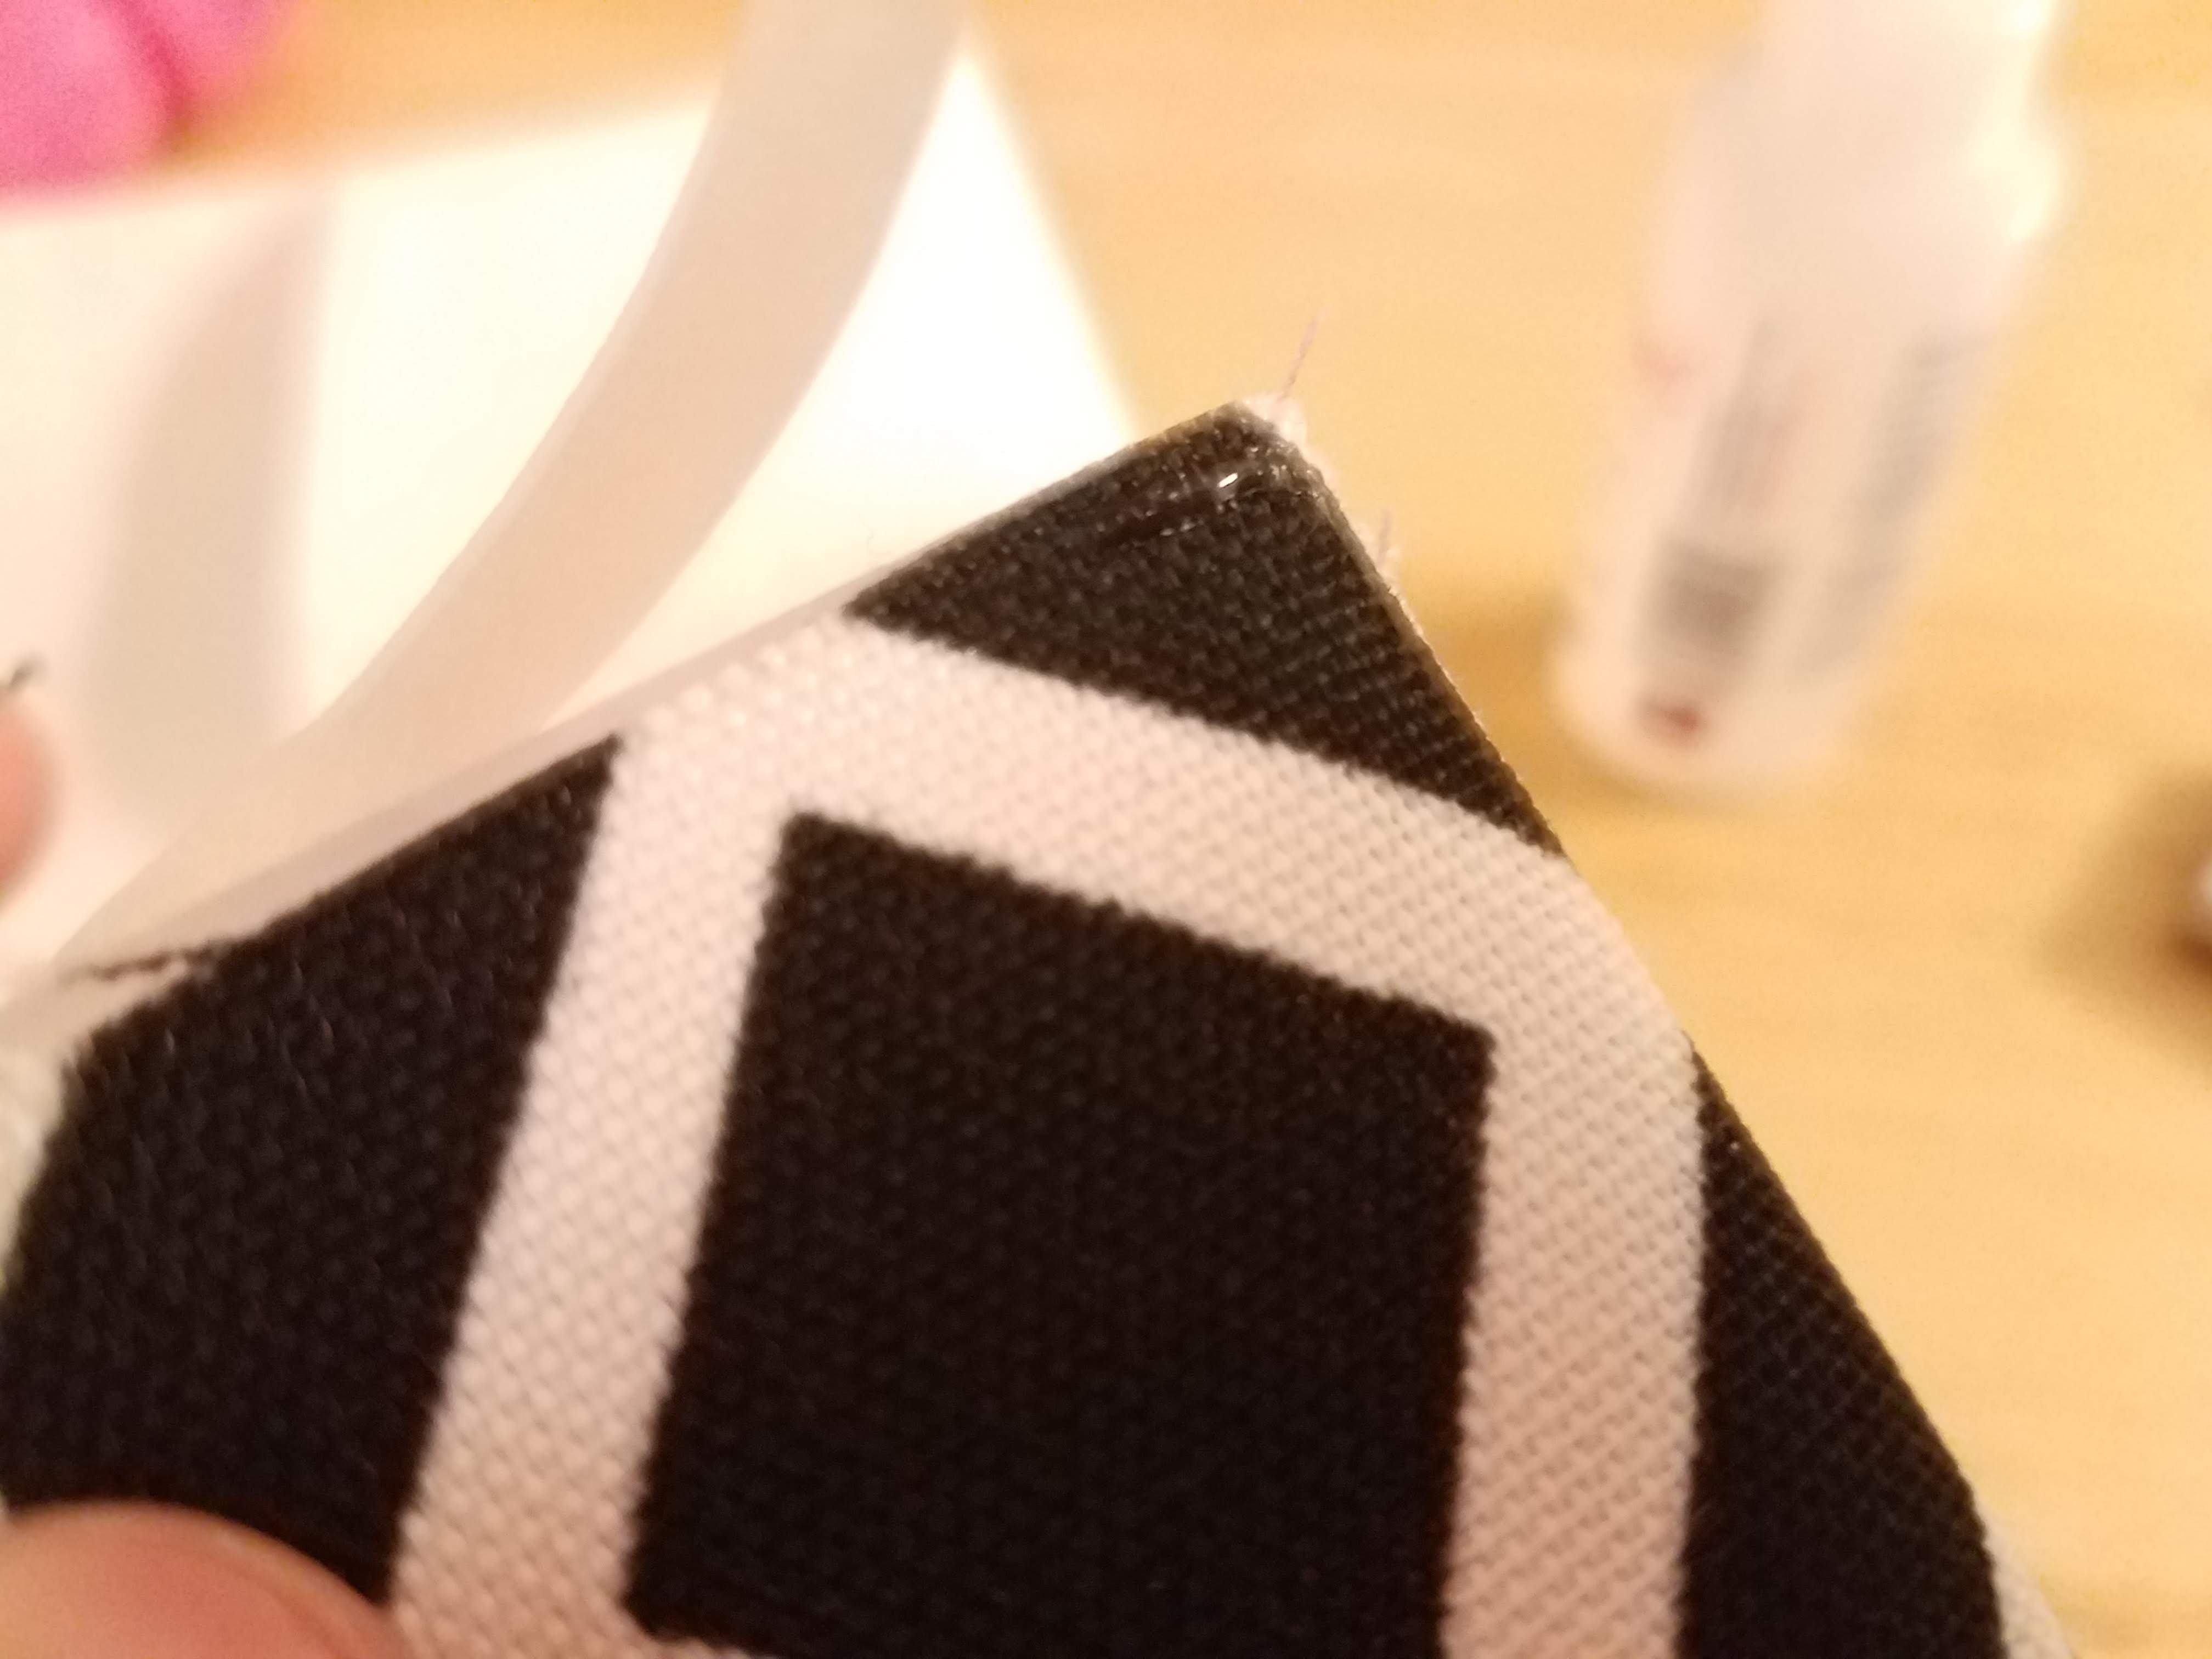
- Fabric – quilting cotton is easy to work with and comes in a ridiculous array of prints and colors. You can get two different looks like I did, one for the outside of the box and one for the inside. Or you can match them. No wrong choice here. If you want to skip the interfacing step, you can feel around for a heavier cotton fabric and use that instead. Make sure it’s not stretchy. I didn’t use interfacing on my black & white fabric since it seemed sturdy without it. How much fabric you need depends on how big a box you’re going to make. A yard and a half of the outside and inside fabrics left me with extra after making my 12x12x12 box. If you’re making something small like I’m showing in this guide, the remnant bin at the fabric store will give you plenty to work with. Even half a yard will let you make multiple small boxes.
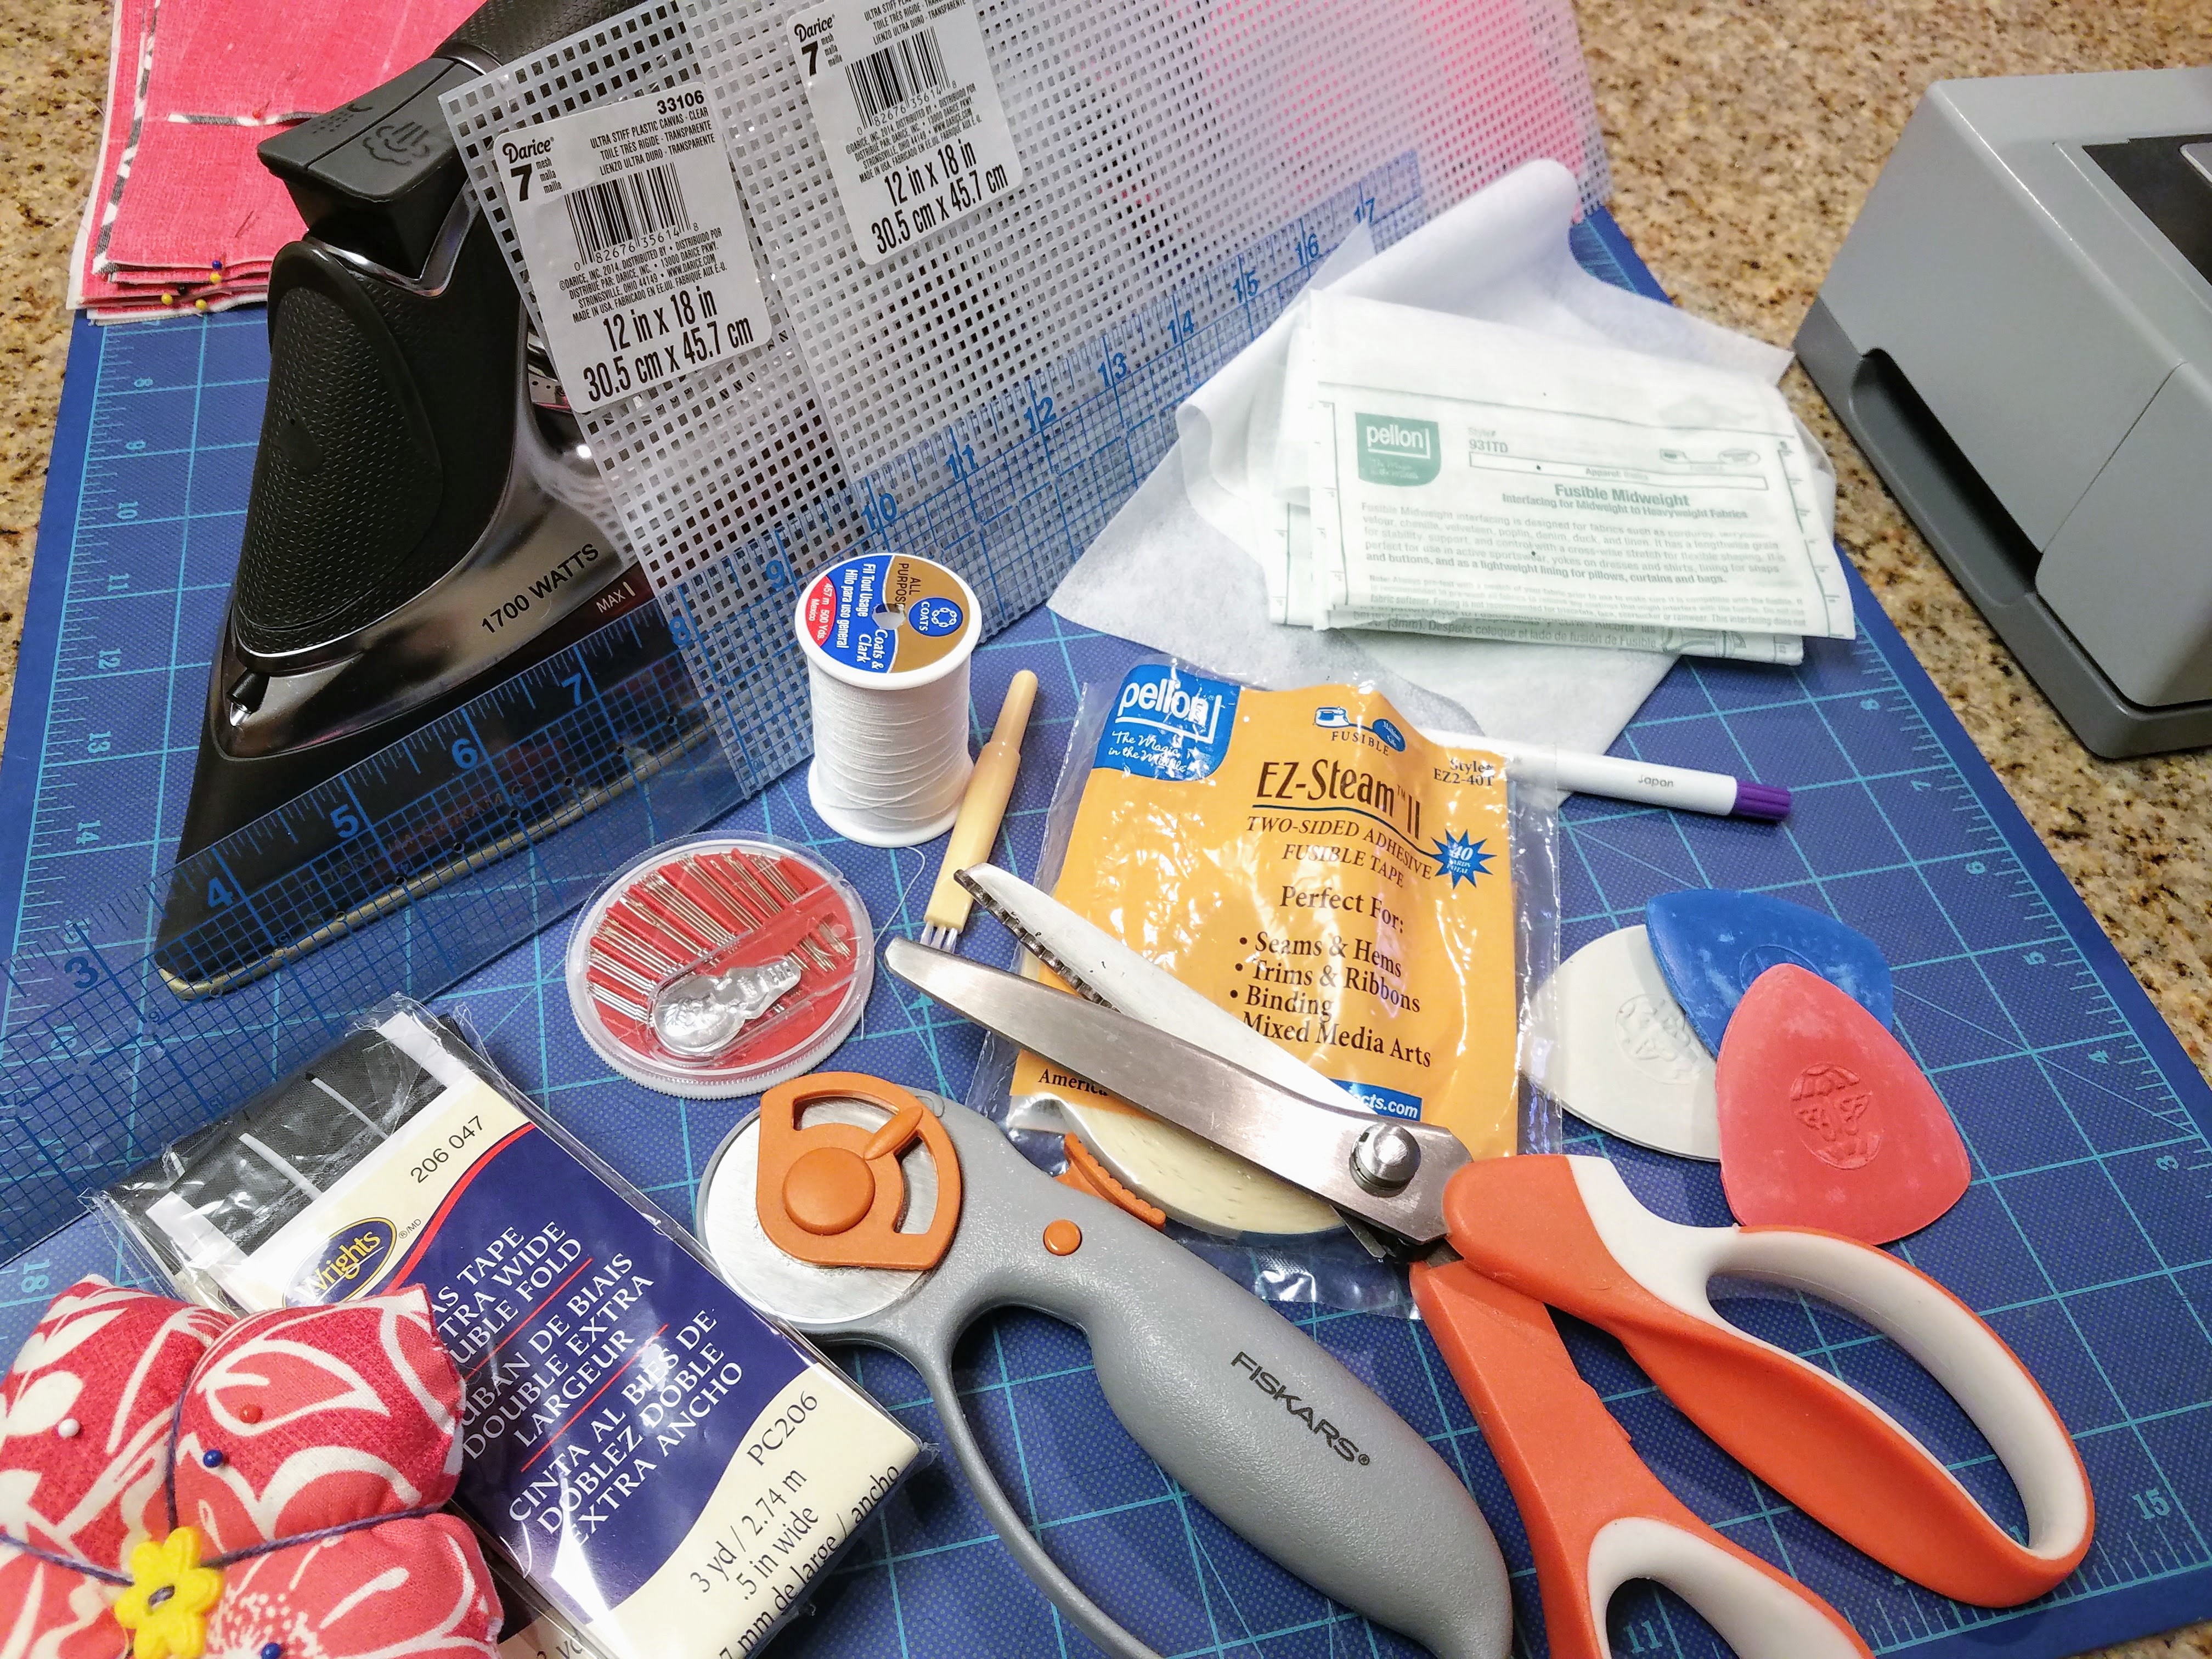
- Thread – White thread works well with my color choices, so I got a 500-yard spool of it. Better to have too much than too little. Get an all-purpose (sometimes called sew-all) polyester thread. Gutermann or Coats & Clark are good brands. If you’re looking for a set, I started with this: Gutermann 26 Spool Thread Box.
- Interfacing – I chose fusible midweight for mid- to heavyweight fabrics (Pellon 931TD). I wanted to add a noticeable weight to my lighter fabrics. Fair warning with this though: it is no joke to fuse if all you have is an iron! Especially on a bigger box.
12 x 12 x 12 box
Took me the better half of a day to fuse it to the two 49″ x 19″ pieces of fabric I used for my 12x12x12 box. Why? Because you have to press the living daylights out of it (considerable pressure for like 20-30 seconds) one small iron-sized section at a time. It’s made me dream of getting an iron press. I had to abandon my ironing board, move to the floor with a towel, and literally put my body weight into pressing it. Also, being able to keep such large cuts of fabric flat helped to fuse it better rather than flopping and shifting and bending it over an ironing board. It sounds awful, and it kind of was, but if you’re just making small boxes then it isn’t so bad. You could also choose a lighter interfacing. Lighter interfacings are easier to fuse. There are also sew-in interfacings, but I haven’t worked with those yet. I don’t think there’d be anything wrong with using a lighter interfacing; the rigidity of the box comes from the ultra stiff plastic canvas (listed further down.)
- Press cloth for applying interfacing – You can buy a yard of unbleached muslin at the fabric store to use as a press cloth for applying interfacing. I had used an old white cotton t-shirt for a while, but the muslin has a high heat tolerance. If you want to learn more about press cloths, here’s a useful reference.
- Tailor’s chalk or Disappearing Ink Pen – I usually favor the pen, but I used chalk here because the marks don’t fade over time. If you mark with the disappearing ink and leave it overnight, it’ll be gone well before the next day. Maybe even inside an hour depending on your fabric.
- Rotary cutter and self-healing cutting mat– This really speeds up your cutting, and I love using it with my wooden yard stick which has some thickness to it. Makes the perfect edge to bump up against and guide you in a straight line. You can get away with a pair of scissors though if you don’t want to buy these things.
- Pins and pincushion(s) – if you don’t have any yet, get pins with glass heads or all metal so you can press your iron over them without melting any plastic bits (carefully! You don’t want to scratch up your iron.) You also don’t need a pincushion, but it’s so much easier grabbing pins from them vs. out of a stabby little box.
- Pinking Shears – I once knew these as “zig-zag scissors.” Having been enlightened, I now call them what they should be called. Here’s what I got. They came with a bonus pair of thread snips which I’m surprised I use all the time now.
- Bias Tape (extra wide, double fold) – Tape suggests something sticky, which bias tape is not. It’s simply a strip of fabric that’s been cut along the “bias” and folded. For more on what a bias is, I refer you to this article.
- Hand-sewing needles – Here’s what I got. That chintzy little threader it comes with is actually pretty amazing, chintziness aside.
- Ruler – You’ll see what I have in the photo above, but I might nudge you more towards a square. I keep wishing I had a square instead. I should probably just buy one already.
- Yard Stick – highly recommended if you’re making a big box.
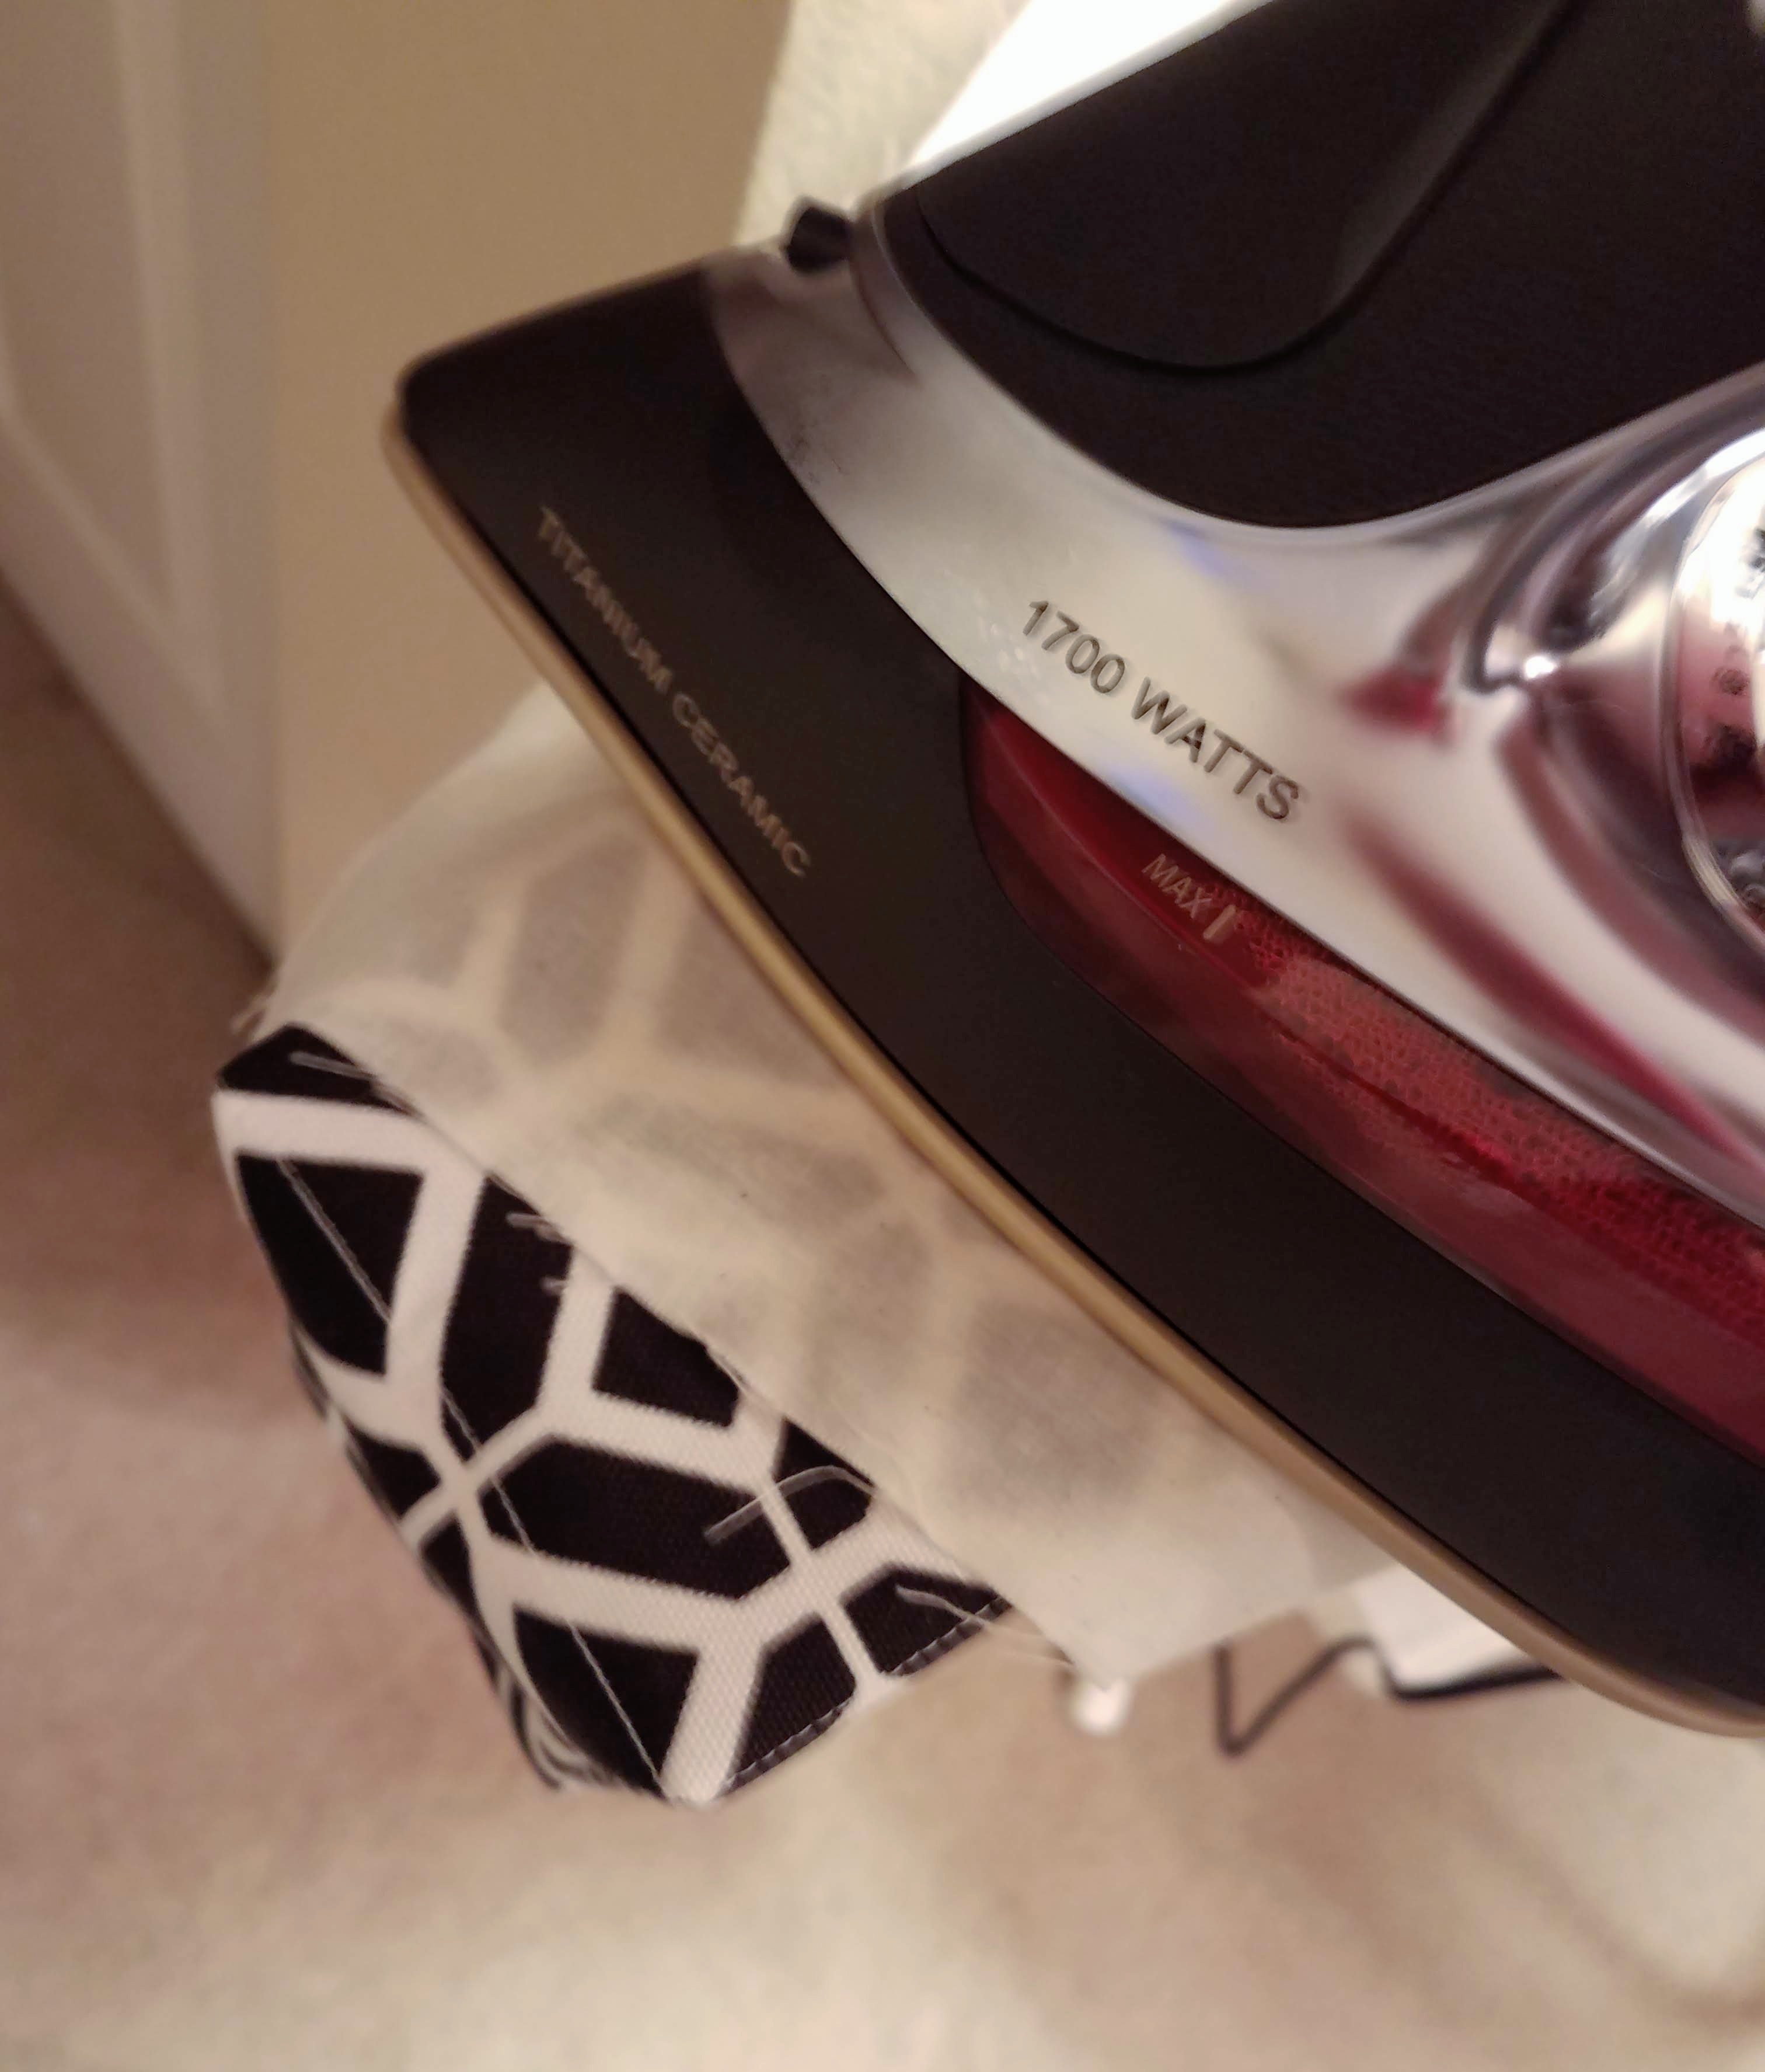
- Iron – Should have the ability to steam, and to shut the steam off if you need. I’ve been really happy with this one. The only drawback is if you’re pressing the life out of some fusible midweight, the iron will start beeping after ~30 seconds if it hasn’t been moved. Got a little annoying, but maybe you’ll find it useful for timing your pressing.
- Ultra-stiff plastic canvas – Joann’s carries this in 12×18 sheets.
- Seam Ripper – just in case you need it. I also found it handy to help me separate the backing from the fusible tape described next:
- 2-sided adhesive fusible tape (1/4″ wide)– Due to the small size of my box, sewing the bias tape around the top wasn’t gonna happen, so I bought this. It’s something of a nightmare to start with: difficult to remove the backing, does not offer any type of temporary bond before ironing, and it can do some annoying things coming off the roll like only the backing peeling off or bits of the backing refusing to peel off altogether or a clumpy bit of adhesive here and there. I didn’t find those issues to be overwhelming though, and once you nail down a technique (I’ll describe mine later in this guide), the end result actually turns out pretty good. I even used it on the bias tape for my 12x12x12 box that I could have sewn but chose not to. They do make it in a wider width (1/2″), or something similar called perma stick tape. I can tell you the perma stick tape is much easier to work with, and I did use it on one of my boxes, but I didn’t like how the bias tape ended up since I had to bend the sticky tape over the top edge of the box due to the wider width of it; it wasn’t as crisp and looked a little frumpy to me. Steam-a-Seam tape has better reviews but I think it’s only available online.
- Fabric Glue – I chose Fabri-Tac and it’s working well for me. It grabs quickly like it says and creates a decent bond without having to use very much at all.
Onward with the Making
⇓
1. Cut your fabric and interfacing.
DETERMINING YOUR CUT SIZE
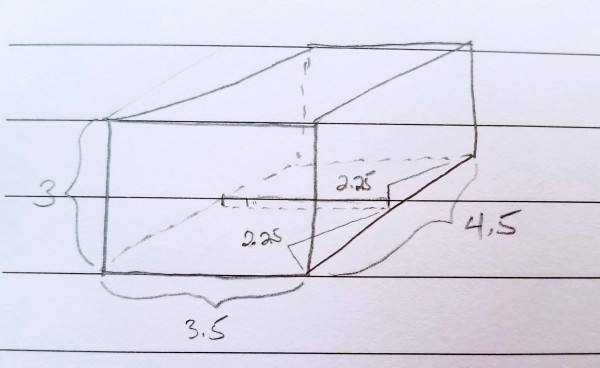
For those who like diagrams, here’s my little sketch.
Decide what size box you want to make. You’ll have a width, height, and depth. Write them down and then do some simple math.
Width: _____
Depth: _____
Height: _____ **
**We have to add to the height in order to have the fabric that makes the bottom of the box. How much do you add, you ask? Simple: divide your depth in half, and add that to the height.
So let’s say your depth is X and your height is Y. Your total height will be Y + (X / 2) + seam allowance.
Here are the dimensions of my little box:
Width: 3.5
Depth: 4.5
Height: 3
Here’s the math that gave me the 17″ x 6.25″ size to cut my fabric and interfacing:
(width x2) + (depth x2) + seam allowance (1″)
My numbers: (3.5 x 2) + (4.5 x 2) + 1 = 17″
height + (depth / 2) + seam allowance (1″)
My numbers: 3 + (4.5 / 2) + 1 = 6.25″
You will need two pieces of fabric at this size per box, one for the outside and one for the lining. What we’re going to do is sew these two pieces together into a tube with 4 compartments, and then add a few more seams to shape it into a box.
What is a seam allowance? You don’t want to be sewing right along the raw edge of your fabric. Things will get tangled, uneven, jammed, and so on. So we leave some extra fabric to give us space to work.
2. Fuse your interfacing (optional).
You can skip this step if you want. I don’t think it will negatively impact your box if you do. All that will happen is your fabric might feel a little thin/flimsy if you’re using regular quilting cotton. Interfacing would add a little more oomph to it. As I said above, the sturdiness of the box is mainly provided by the plastic canvas we insert later.
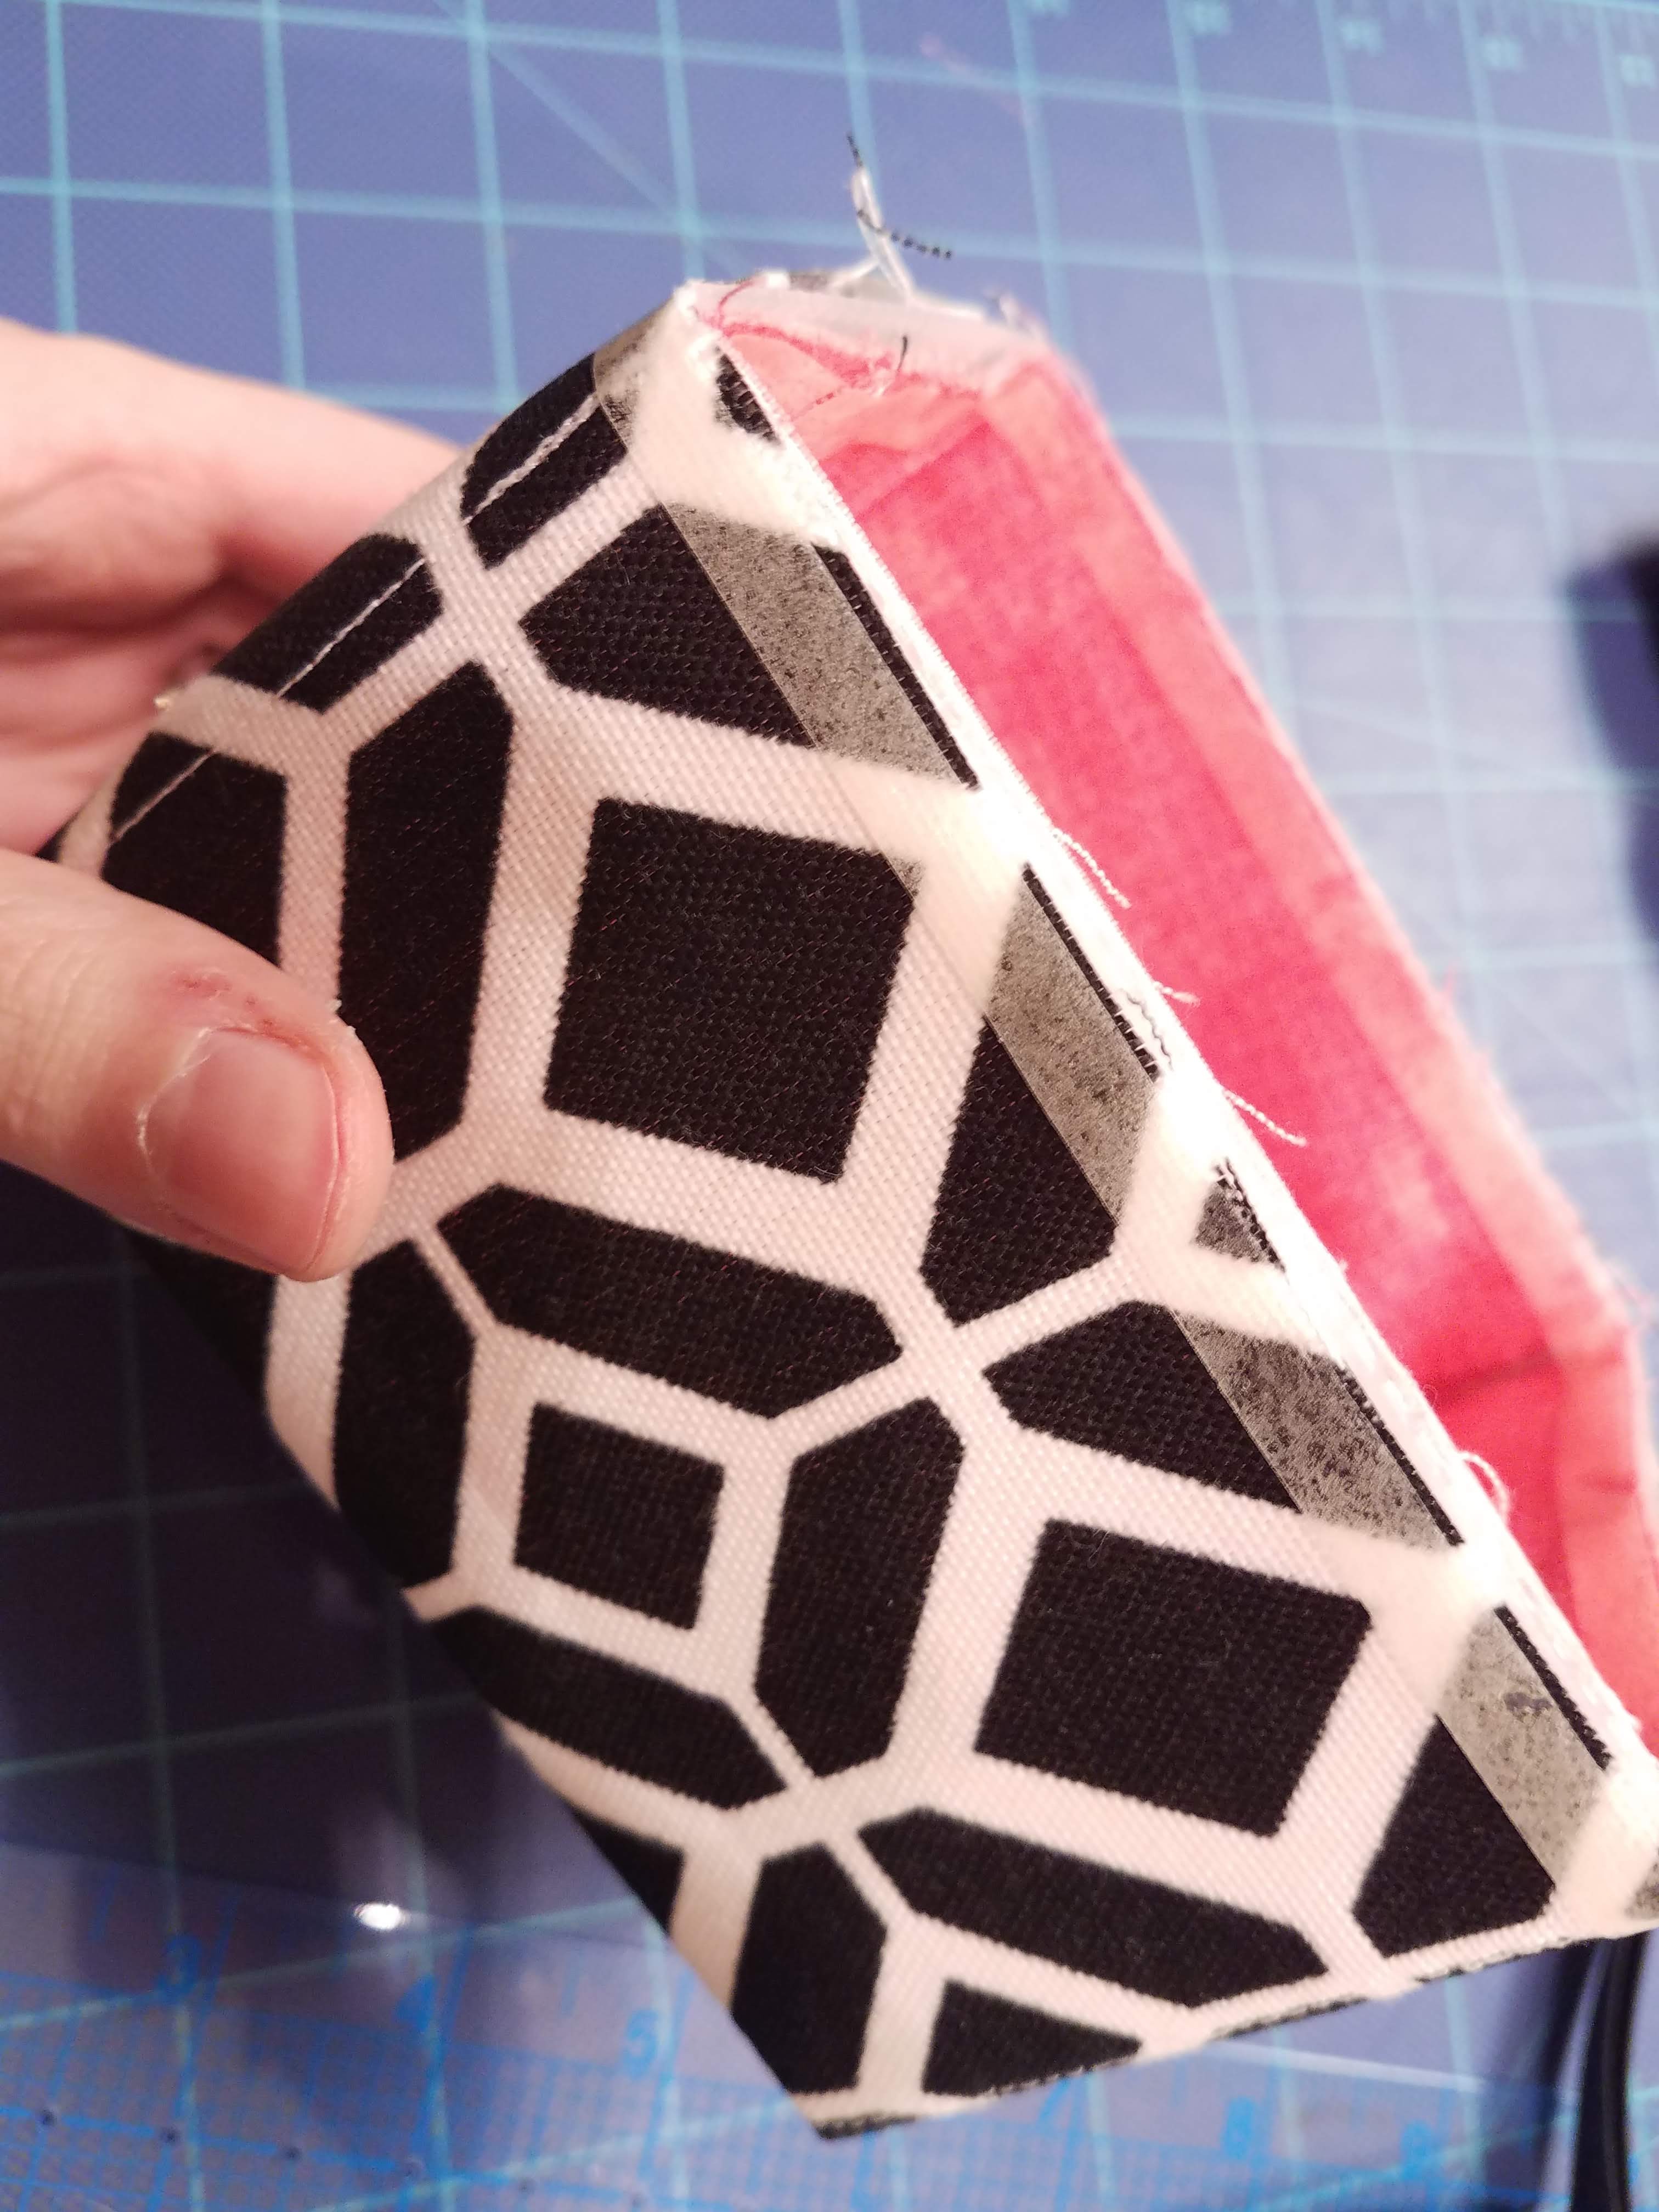
 You can see (left) that I only applied interfacing to my pink quilting cotton (which I used as the inside lining of the box.) The black and white cotton felt stiffer to me and I didn’t think it really needed interfacing.
HOW TO USE INTERFACING
When you purchase interfacing at a fabric store, they usually give you a section of the instructions to go with it. (You can sometimes find interfacing in the remnant bins, too.) So far, I’ve worked with sheerweight and midweight interfacing and they both worked generally the same:
- Heat your iron to cotton setting, no steam. (Some people even bump it up to linen, saying that higher heat helps it fuse better. Consider the fabric you’re working with though. Some things can melt so before you start going crazy with interfacing on all the things, do a little research for the fabric type you have. Since we’re using cotton here, we’ll stick with the cotton or linen settings. I have read that some people DO use steam if the interfacing is being stubborn. I haven’t experimented with that yet, but if you feel brave, go for it. If it doesn’t work out, it’s not the end of the world. We’re allowed to make mistakes.)
- If you’re using a press cloth to protect your ironing board, lay that down as the bottom layer. You don’t have to; I didn’t, but I wish I had, because things started to stick to my ironing board later on.
- Next, lay your interfacing (cut to your fabric size) on top with the bumpy side up. (The bumpy side has the adhesive.)
- Next, lay your fabric on top of that with the wrong side down (the wrong side is the “ugly” side of the fabric.) So the adhesive on the interfacing will be fused to the wrong side of the fabric.
- Next, lay another press cloth on top of all of this. Make sure everything is lined up well, and nice and smooth.
- Spritz your press cloth with water so it’s slightly damp.
- Take your hot iron and apply pressure over your stack of fabric. Don’t move it. Just hold it in place for 10-20 seconds. Then lift your iron, and move it to a new section, slightly overlapping your previously pressed section, and repeat. Continue doing this until you’ve pressed the entire thing, and then let it cool. I’ve read some recommendations about letting it cool for up to 30 minutes so the adhesive sets before you start moving it around. You probably don’t have to wait that long. However, I did on my big box because it was giving me such trouble.
- Remove your press cloths and check things out. You should not be able to peel the edges of your fabric and interfacing apart, and you shouldn’t see any bubbling. If you rub the fabric in your fingers, the two layers should stay together. If you see any sections that look like they didn’t fuse well (it will kind of look like a pocket of air between the fabric and interfacing), replace your press cloths, spray that section again, and press it again, maybe a little longer with more pressure.
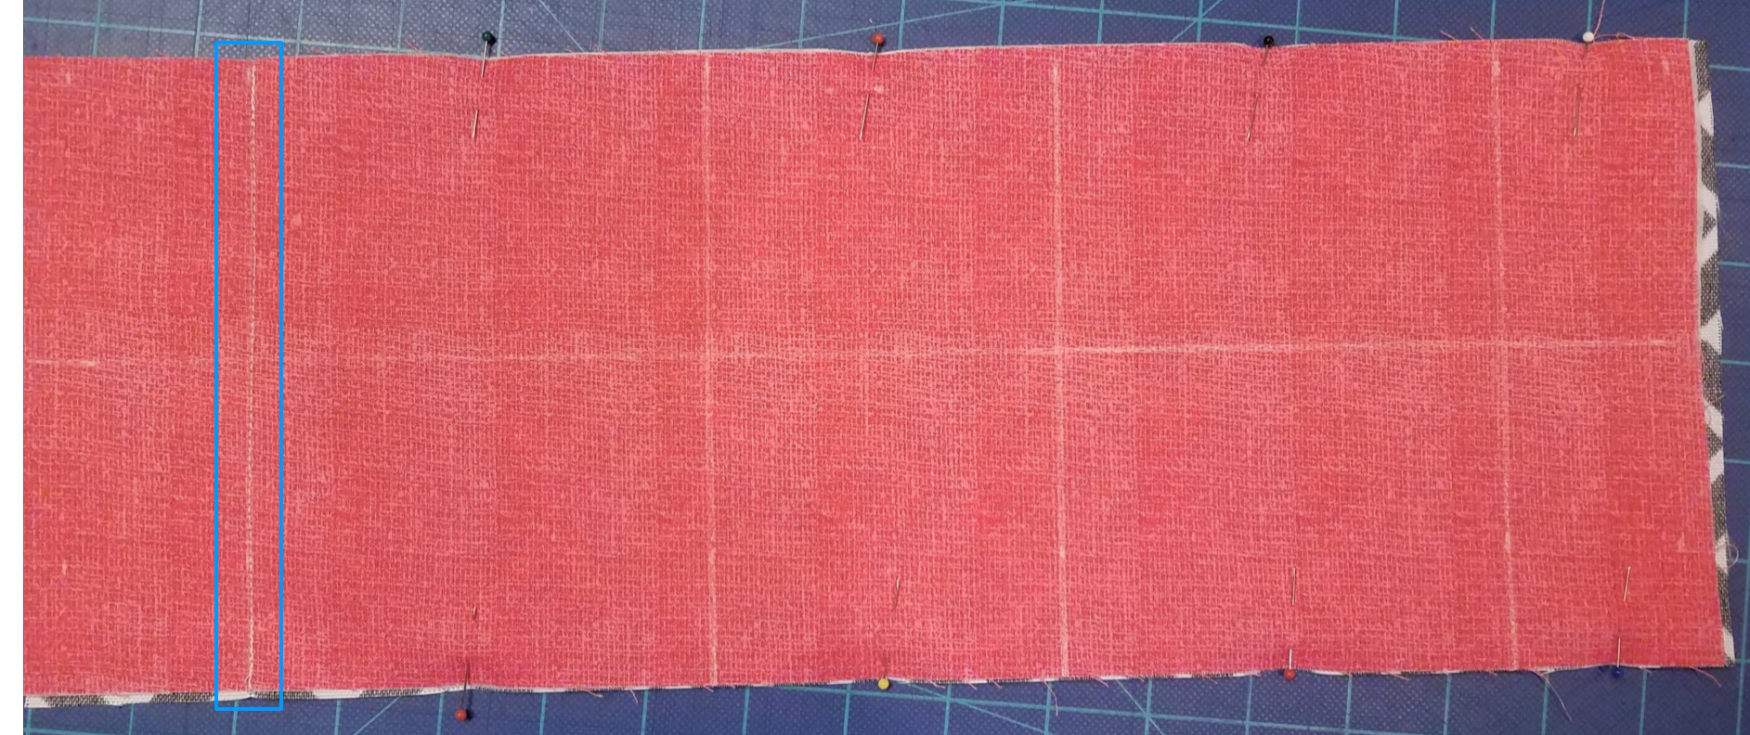
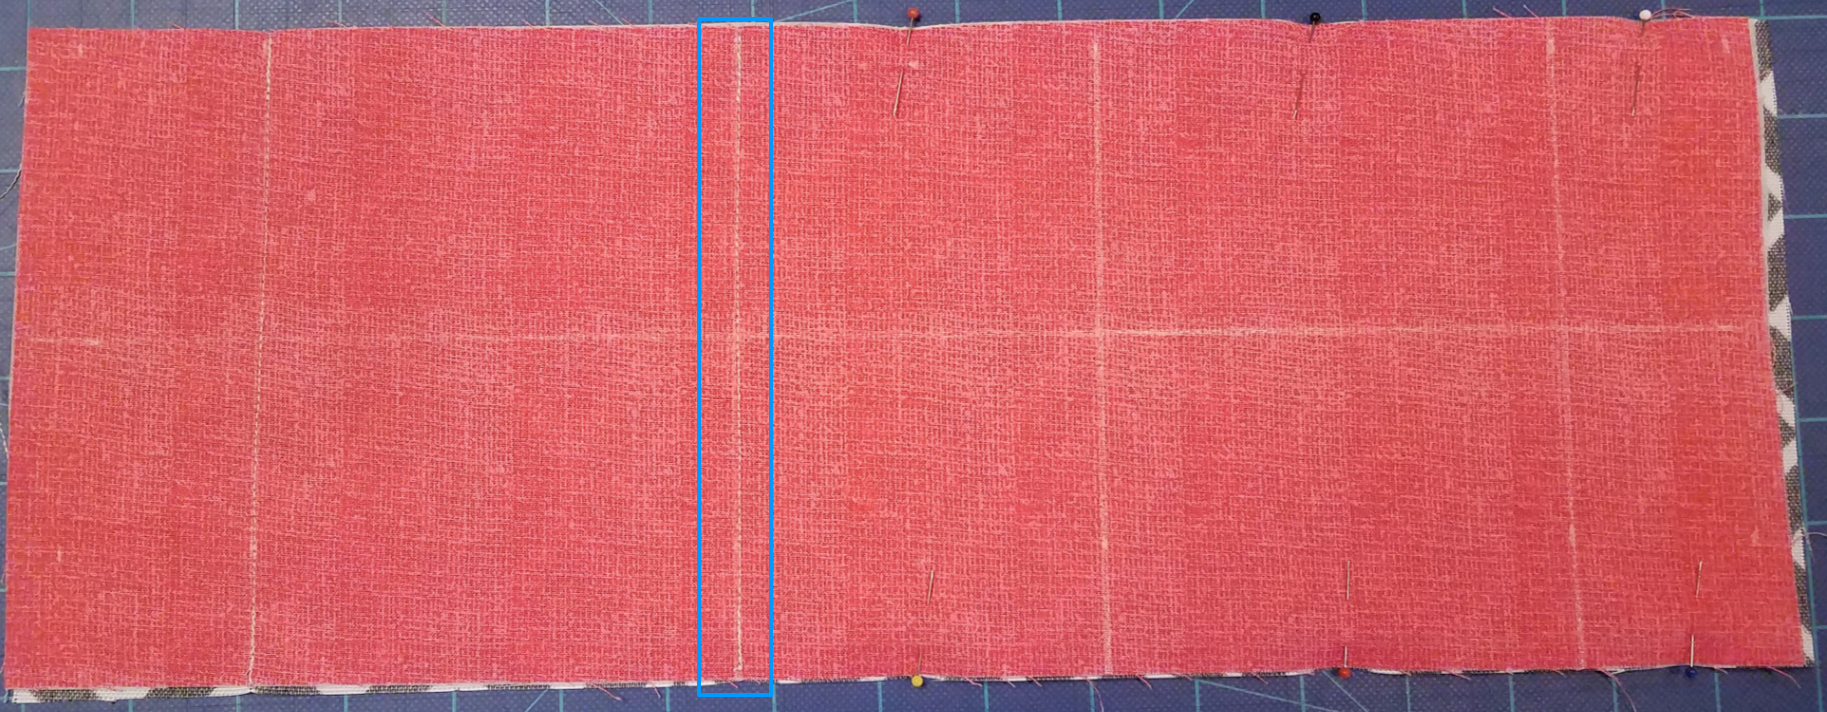
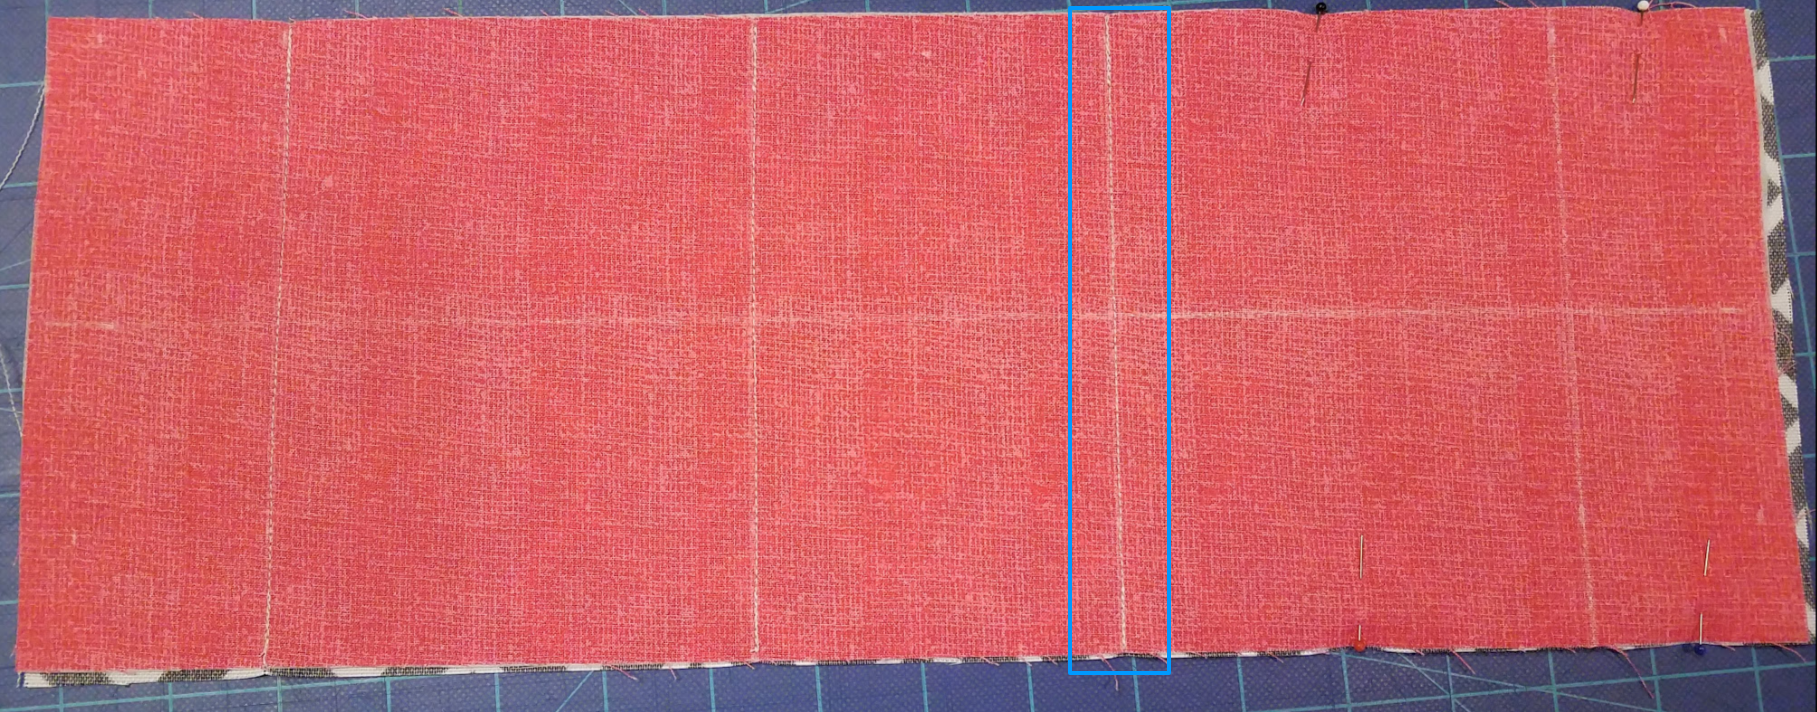
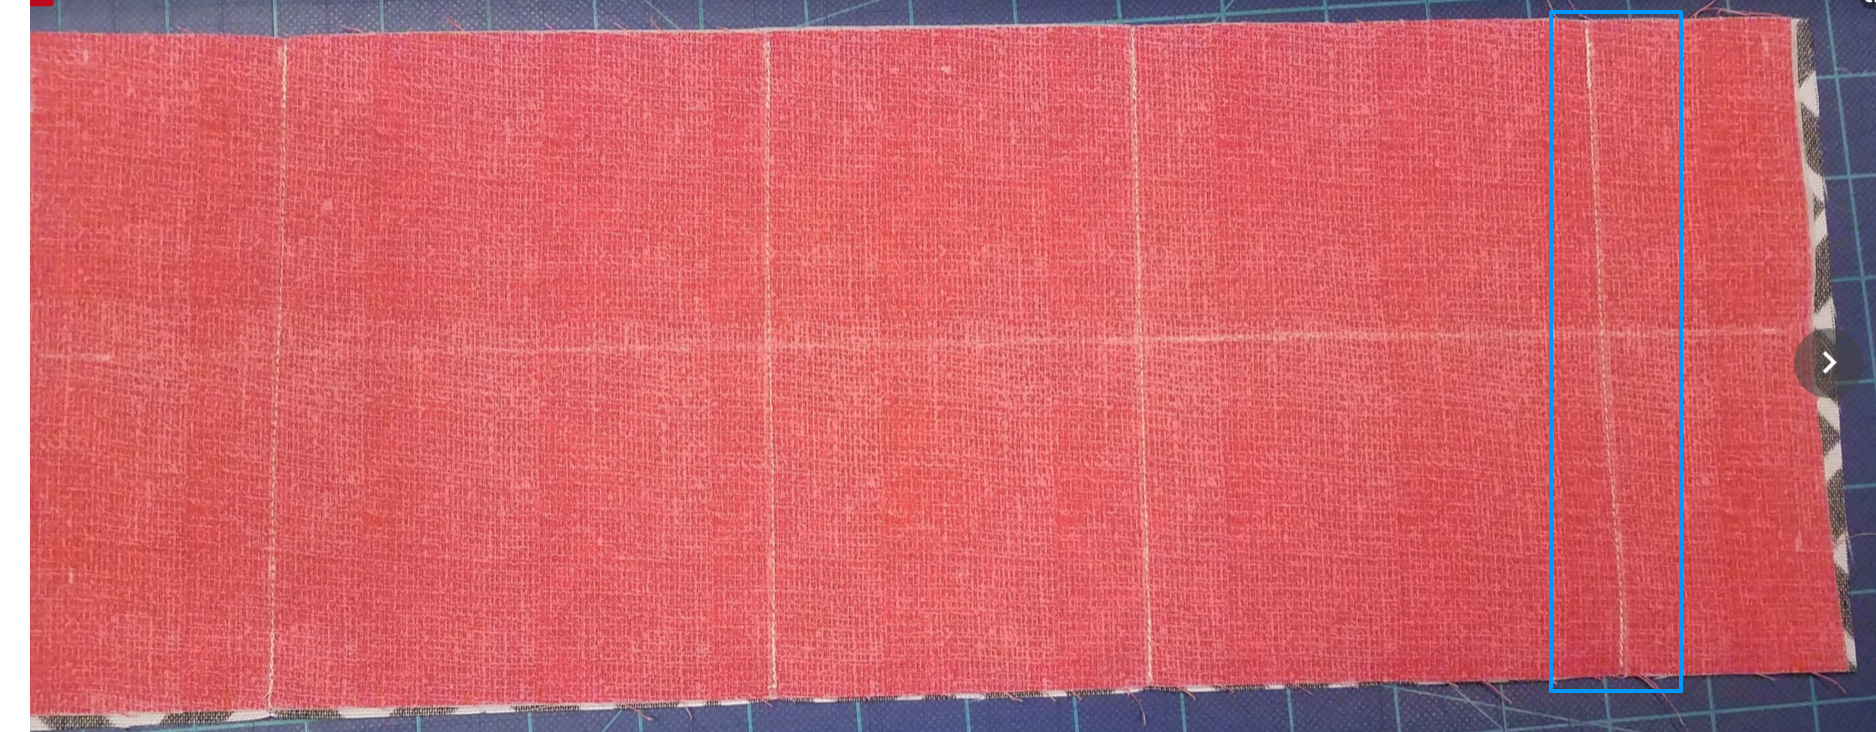
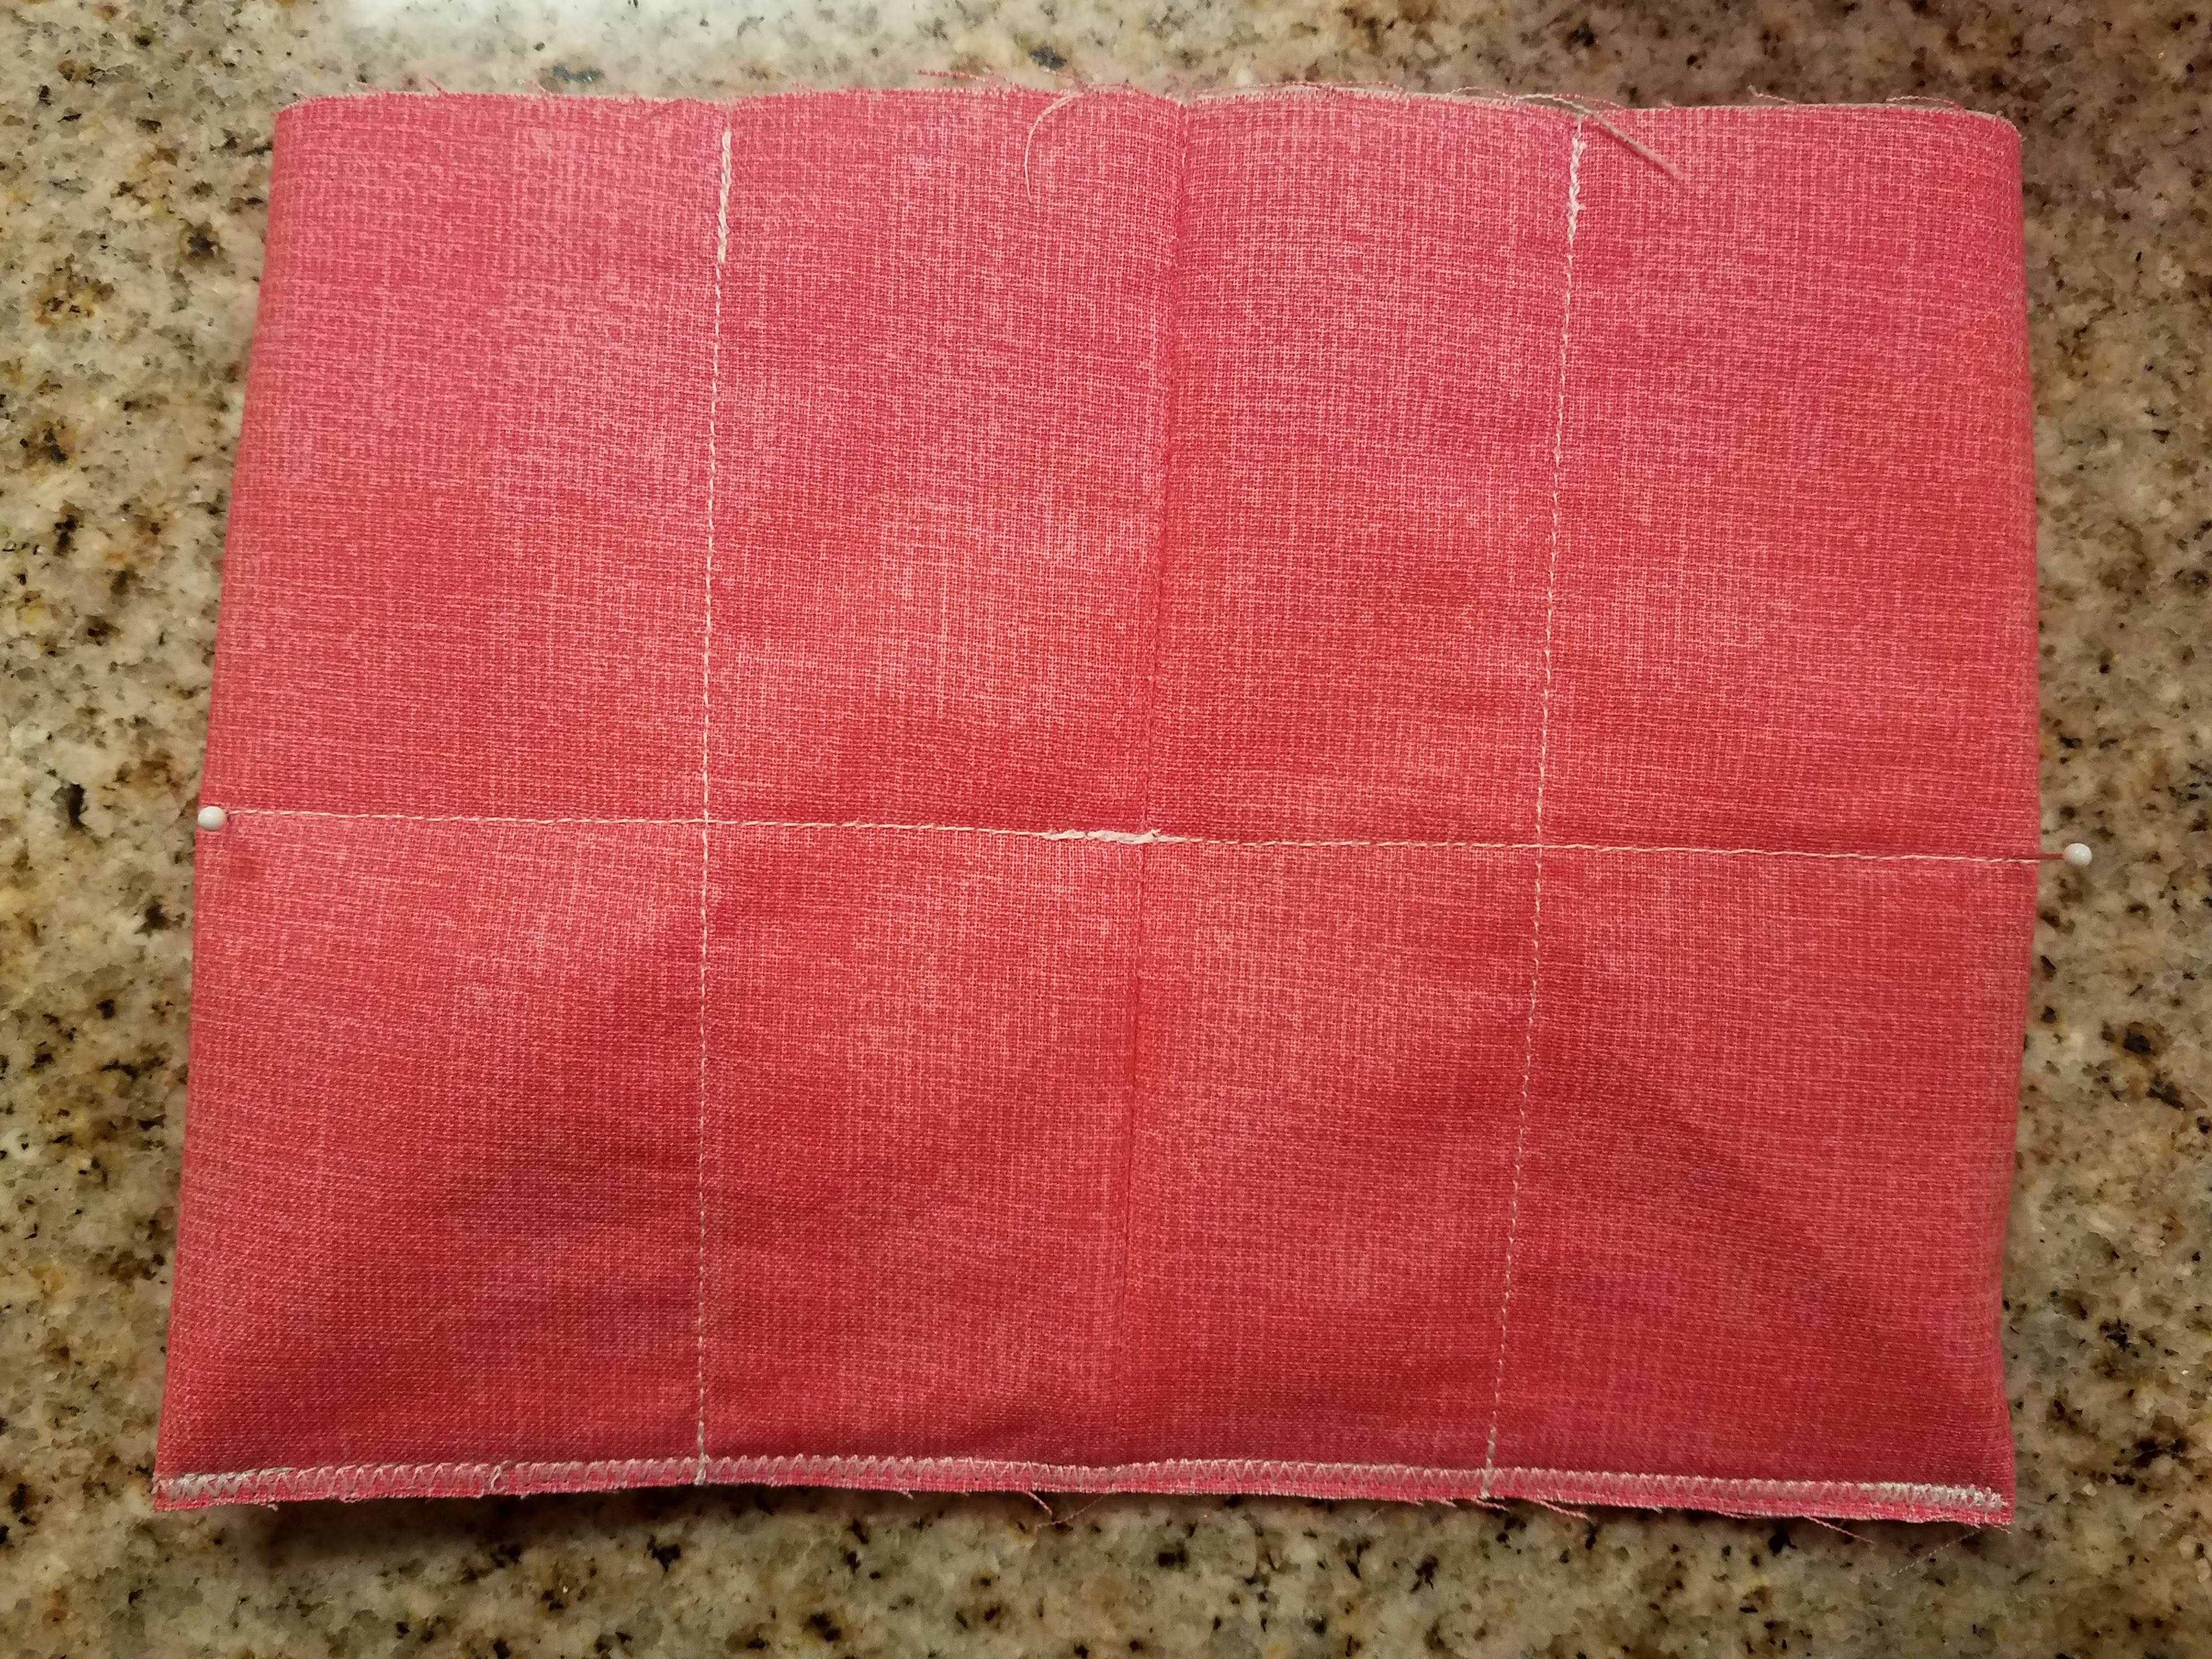
3. Make your marks.

I made my marks on my lining fabric so any remnants would be on the inside of the box instead of the outside.
Chalk or disappearing ink?
I chose to use chalk because I was marking several of these and I needed the marks to not disappear. However, if you plan on sewing right away, you can use disappearing ink. Note: if you iron after marking with disappearing ink, the ink will come back, but you can rub it off again with a damp cloth. The chalk rubs off easily, and by the time you’re done wrangling the fabric into a box, it pretty much disappears.
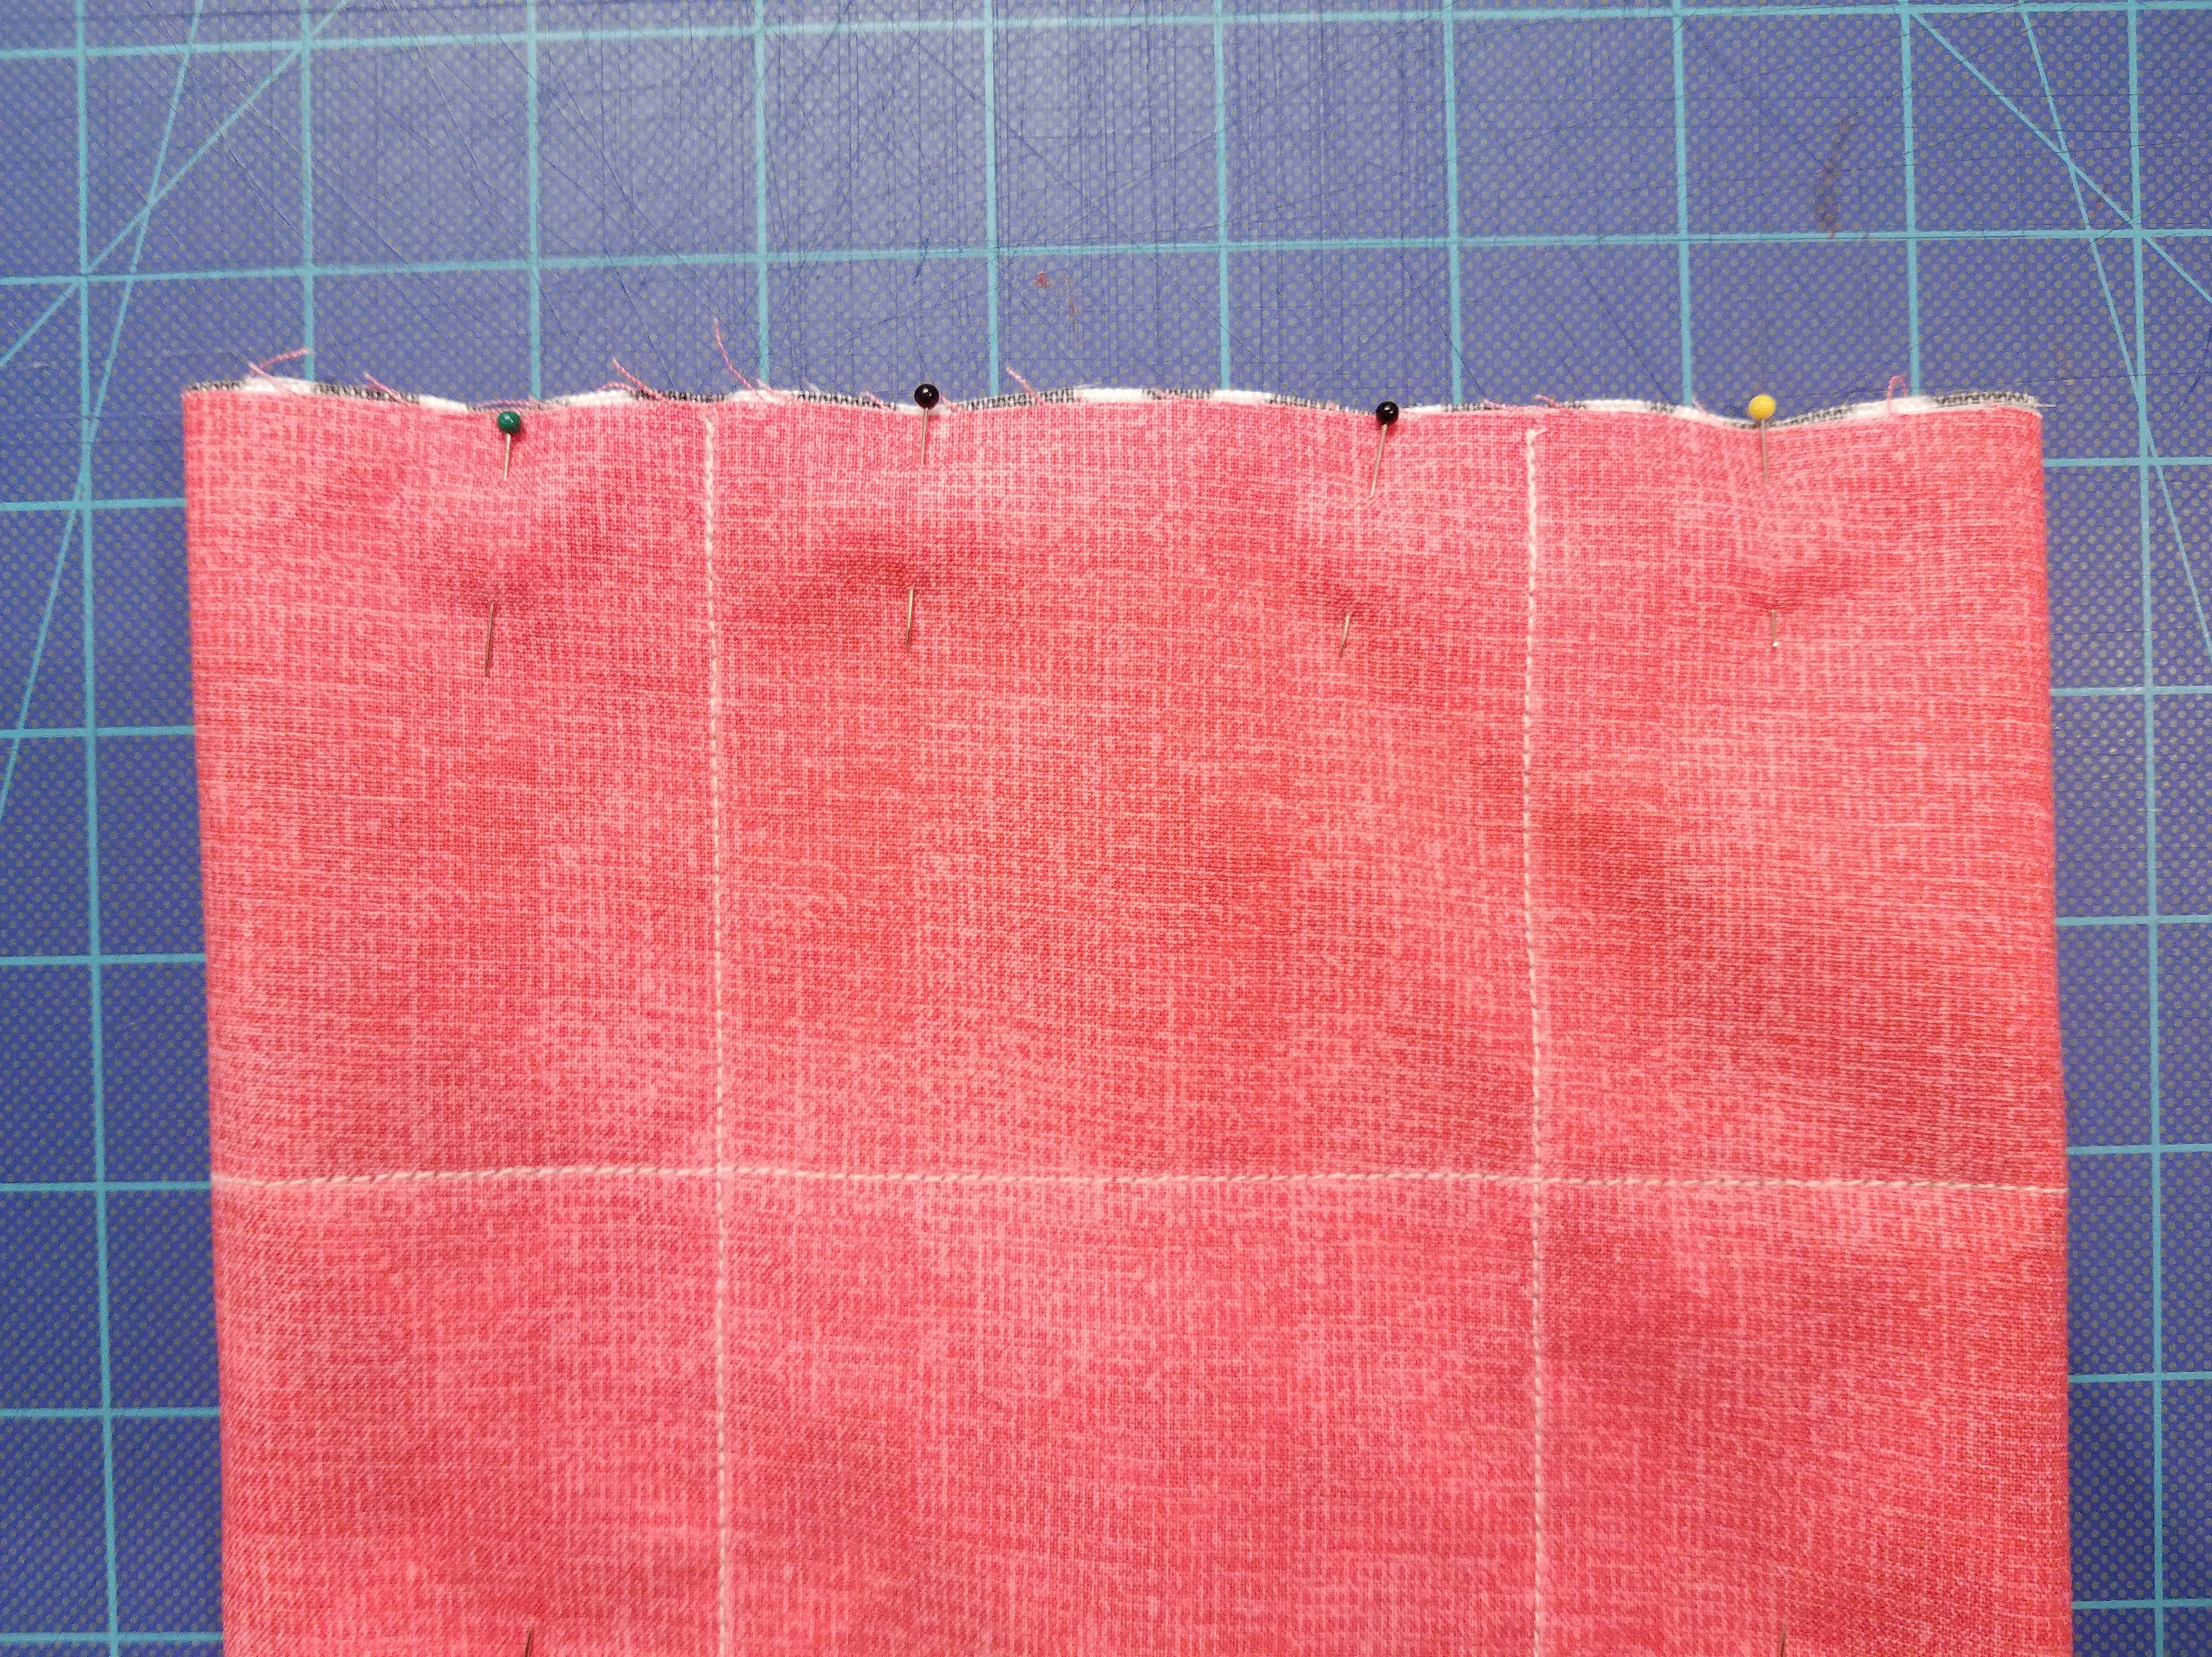
Choose the straighter of your long edges as the top of your box, and make your marks along that edge.
0.5″, 2.25″, 6.75″, 8.5″ (middle), 10.25″, 14.75″, 16.5″
*Note: your final mark may not be exactly 0.5″ from the right side if your cuts aren’t straight, but that’s ok. We’ll be trimming things up later.
Notice the numbers in pink: these mark the seams that will divide your box into 4 compartments. They are the marks where you draw your vertical lines from top to bottom. Make these same marks along the bottom edge, and then use a ruler to draw your vertical lines as shown in my photo.
If your box is a different size, here’s how to determine where your marks should be based on the numbers above:
- FIRST NUMBER: 0.5″ = half your total seam allowance.
- SECOND NUMBER: 2.25″ = add 1/2 of the shorter side of your box to the first number (My short side is 3.5″, so (3.5 ÷ 2) + 0.5 (first number) = 2.25)
- THIRD NUMBER: 6.75″ = add the full length of the longer side of your box to the second number (My long side is 4.5, so 2.25 (second number) + 4.5 = 6.75)
- FOURTH NUMBER: 8.5″ = this is the middle mark of the full width of your fabric. (My full width was 17″, so 17 ÷ 2 = 8.5)
- FIFTH NUMBER: 10.25″ = add the full length of the shorter side of your box to the THIRD number (My short side is 3.5″, so 6.75 (THIRD number) + 3.5 = 10.25)
- SIXTH NUMBER: 14.75″ = add the full length of the longer side of your box to the fifth number (My long side is 4.5, so 10.25 (fifth number) + 4.5 = 14.75)
- SEVENTH NUMBER: 16.5″ = add 1/2 of the shorter side of your box to the sixth number (My short side is 3.5″, so (3.5 ÷ 2) + 14.75 (sixth number) = 16.5)
Again, the pink represents the vertical lines you’ll draw.
For the horizontal line, which will become the bottom edge of the box, simply measure the height of your finished box down from the top. Mark along the left and right edges and then use a ruler to draw the horizontal line.
3″ from top
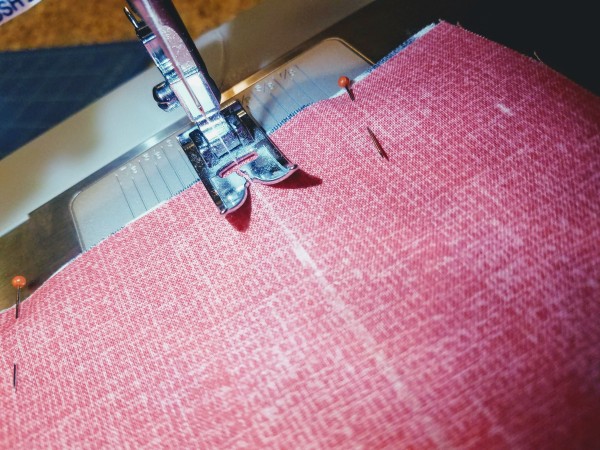
4. Pin your fabric
Take your lining piece which you’ve just marked, and your outer piece and line up the top left corner. The wrong sides should be facing each other, meaning the right sides are facing outward. Make sure the top edges are lined up as straight as they can be. If the other edges don’t line up, that’s fine. We’ll be trimming later. Pin the pieces together as shown in the image in step #3. You can see in my previous photo some of my edges don’t line up perfectly either, but the top and left corner do.
5. Sew the vertical seams
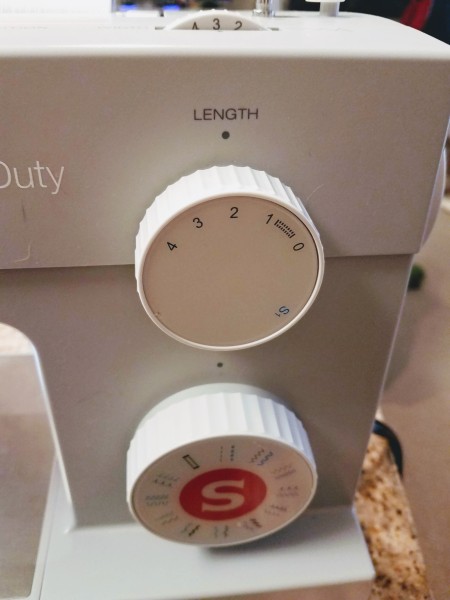 Time to make those compartments! Use a basic straight stitch. My settings are shown to the left:
Stitch width: 3
Stitch length: 2
Stitch: basic straight
 Then begin sewing along each of the vertical lines you marked, one at a time. Don’t forget to backtack at the beginning and end of the seam. I always forget to backtack at the beginning because I’m that excited to get sewing. It doesn’t matter which seam you start with, or if you do it from top to bottom or bottom to top. Whatever you’re comfortable with. You can turn it any which-way you want to guide it through the machine at this point. Just follow the marks you made and you’ll be good.
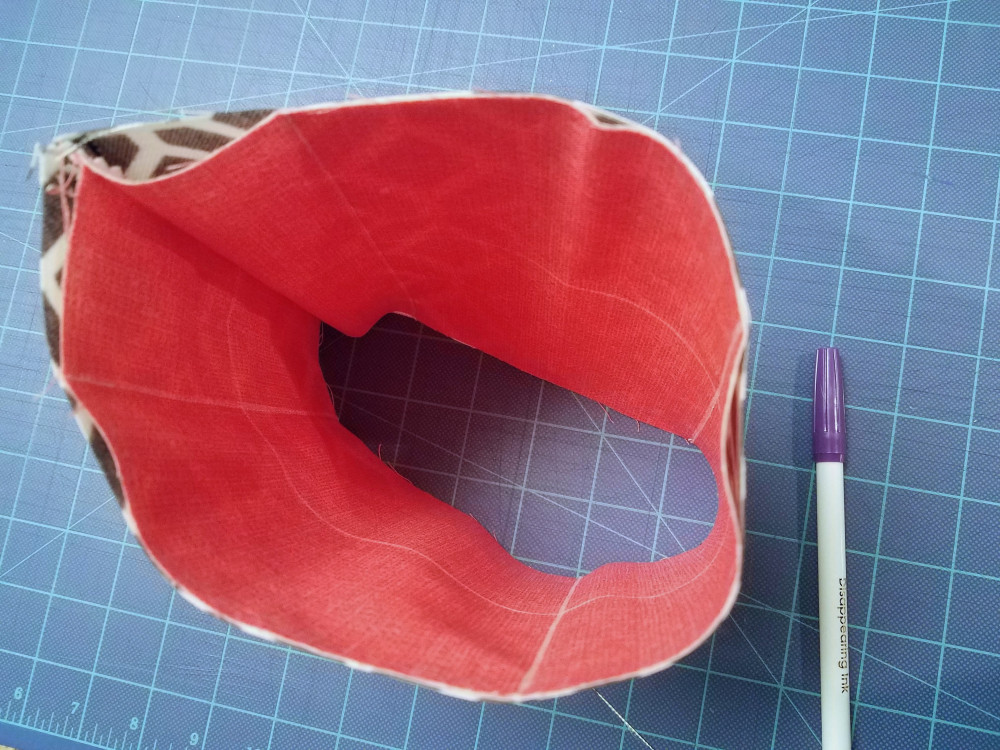
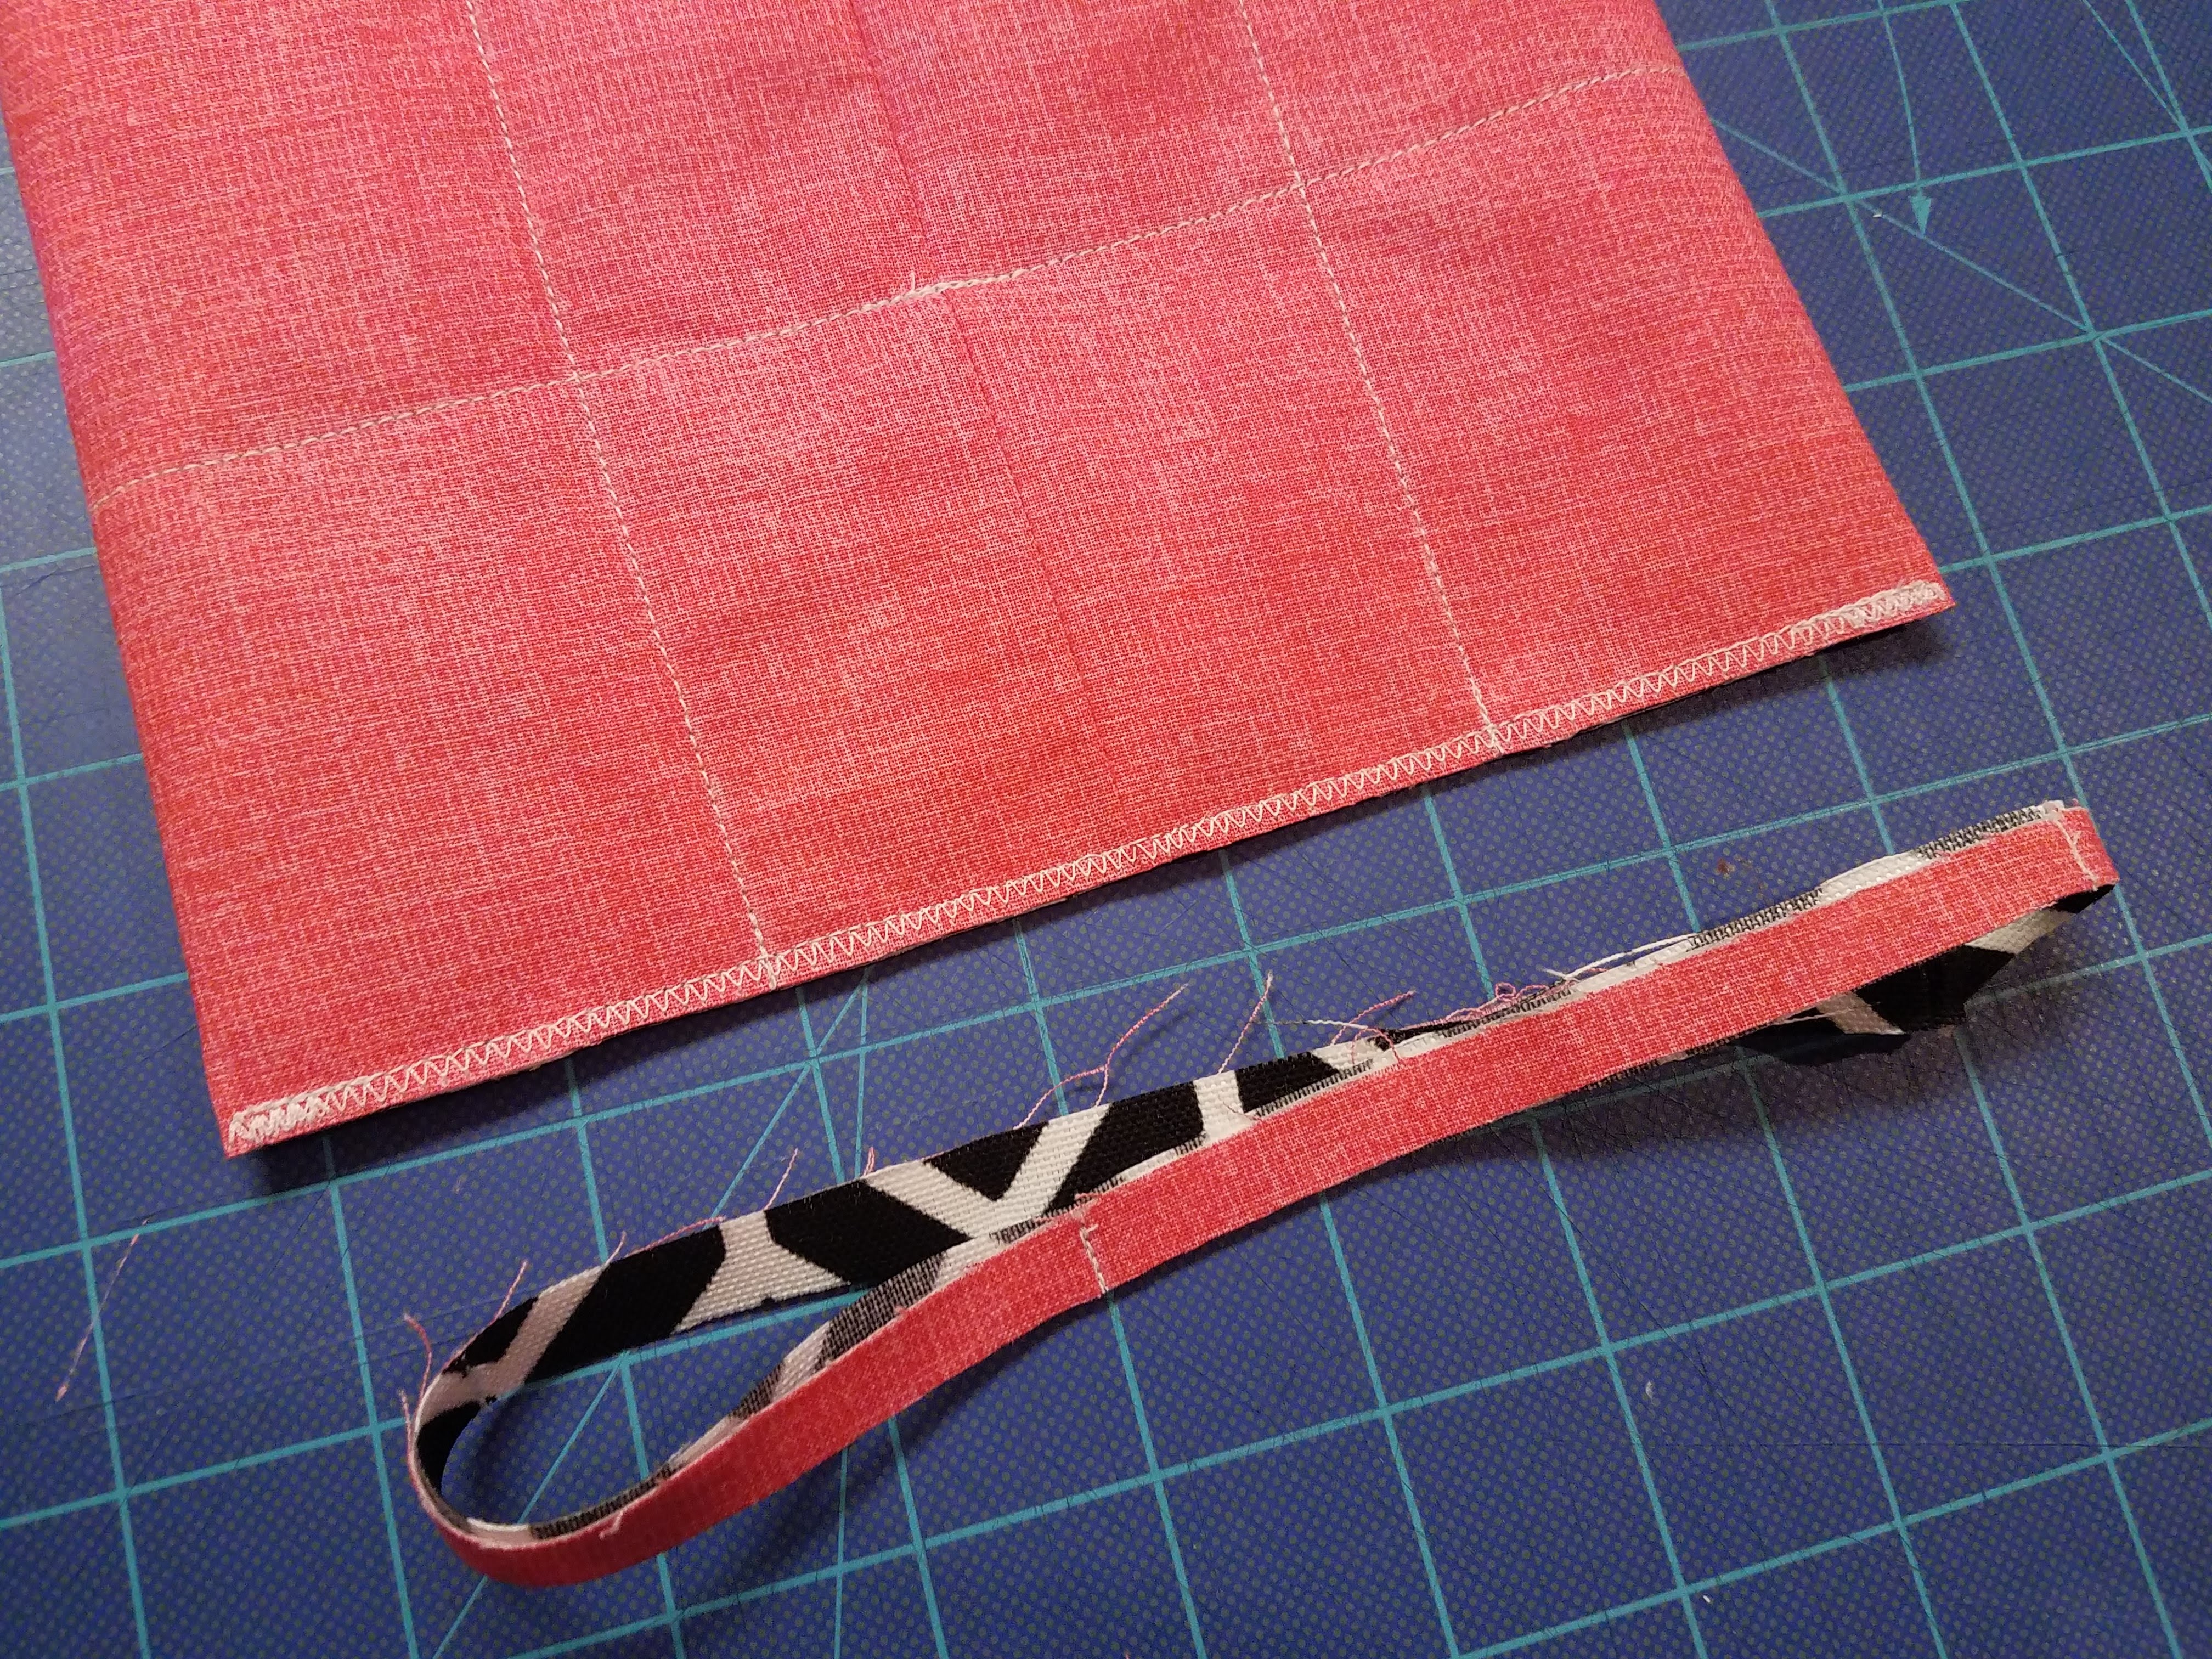
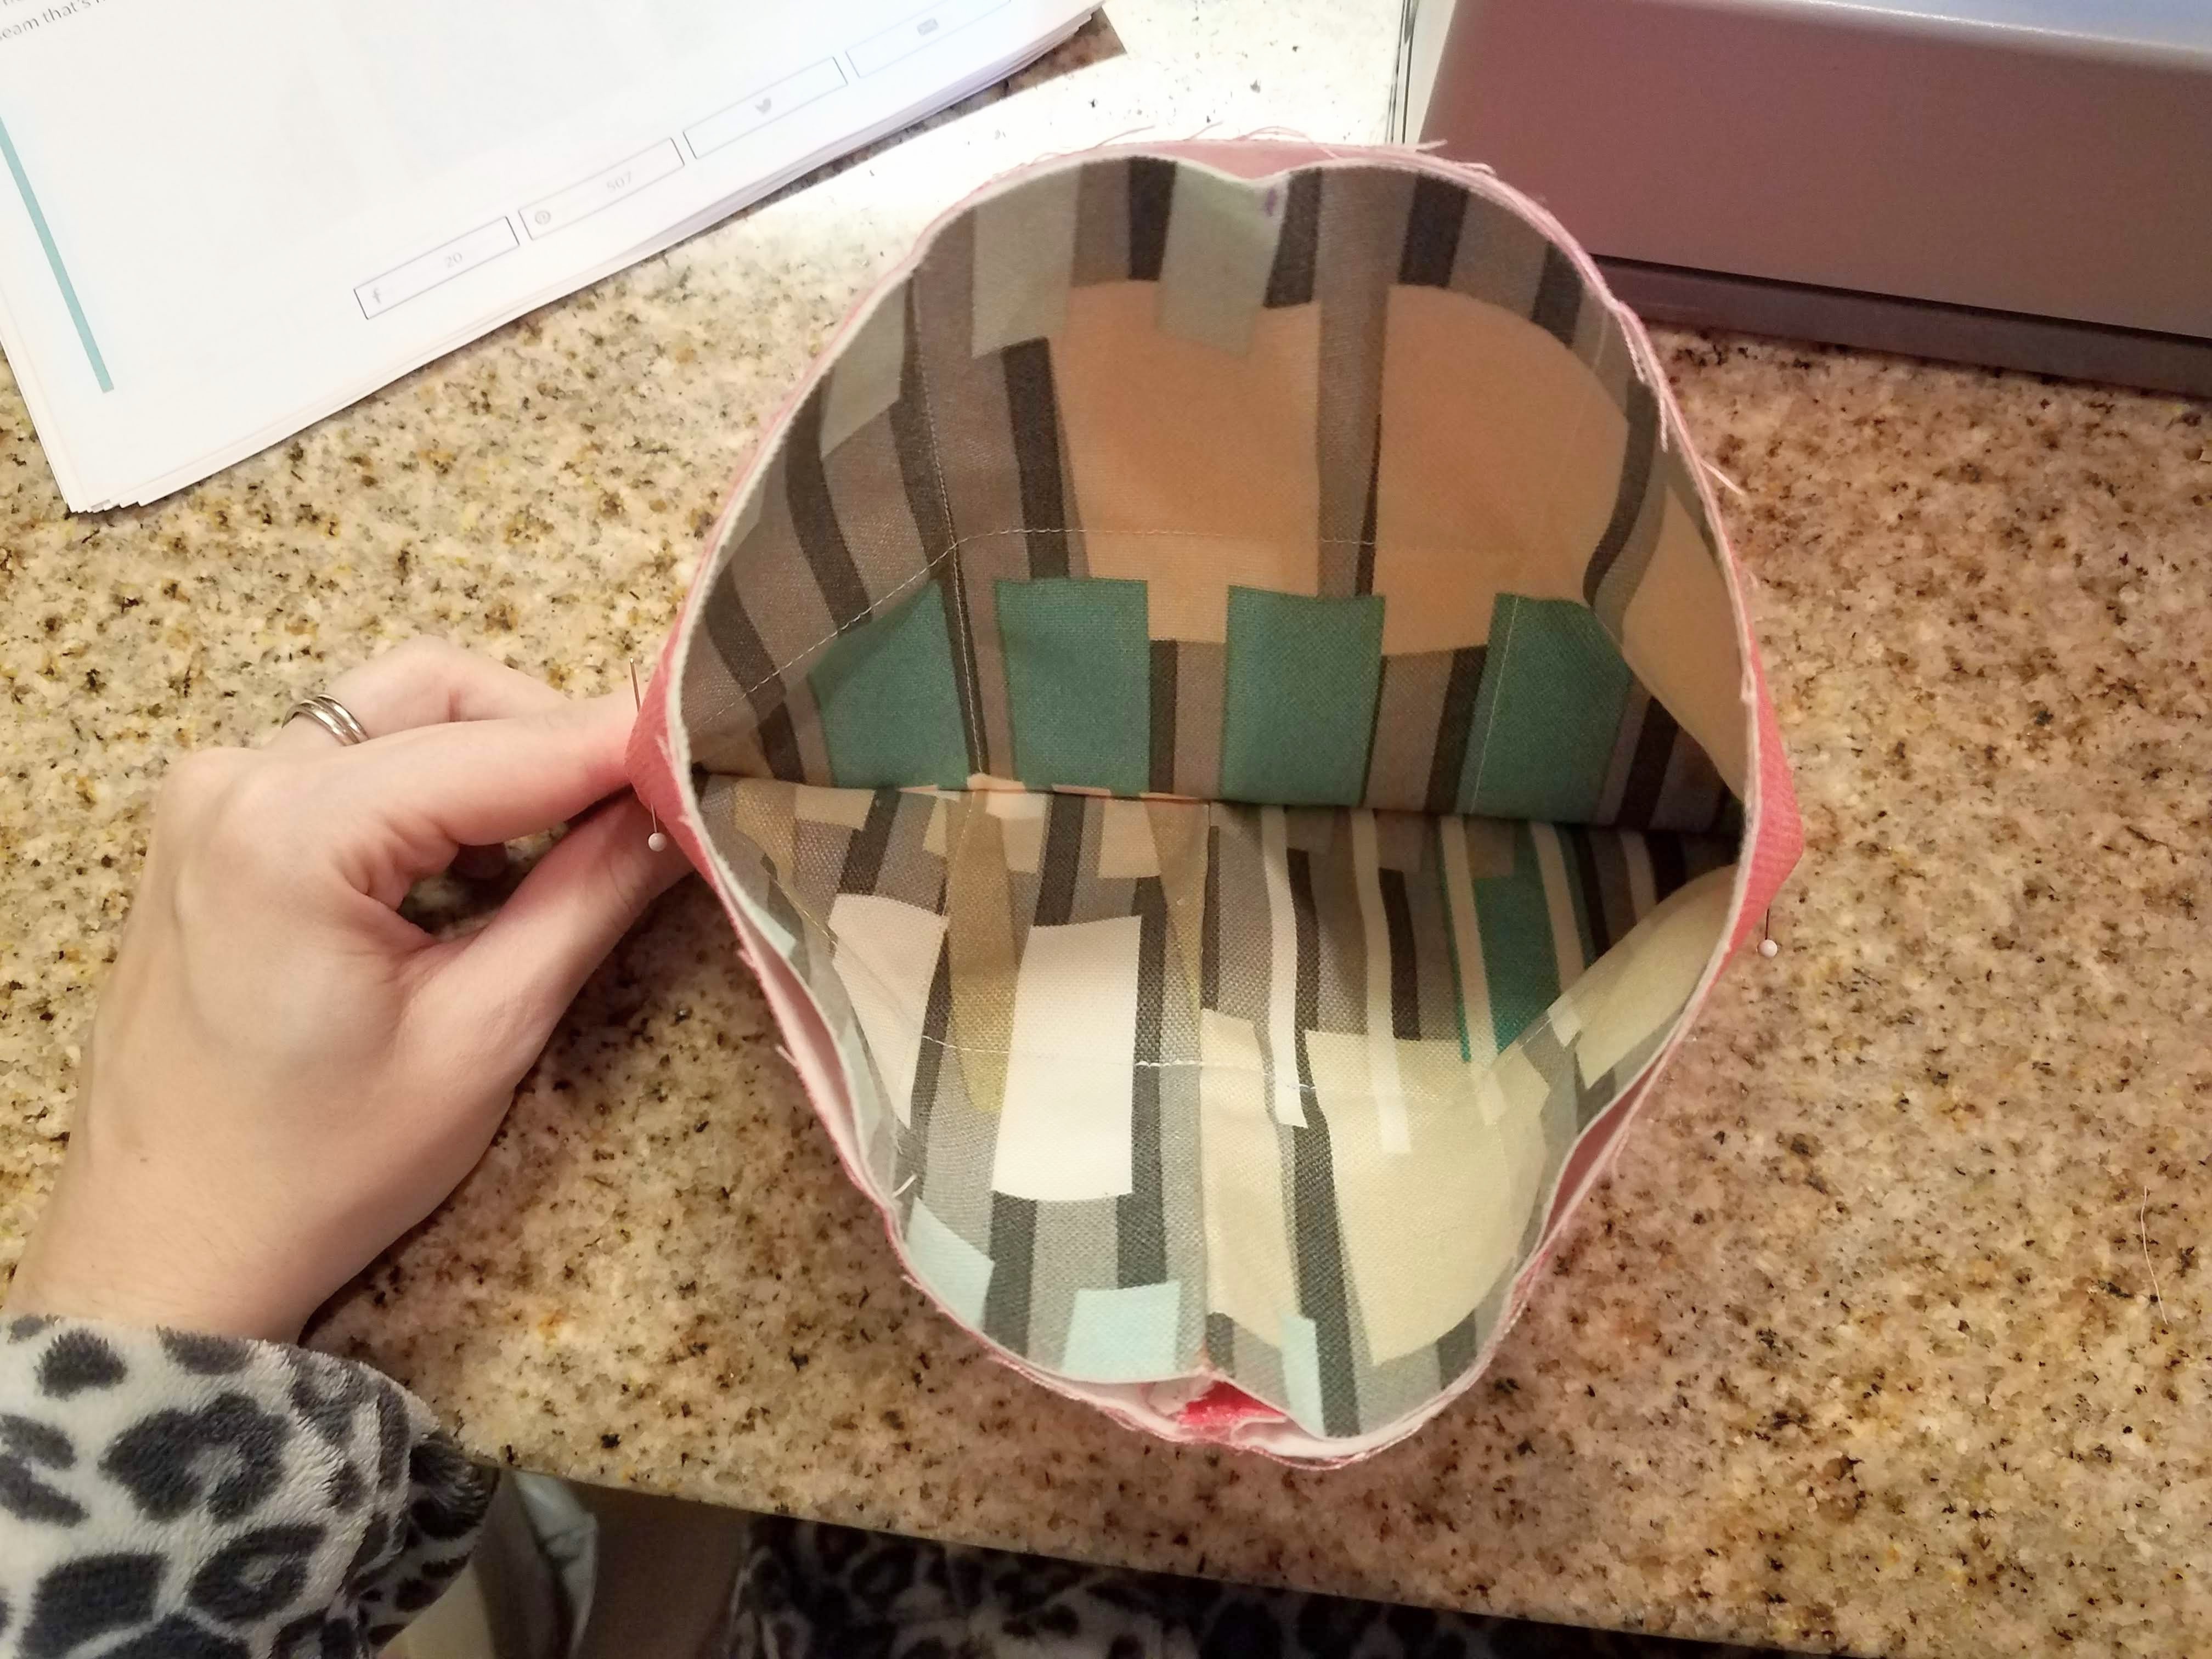
6. Sew the final vertical seams to make a tube. This will be the back of the box.
We’re going to work on the lining fabric first. For the outer fabric, we’re going to do some hand-sewing so the seam looks neat and hidden, but more on that soon.
CLOSING THE LINING FABRIC
Fold in half so the lining fabric is on the inside. You can pin the outside fabric back so it’s out of the way as you work on the lining.
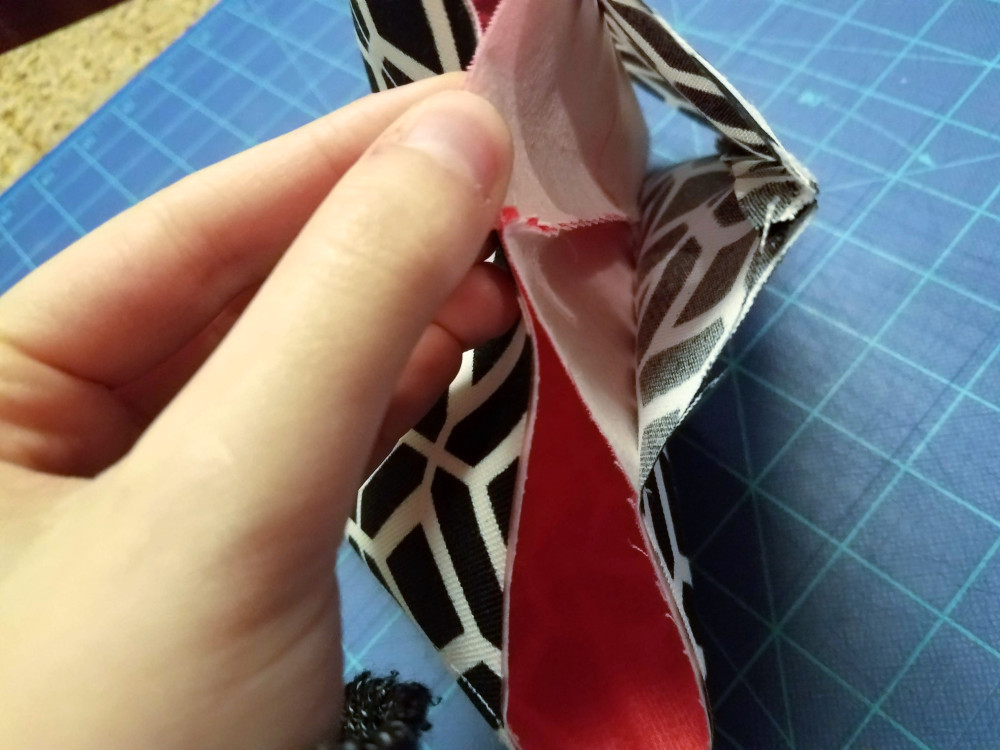
Notice your seam allowance marks on the lining (the 0.5″ and 16.5″ marks):
When you fold in half, make sure these marks line up opposite each other, along both the top edge and the bottom edge. To help with this, you can stick pins through one of your top marks and one of your bottom marks and then mark the other side of the lining fabric where the pin sticks through. Pin the lining fabric (and ONLY the lining fabric) together, making sure your seam allowance marks line up and your top edge lines up. The right and bottom edges will not necessarily line up, and that’s okay.
To make it easier, you can fold back and pin the outside fabric out of the way.
Next, draw a line connecting your seam allowance marks. This is where you will sew the seam to close the lining into a tube. Here’s how it should look before sewing:
Using the same stitch settings as before, sew a basic straight stitch along the line you just created. It will end up like this: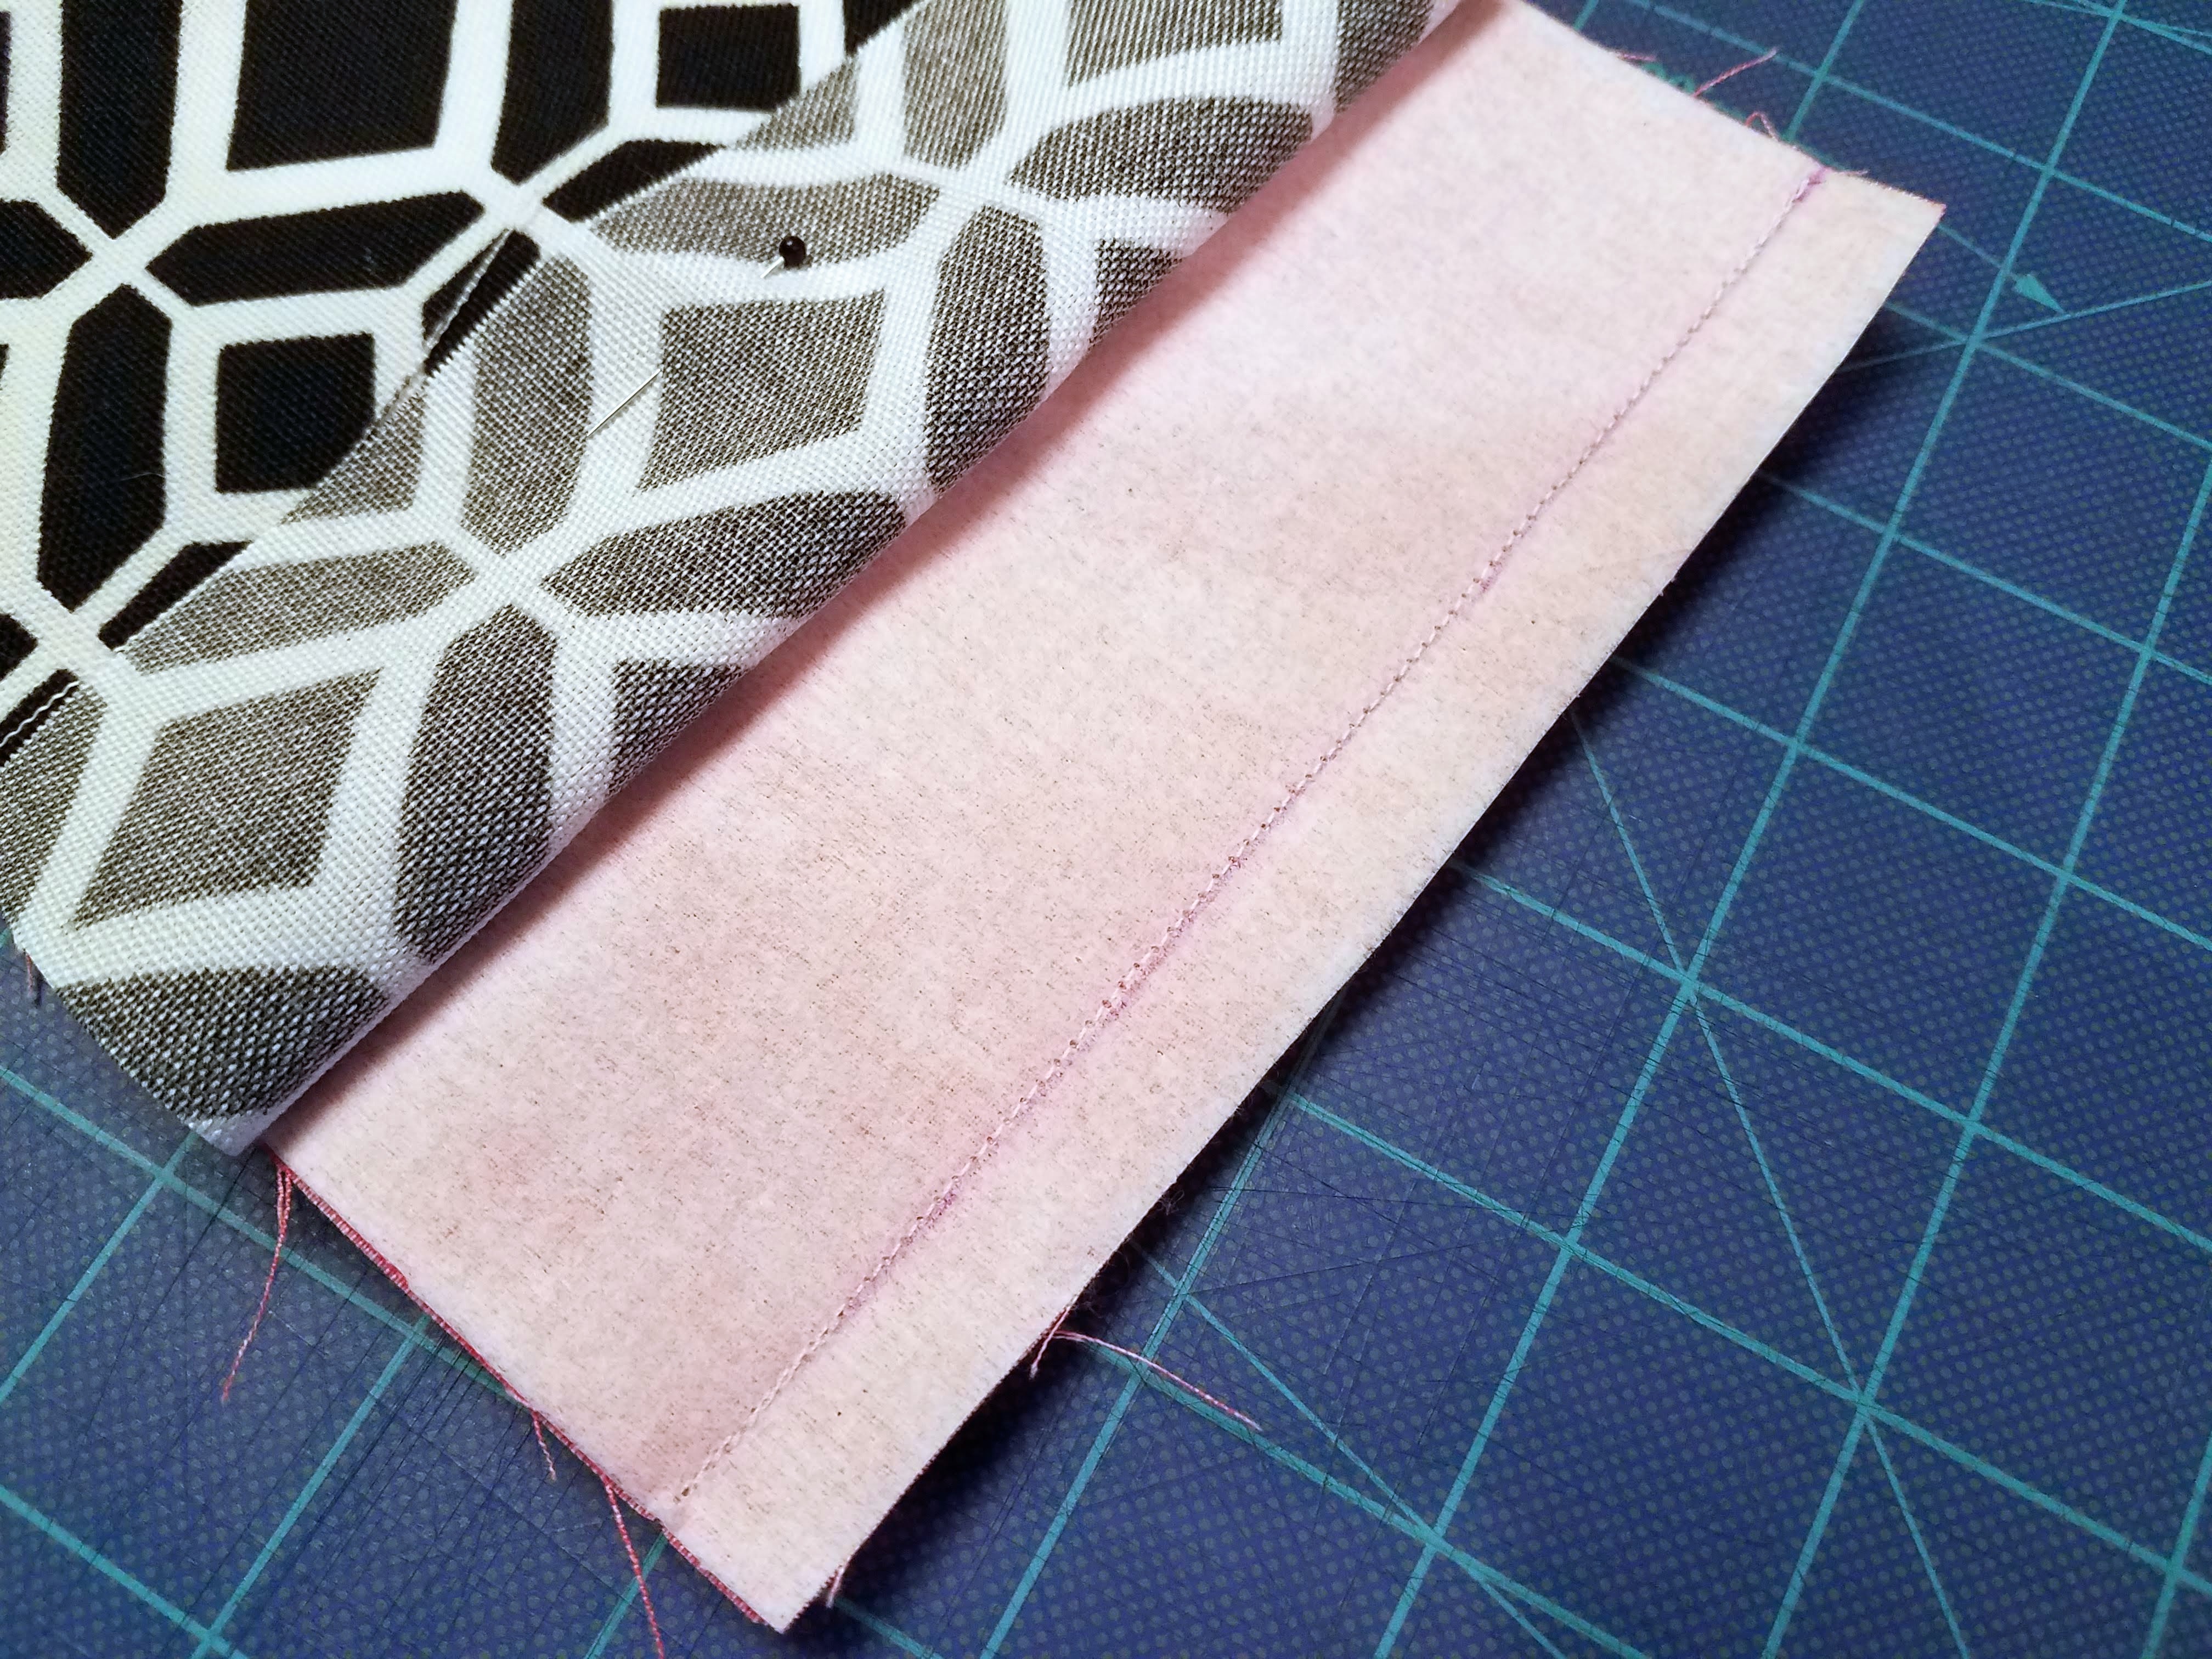
Use your pinking shears to trim nice and close to the seam: 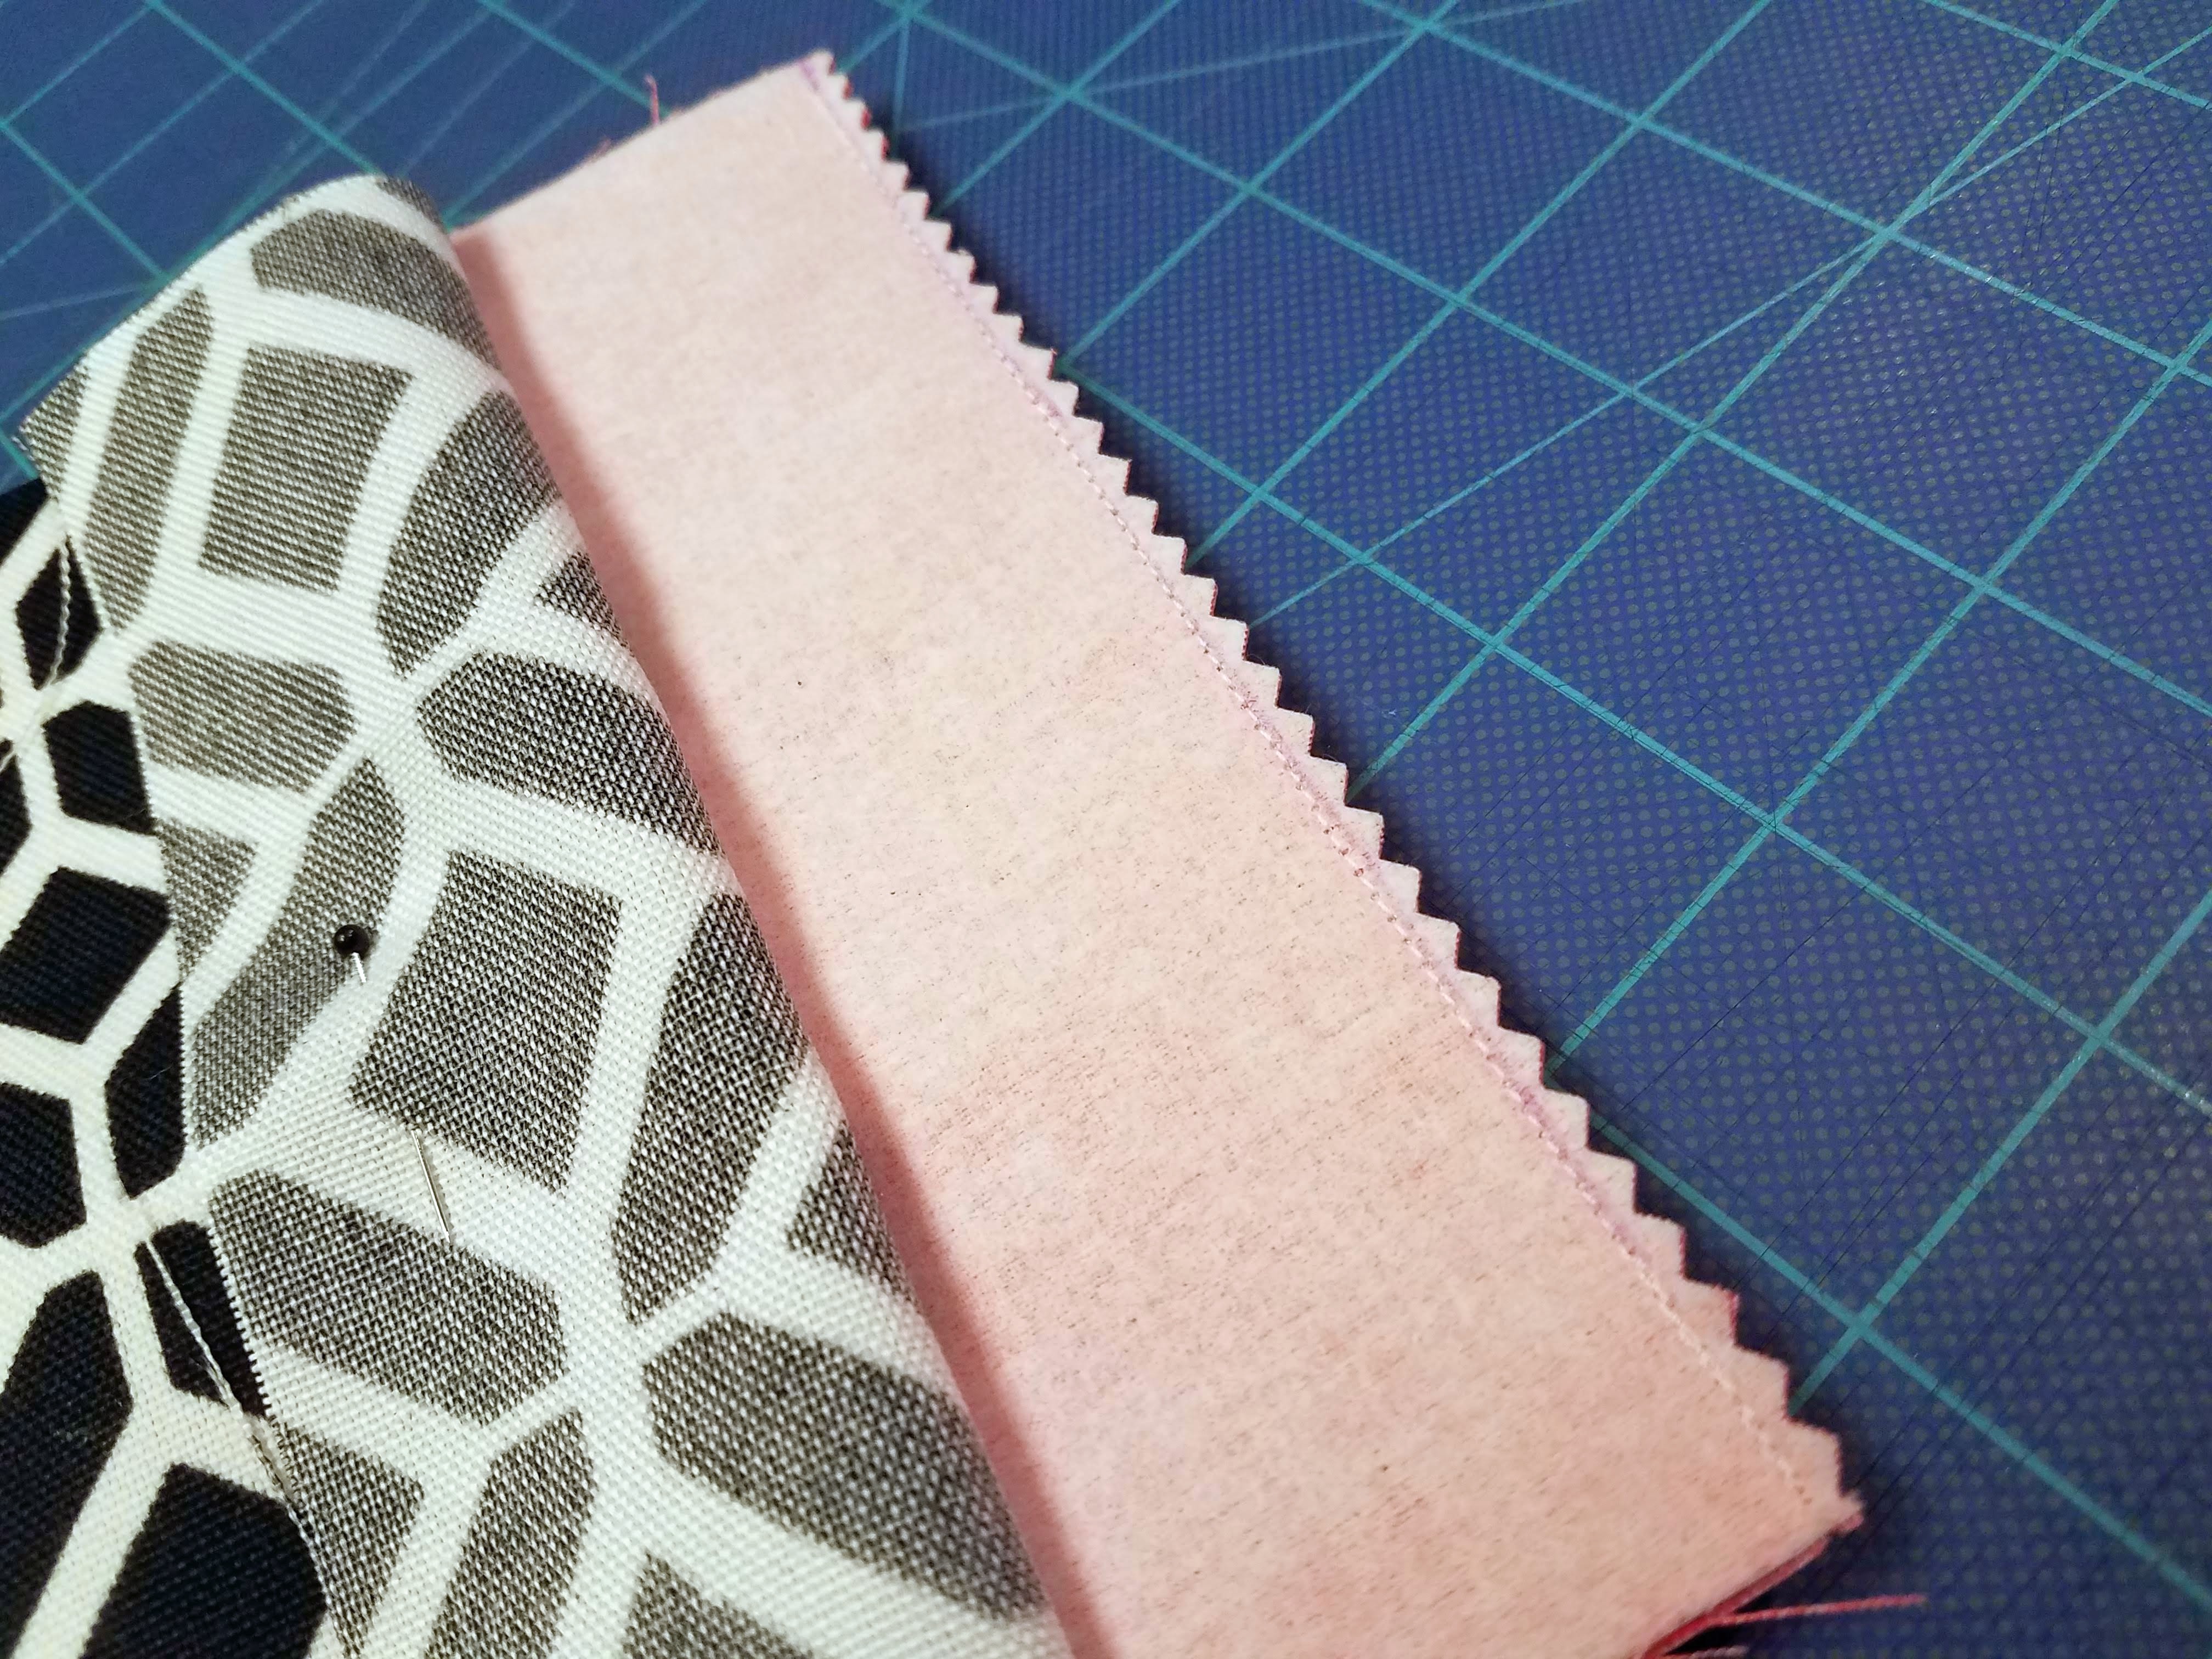
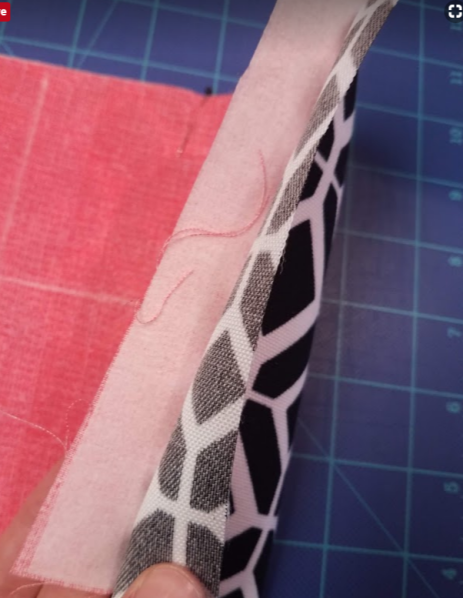
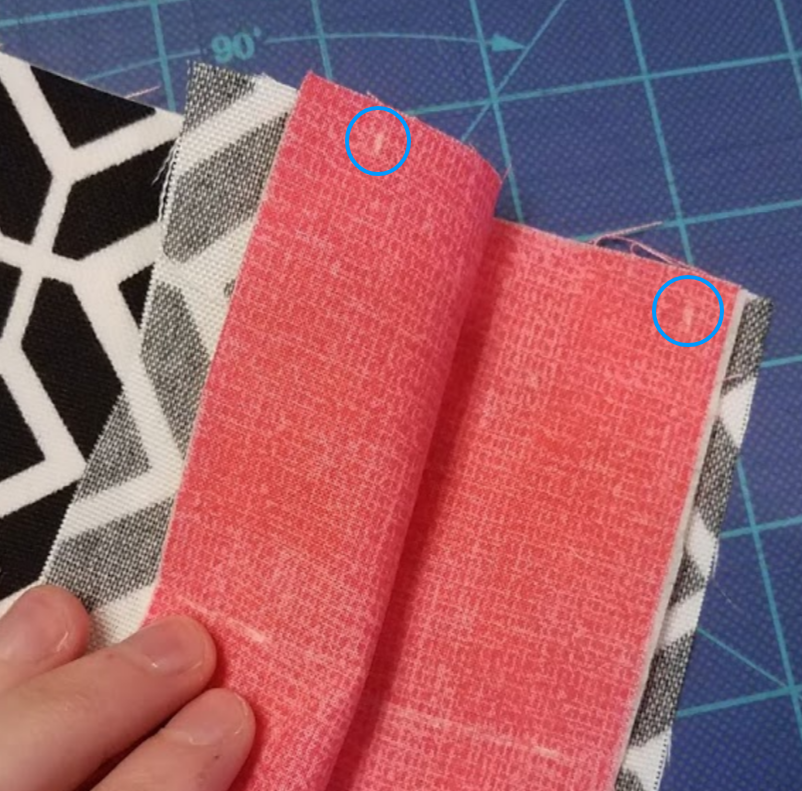
CLOSING THE OUTER FABRIC
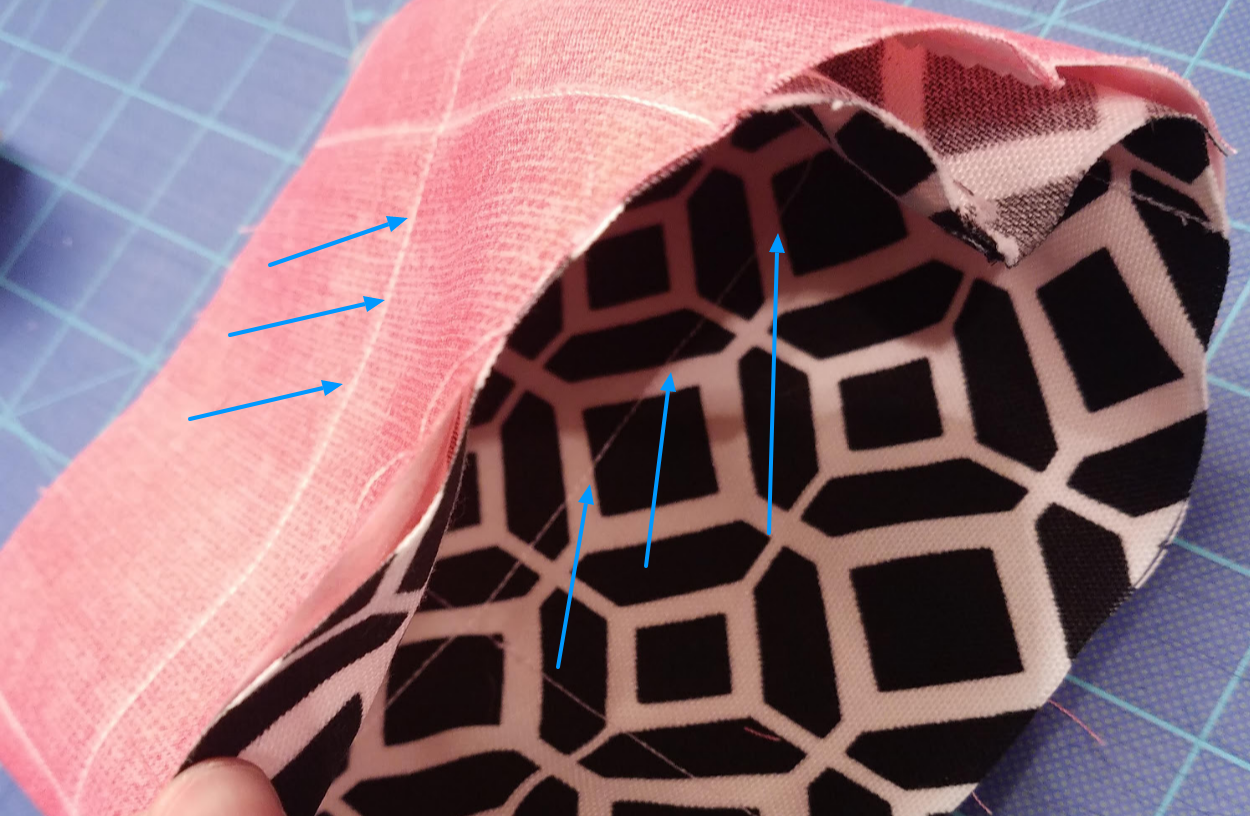
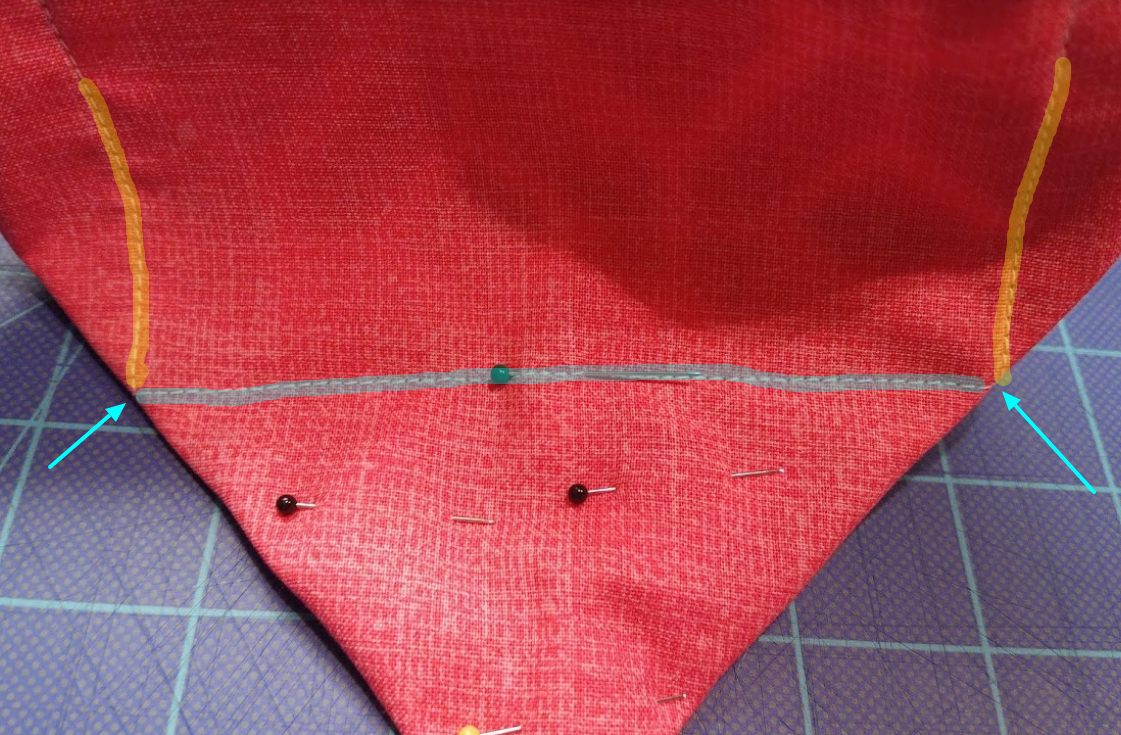
We’re going to hand-sew the outer fabric so the seam is hidden. Or use this technique to construct this seam on your sewing machine. To make sure it’s nice and neat and we don’t end up with extra fabric bunching up in the back, we need to mark where we want our seam for the outer fabric so it fits nicely over the inner fabric.
Unpin the outer fabric. Now see where the last seam you just sewed is in the lining (marked by blue arrows below)? You want to mark where that seam falls on the outer fabric. Mark along the top edge and the bottom edge on both flaps of the outside fabric. In this photo, I’m showing you the top edge. You’ll see that my right edges don’t line up; that’s okay. Duplicate these marks along the bottom edge: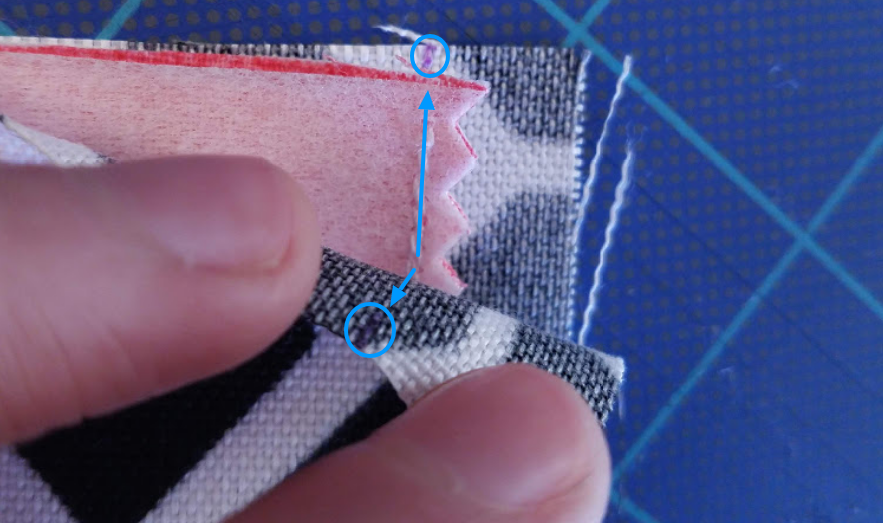
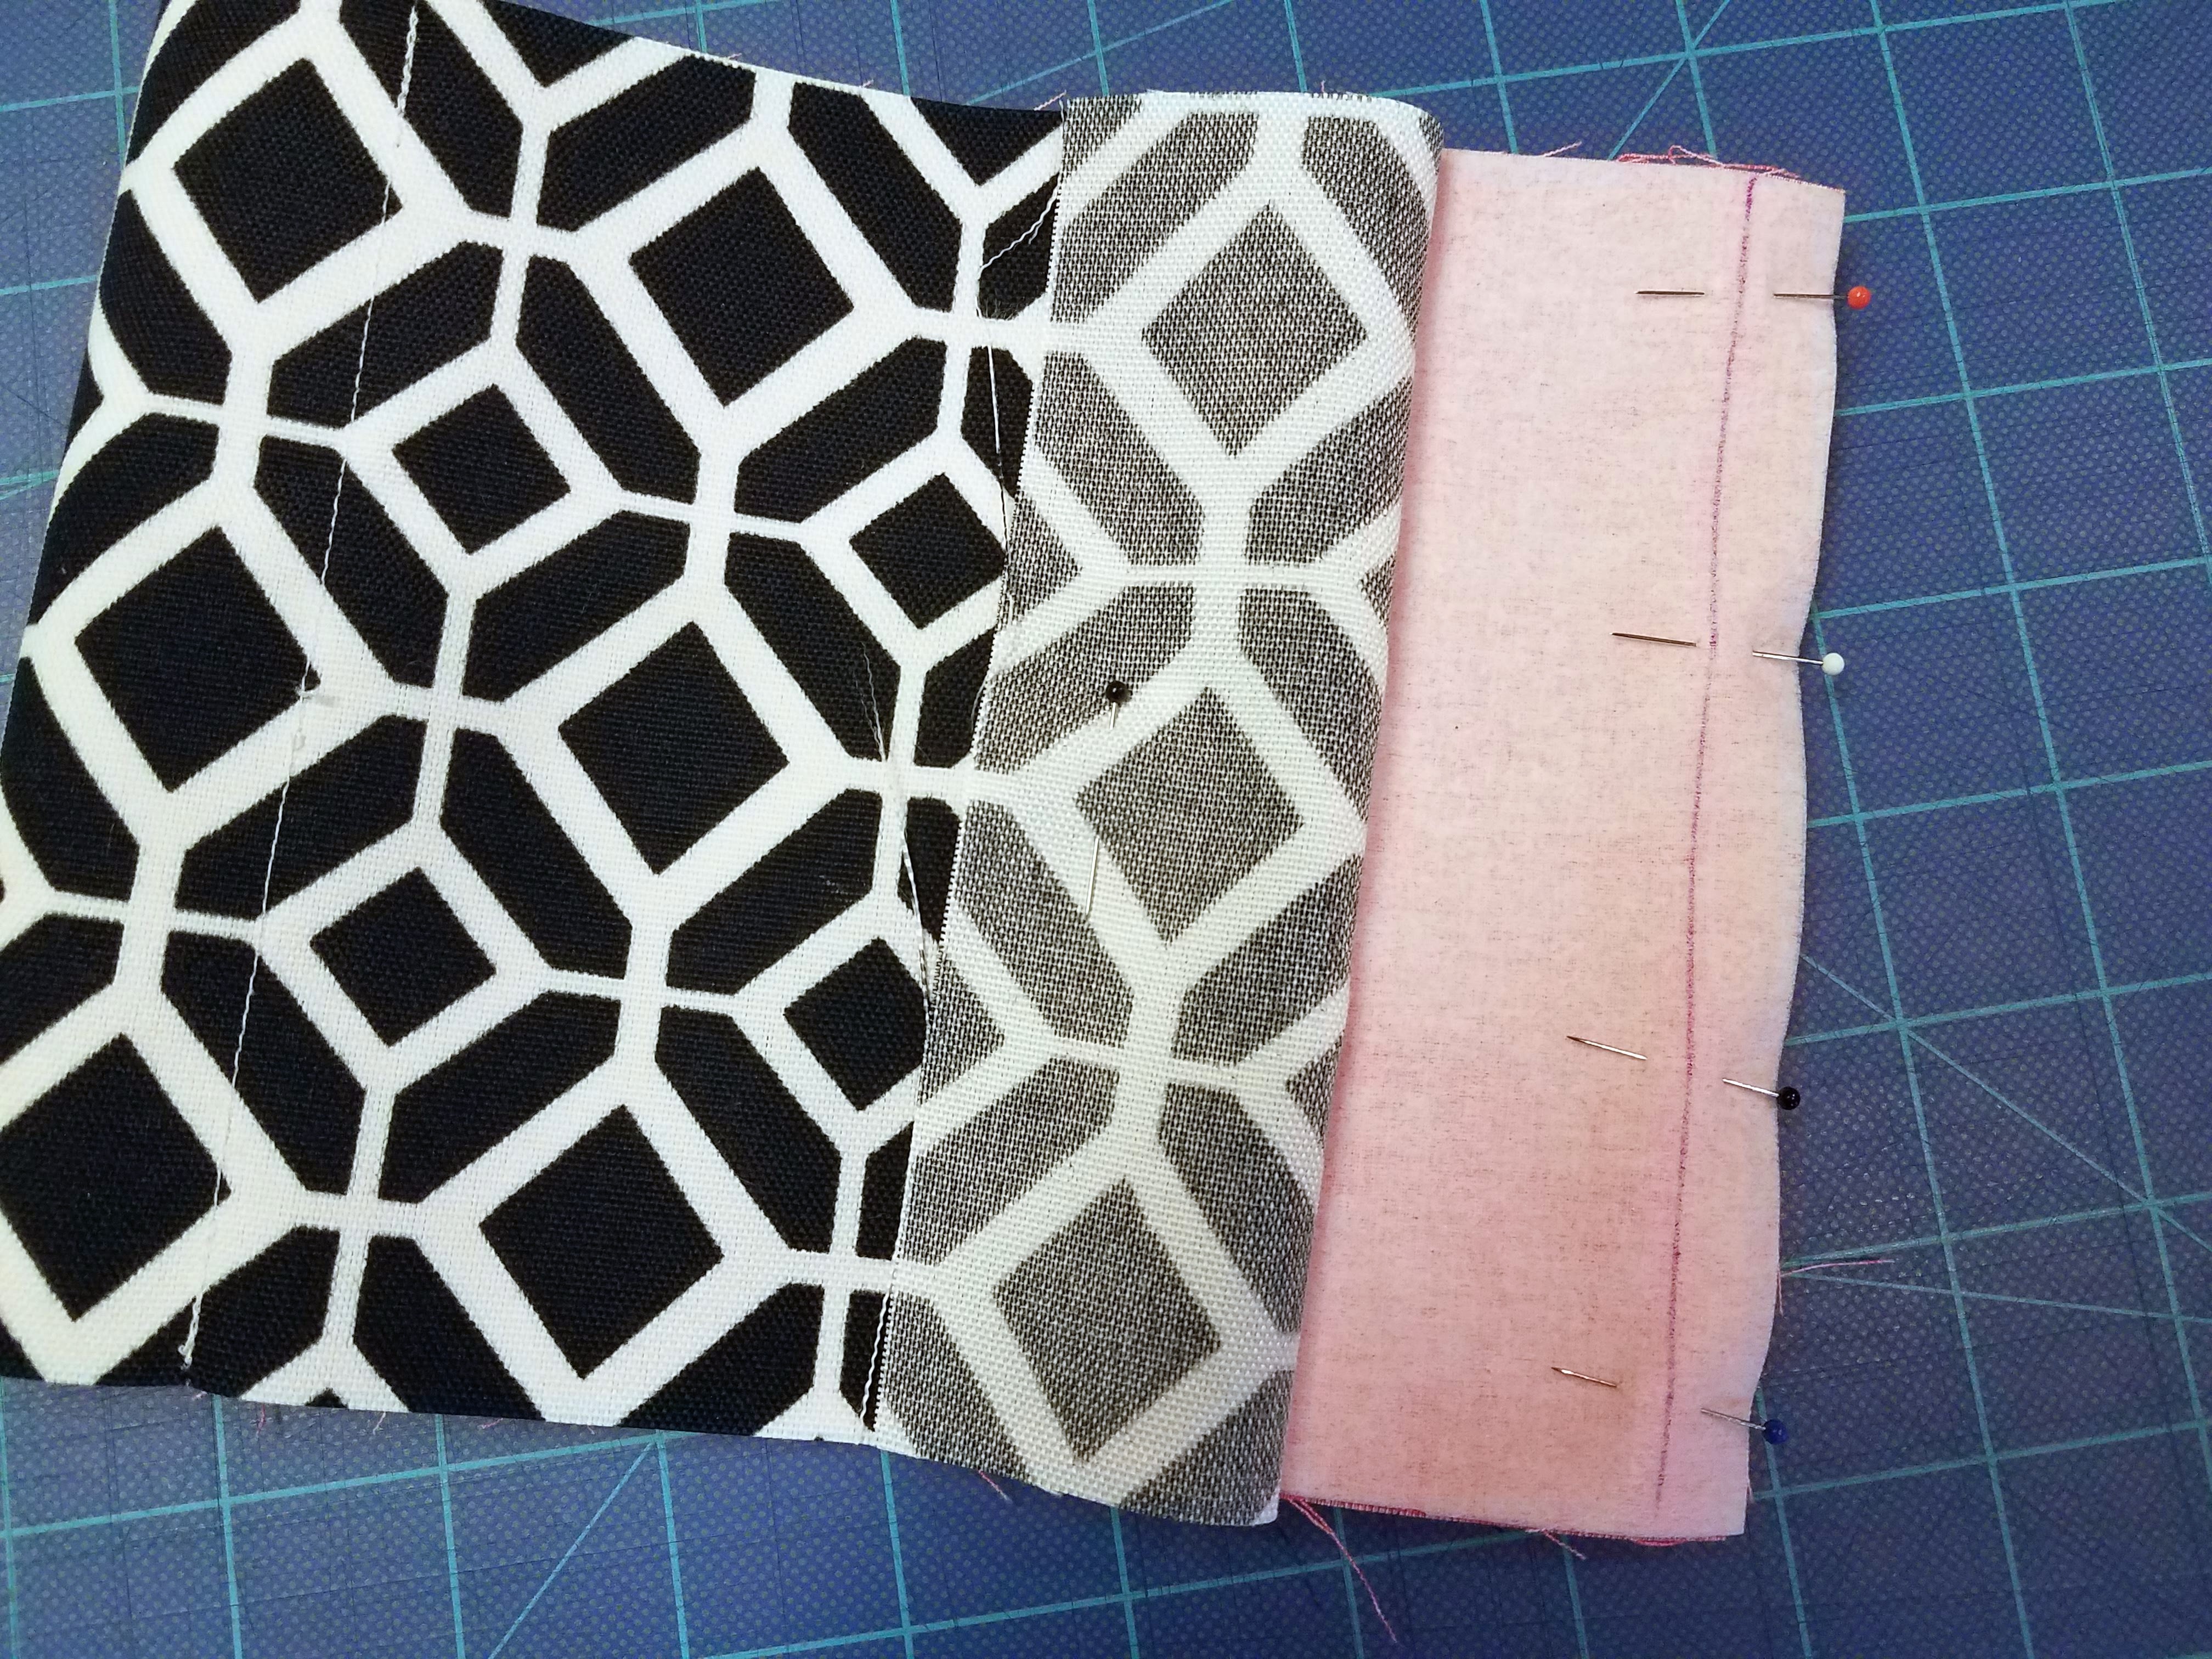
Fold the edges over along these marks and pin them down. If drawing a line to guide you is helpful, go for it; make sure it’s on the wrong side of the fabric though. Here’s how it should look:
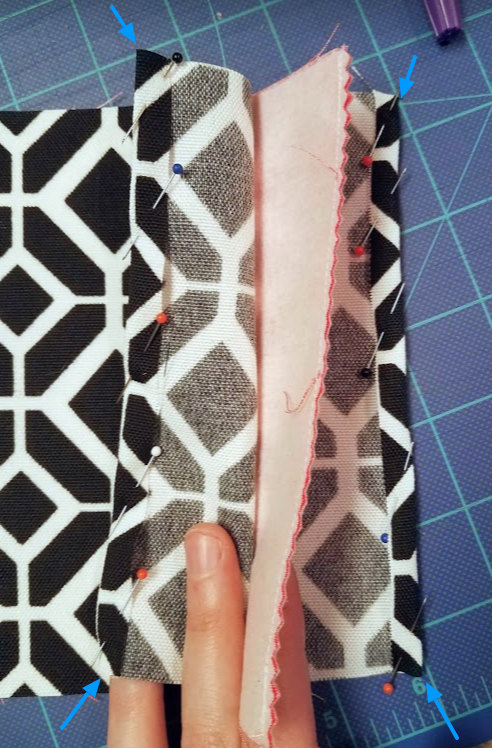
My pins are angled. There’s no reason behind that. It’s just how I ended up doing it. You can leave yours perpendicular to the fabric, or however you need them to be so they’re as out of the way as they can be for ironing. Notice the blue arrows; that’s where the marks you made in the previous step should be on the wrong side of the fabric.
Now, iron those folds you just made. This is going to make your hand-sewing a lot easier. Be careful not to drag your iron over the pins since they can scratch the plate of your iron. You can press on top of them though. If you have plastic heads like mine, keep your iron away from them or they’ll melt.
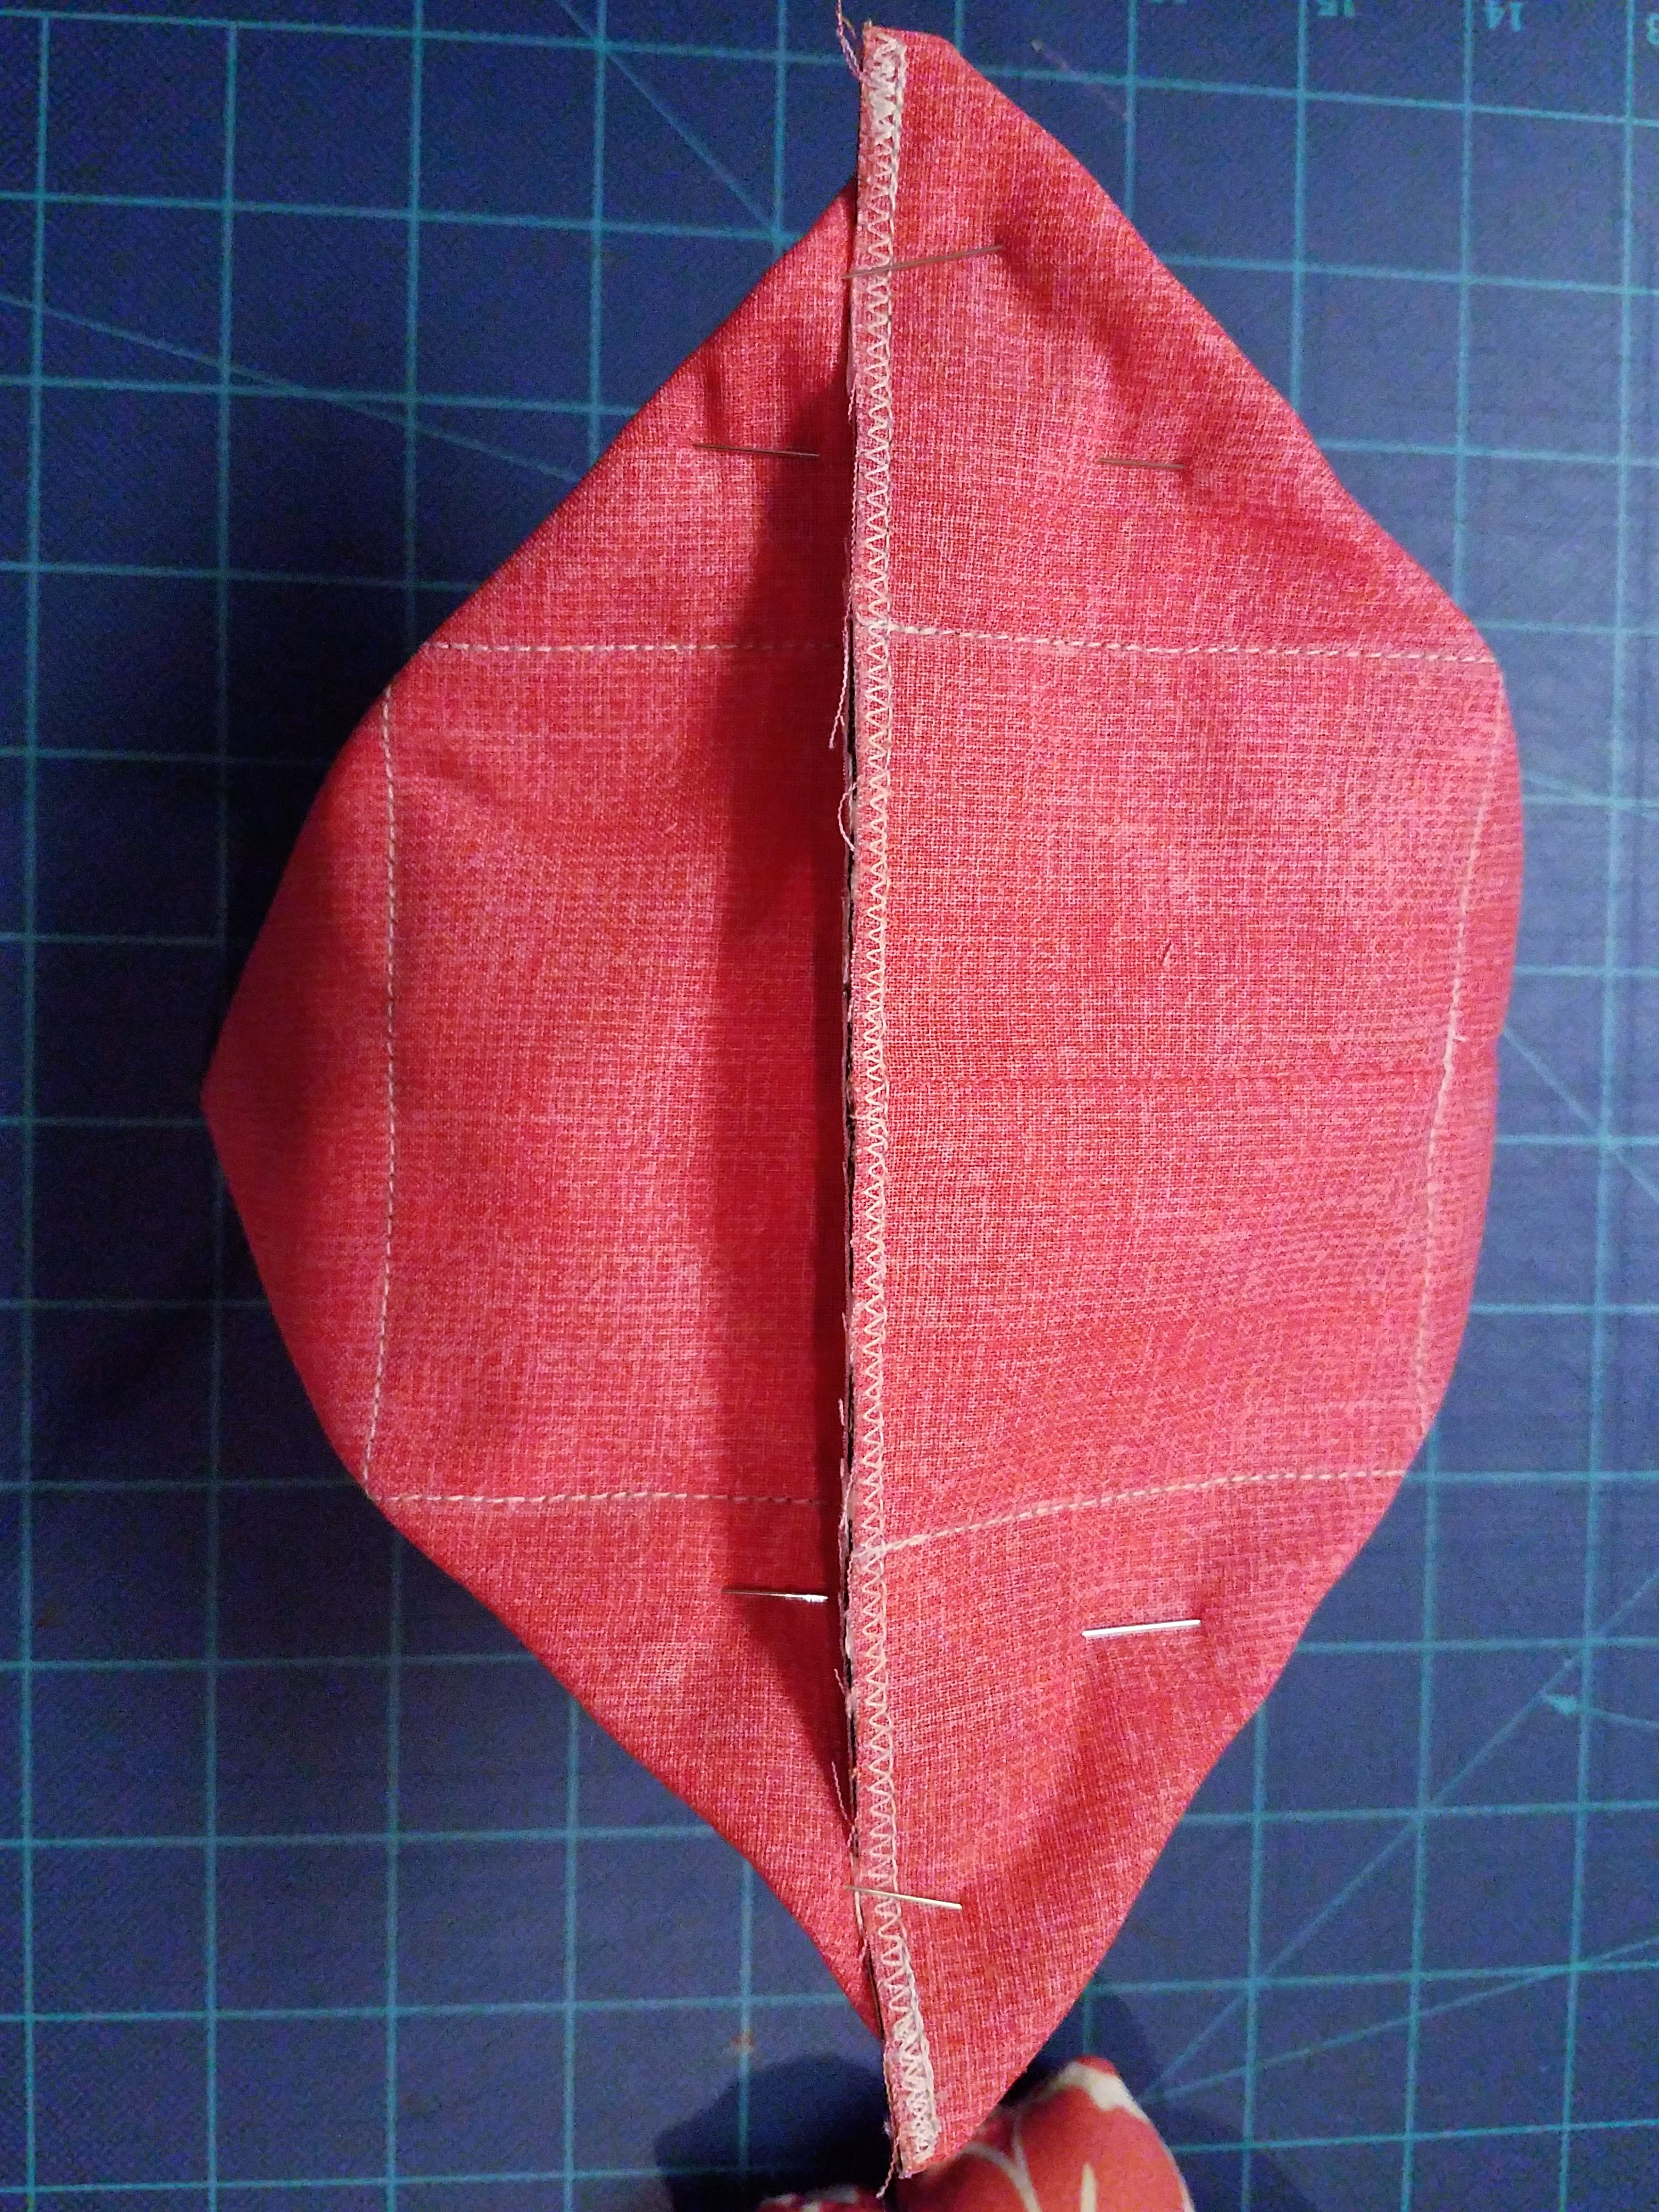
After you’ve ironed and you have nice defined folds, you can remove the pins, and then pin the edges together like this:
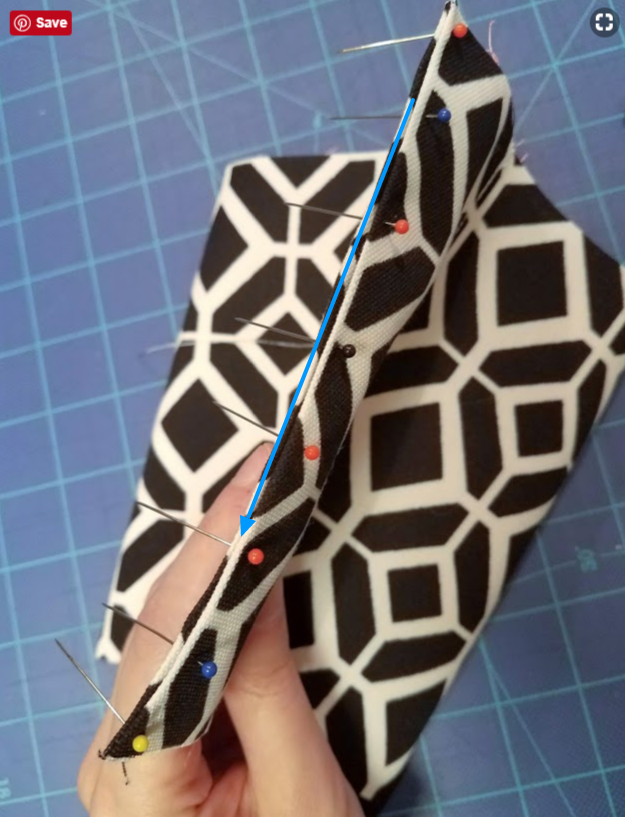
Now you’re ready to hand-sew using a ladder stitch. I use about an arm’s length of thread for this size box, doubled up (as you’ll see in this guide on how to ladder stitch.) I find it works best for me to pull the thread along the direction of the arrow in my photo above (if you’re starting from the orange pin) when I’m tightening the stitches. If you start from the yellow pin, just pull the other way.
If you need to pin the lining fabric out of the way inside the tube, go for it. Sometimes I have to so I’m sure to not catch it in any of my stitches. The outer and inner fabric should not be joined along this seam.
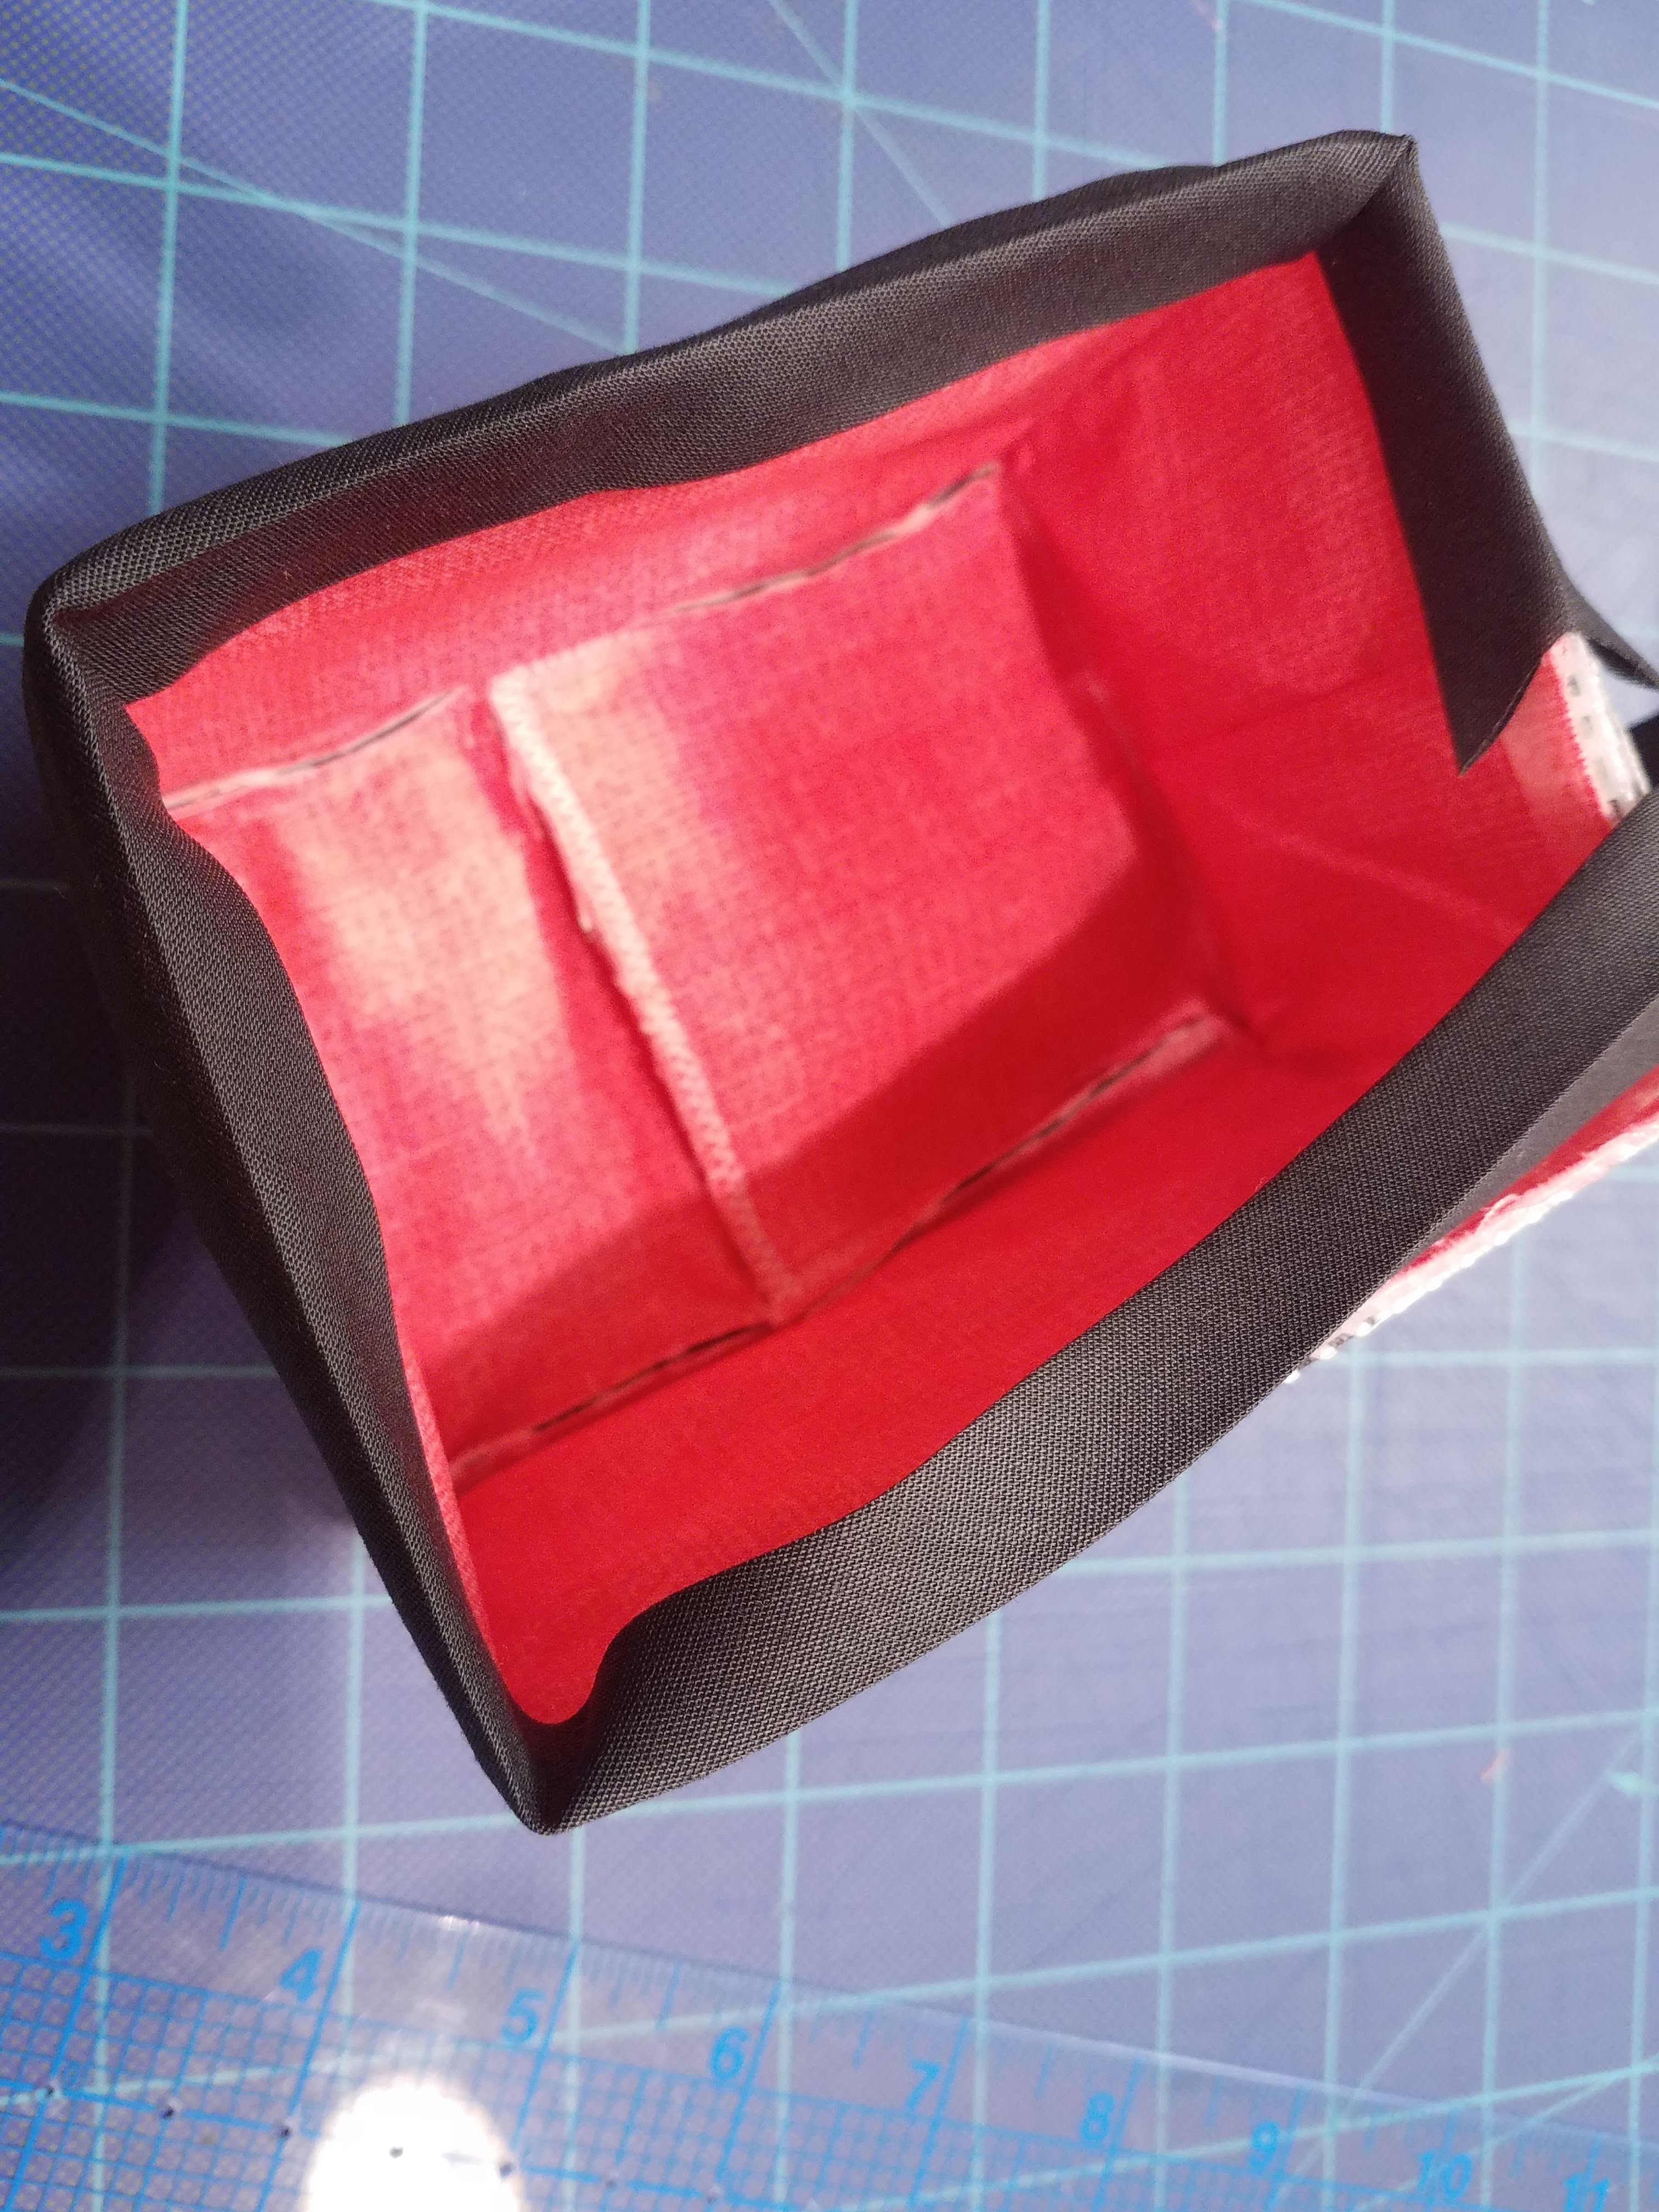
When you’re done, you should have a nice hidden seam like you see below. Take heart if it’s you’re first time sewing a ladder stitch and you think it doesn’t look very good. The more you do it, the better you’ll get.
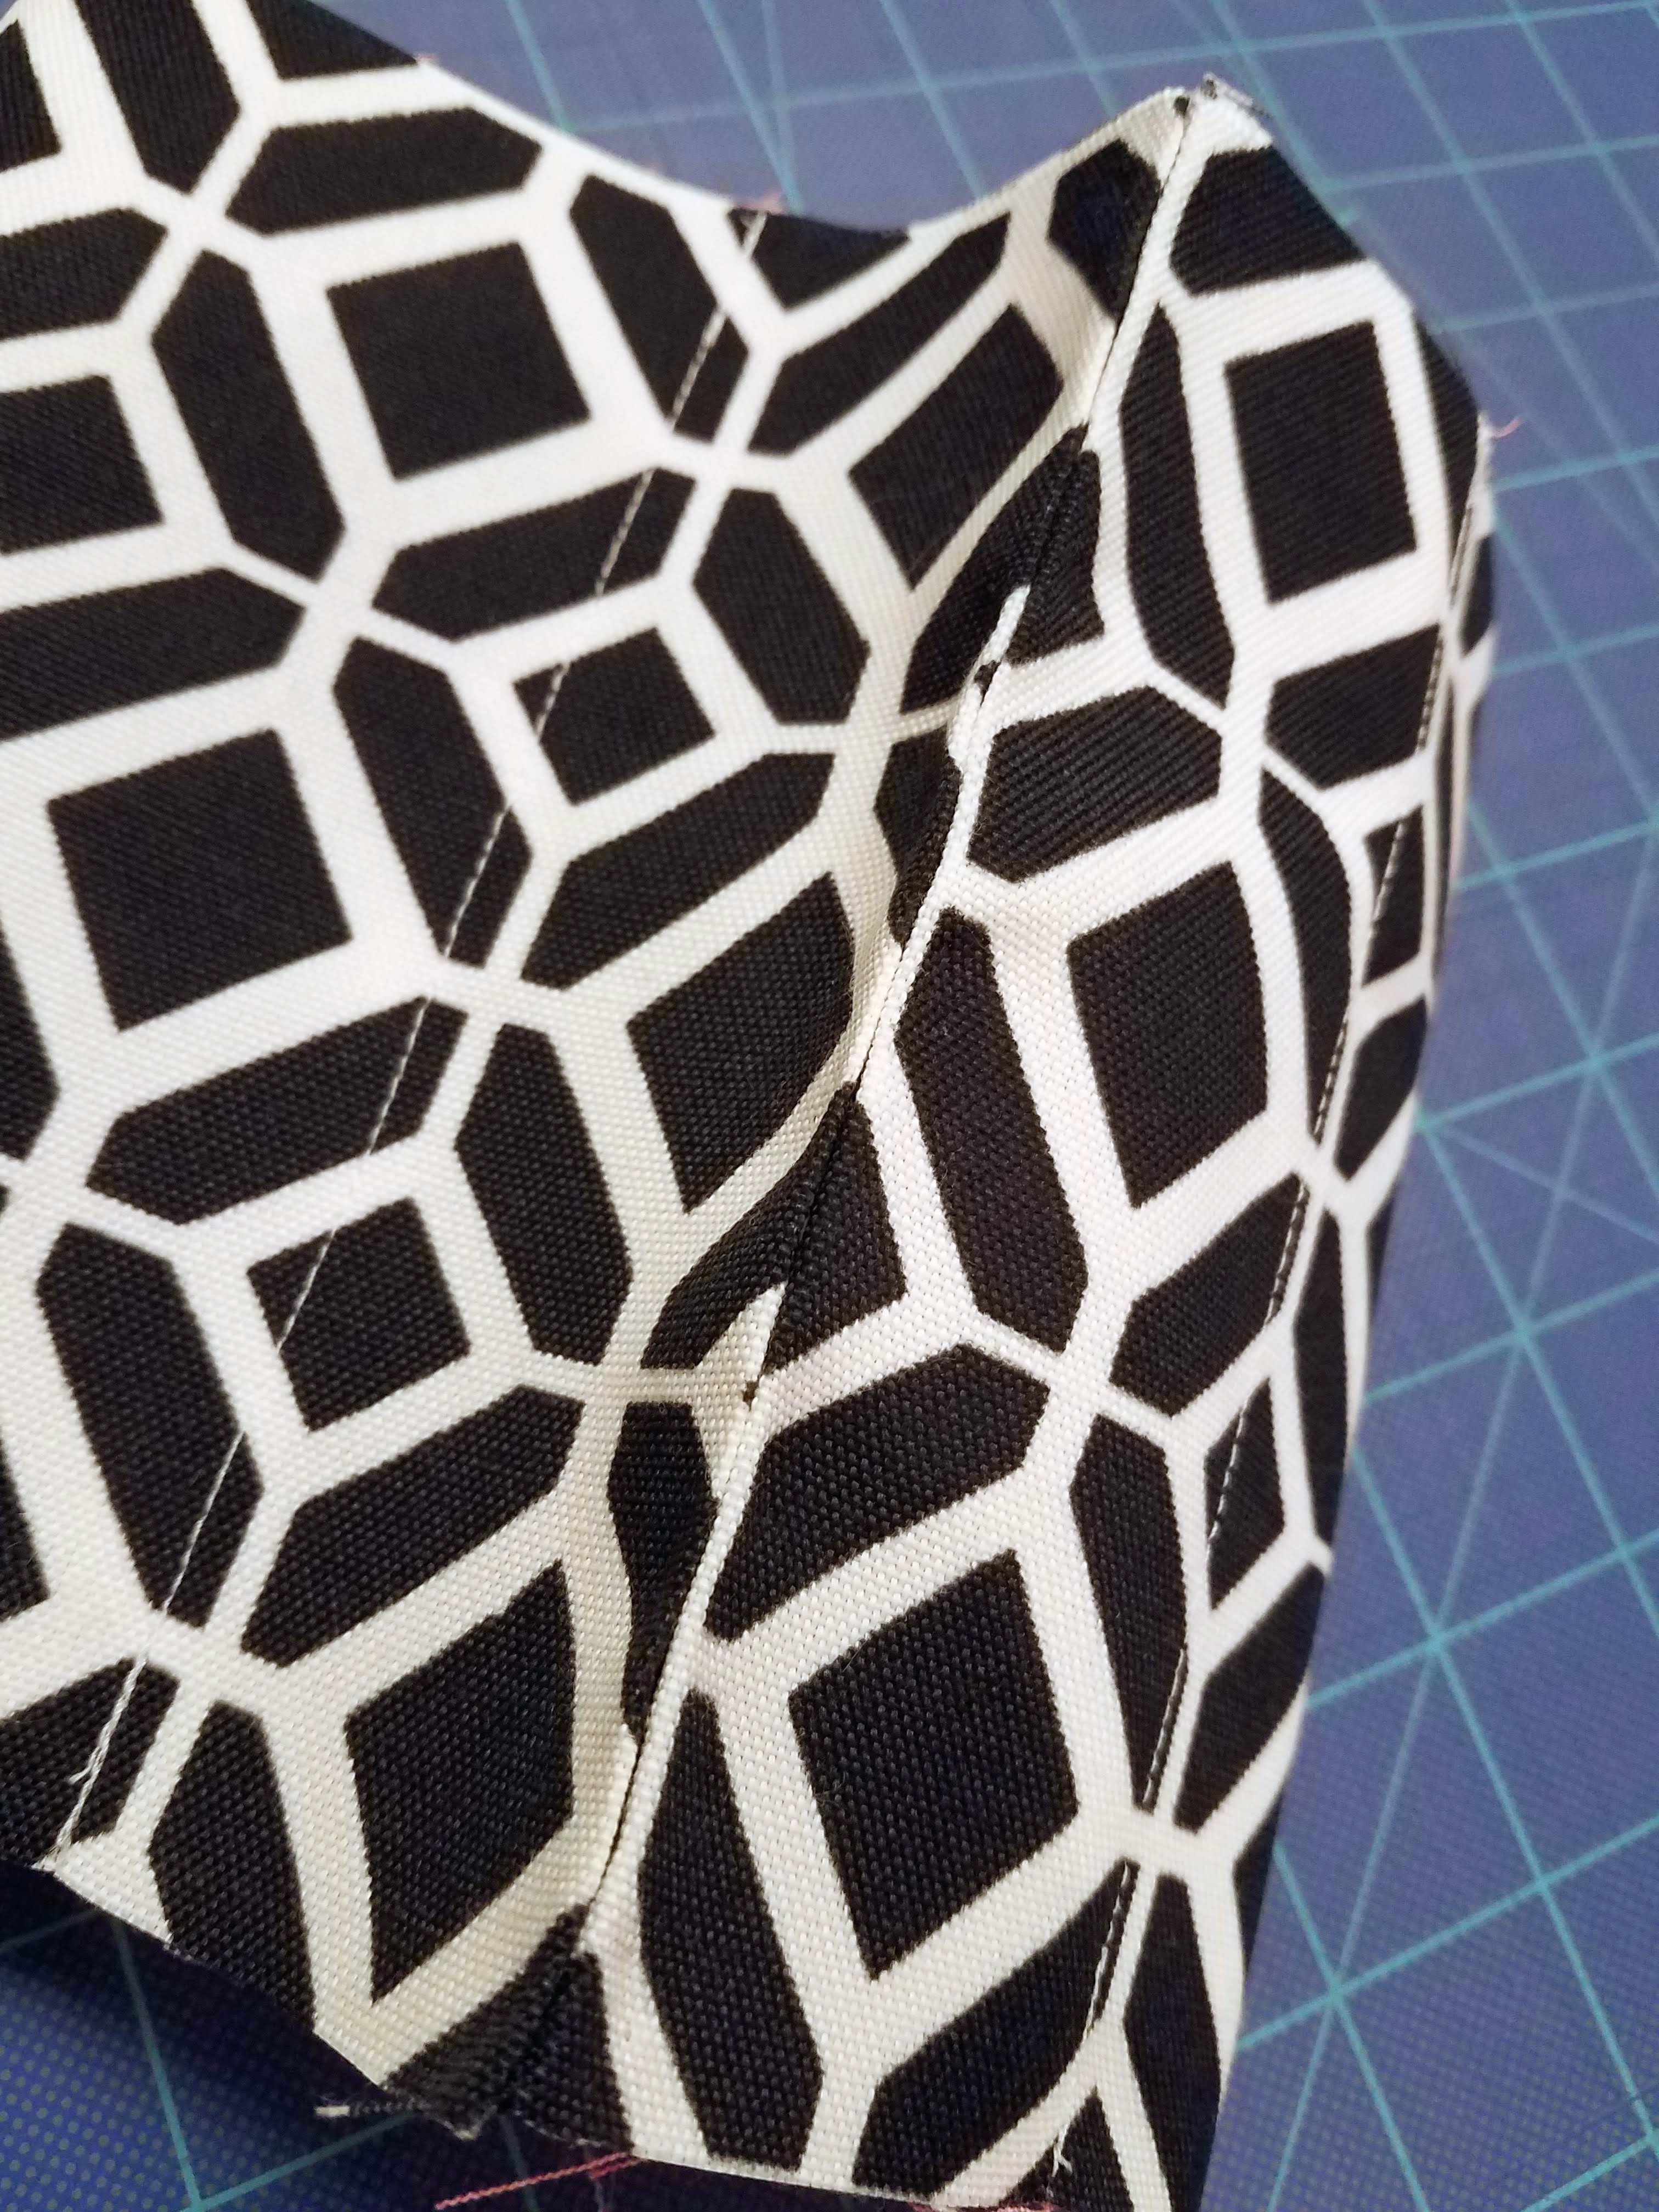
So now you have a tube. You’ll notice the extra fabric inside that seam you just hand-sewed. You can attempt to pink it if you want; I usually just iron it so it lays nice and flat one way or another. There’s not much room to maneuver pinking shears in that compartment.
7. Sew along the horizontal mark.
Turn your tube inside out. You should (hopefully) still see the horizontal mark you made 3″ (or whatever height your box is) from the top.
Slide the removable extension table off your sewing machine so you can work around your free arm. Most machines have this feature:
Now slide your tube over the free arm, lining up your mark with the needle. You’ll be sewing one long seam around the tube through one layer of inner fabric and one layer of outer fabric. This seam (marked by blue arrows below) becomes the bottom perimeter of your box.
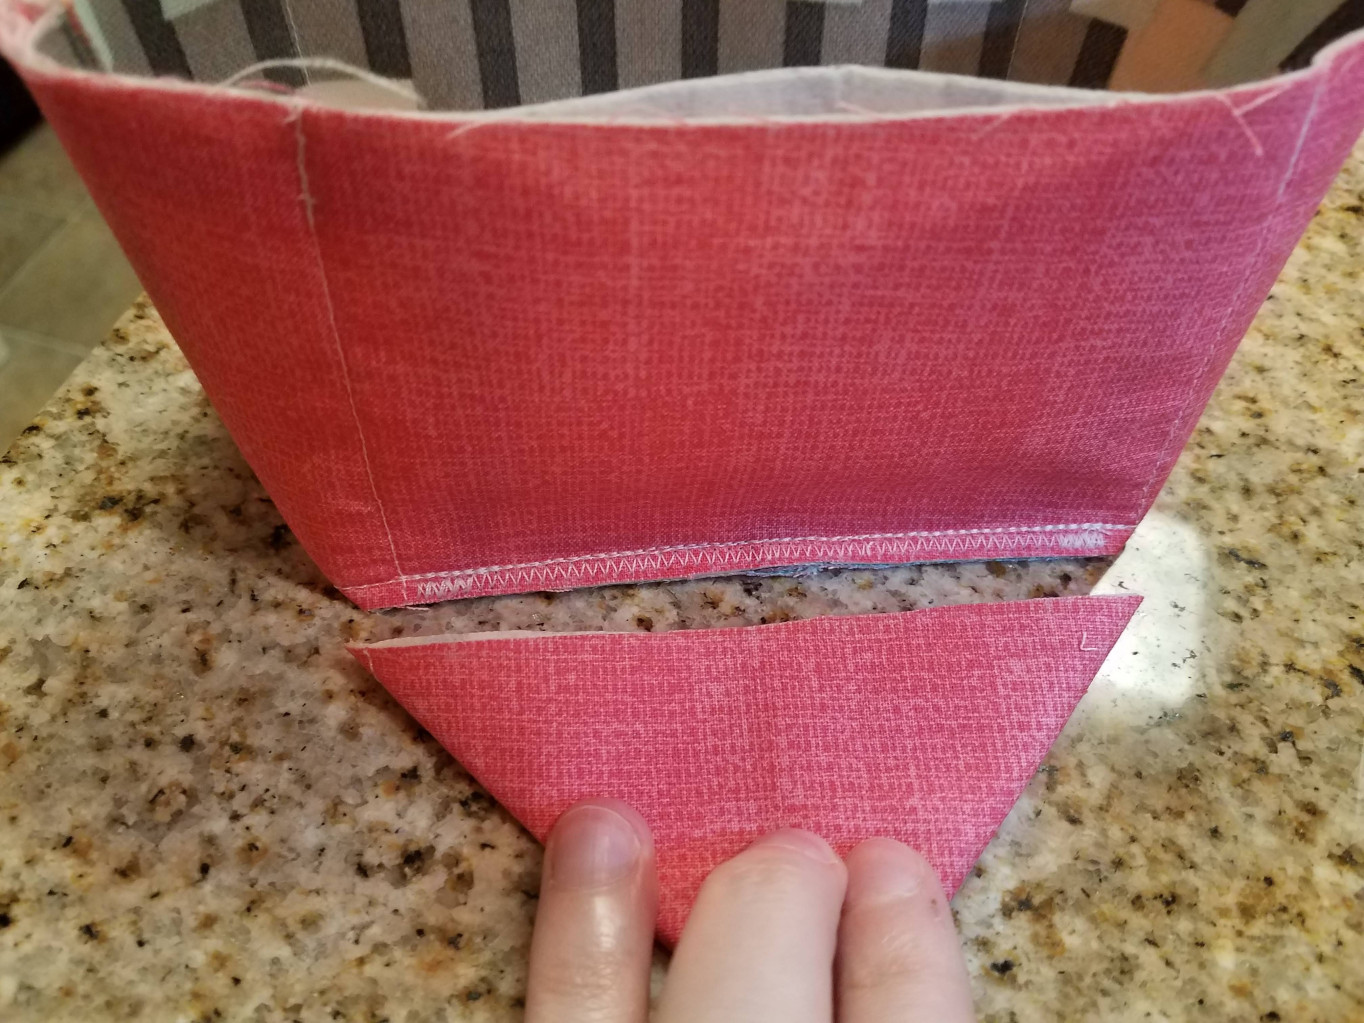
8. Sew the bottom closed.
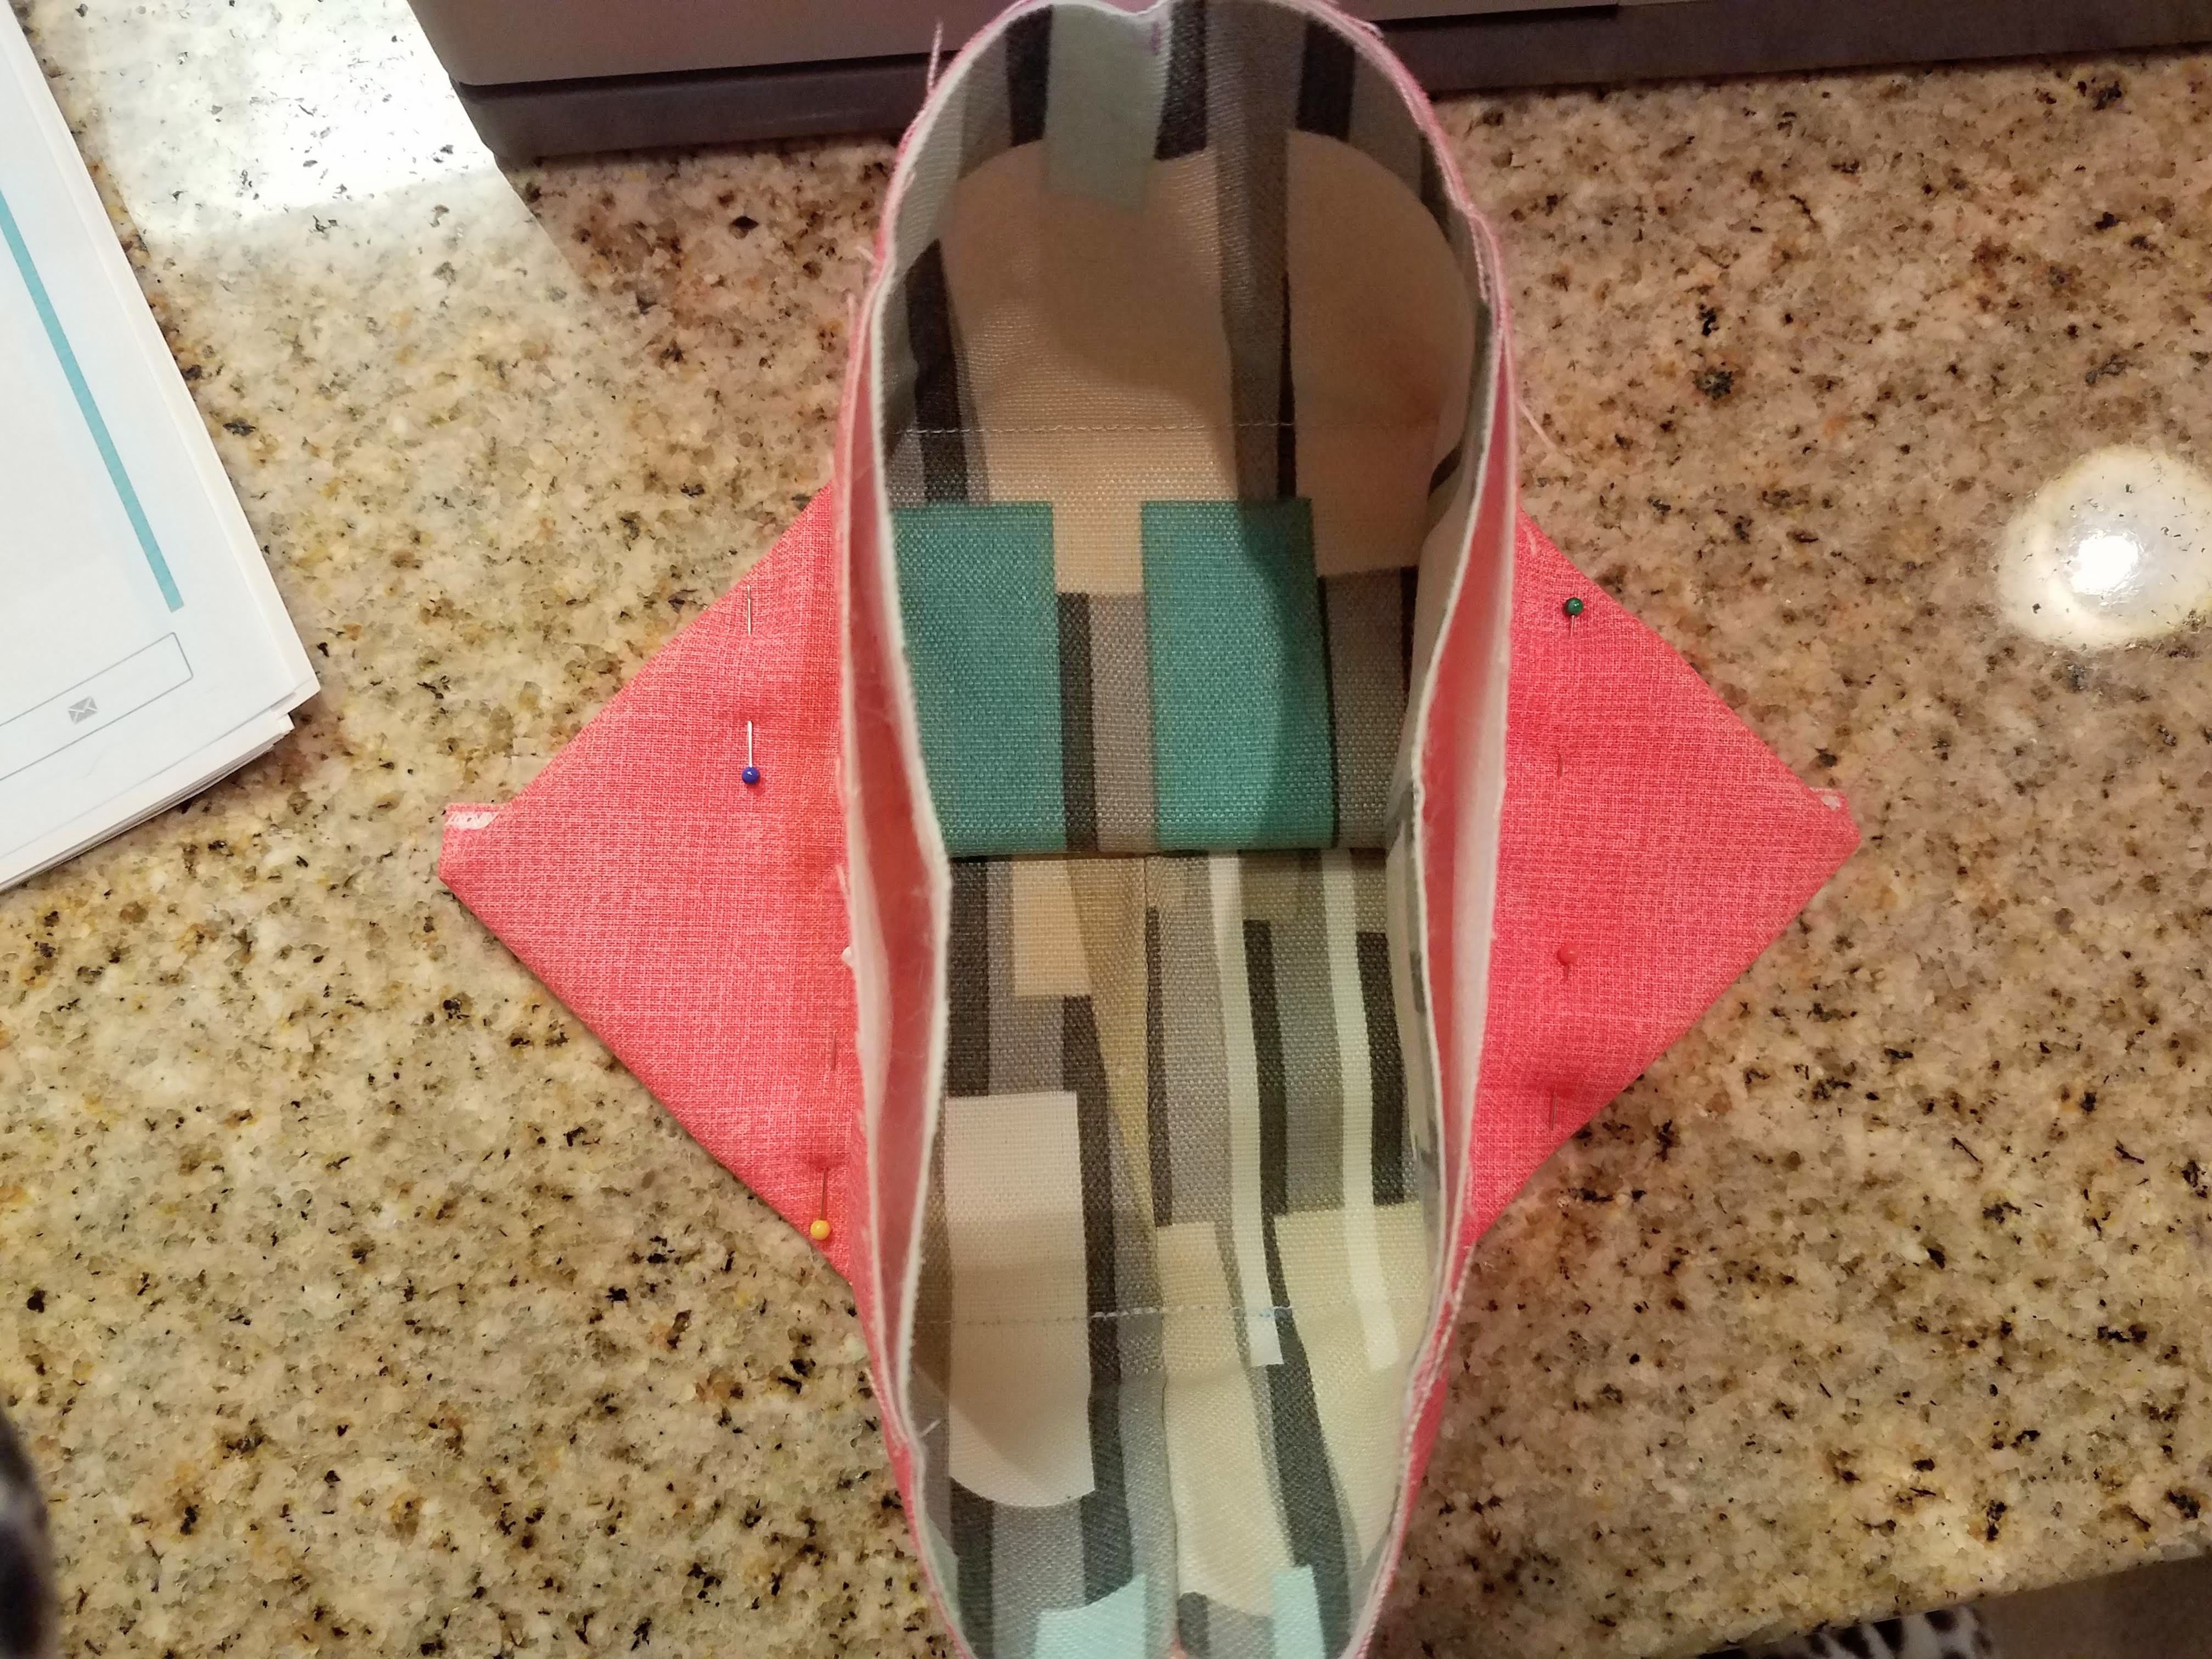
Our next seam is sewn along the bottom raw edge through all the layers of the fabric. It will turn the tube into a pouch. Before you sew that seam, though, we need to line some things up and pin it in place.
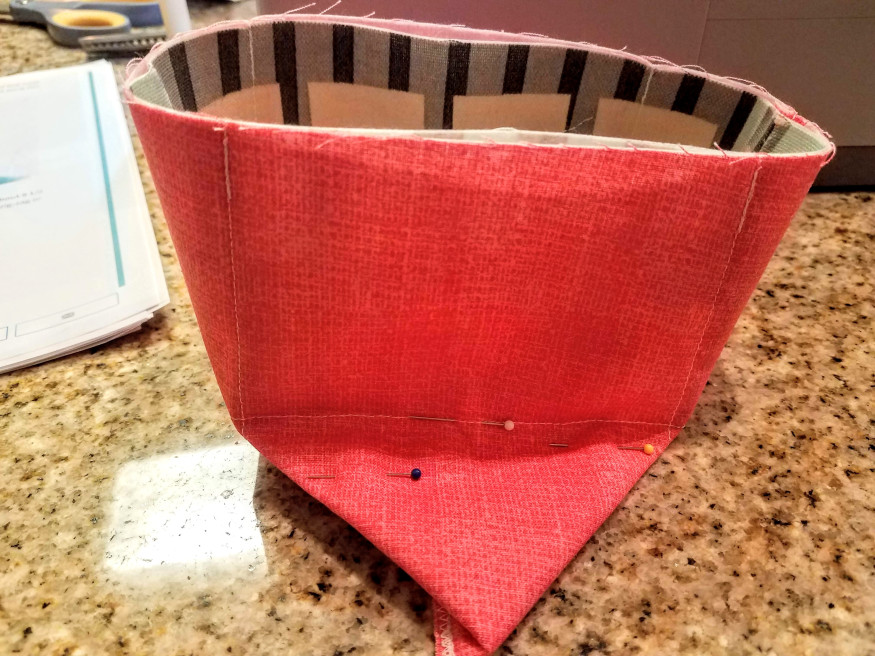
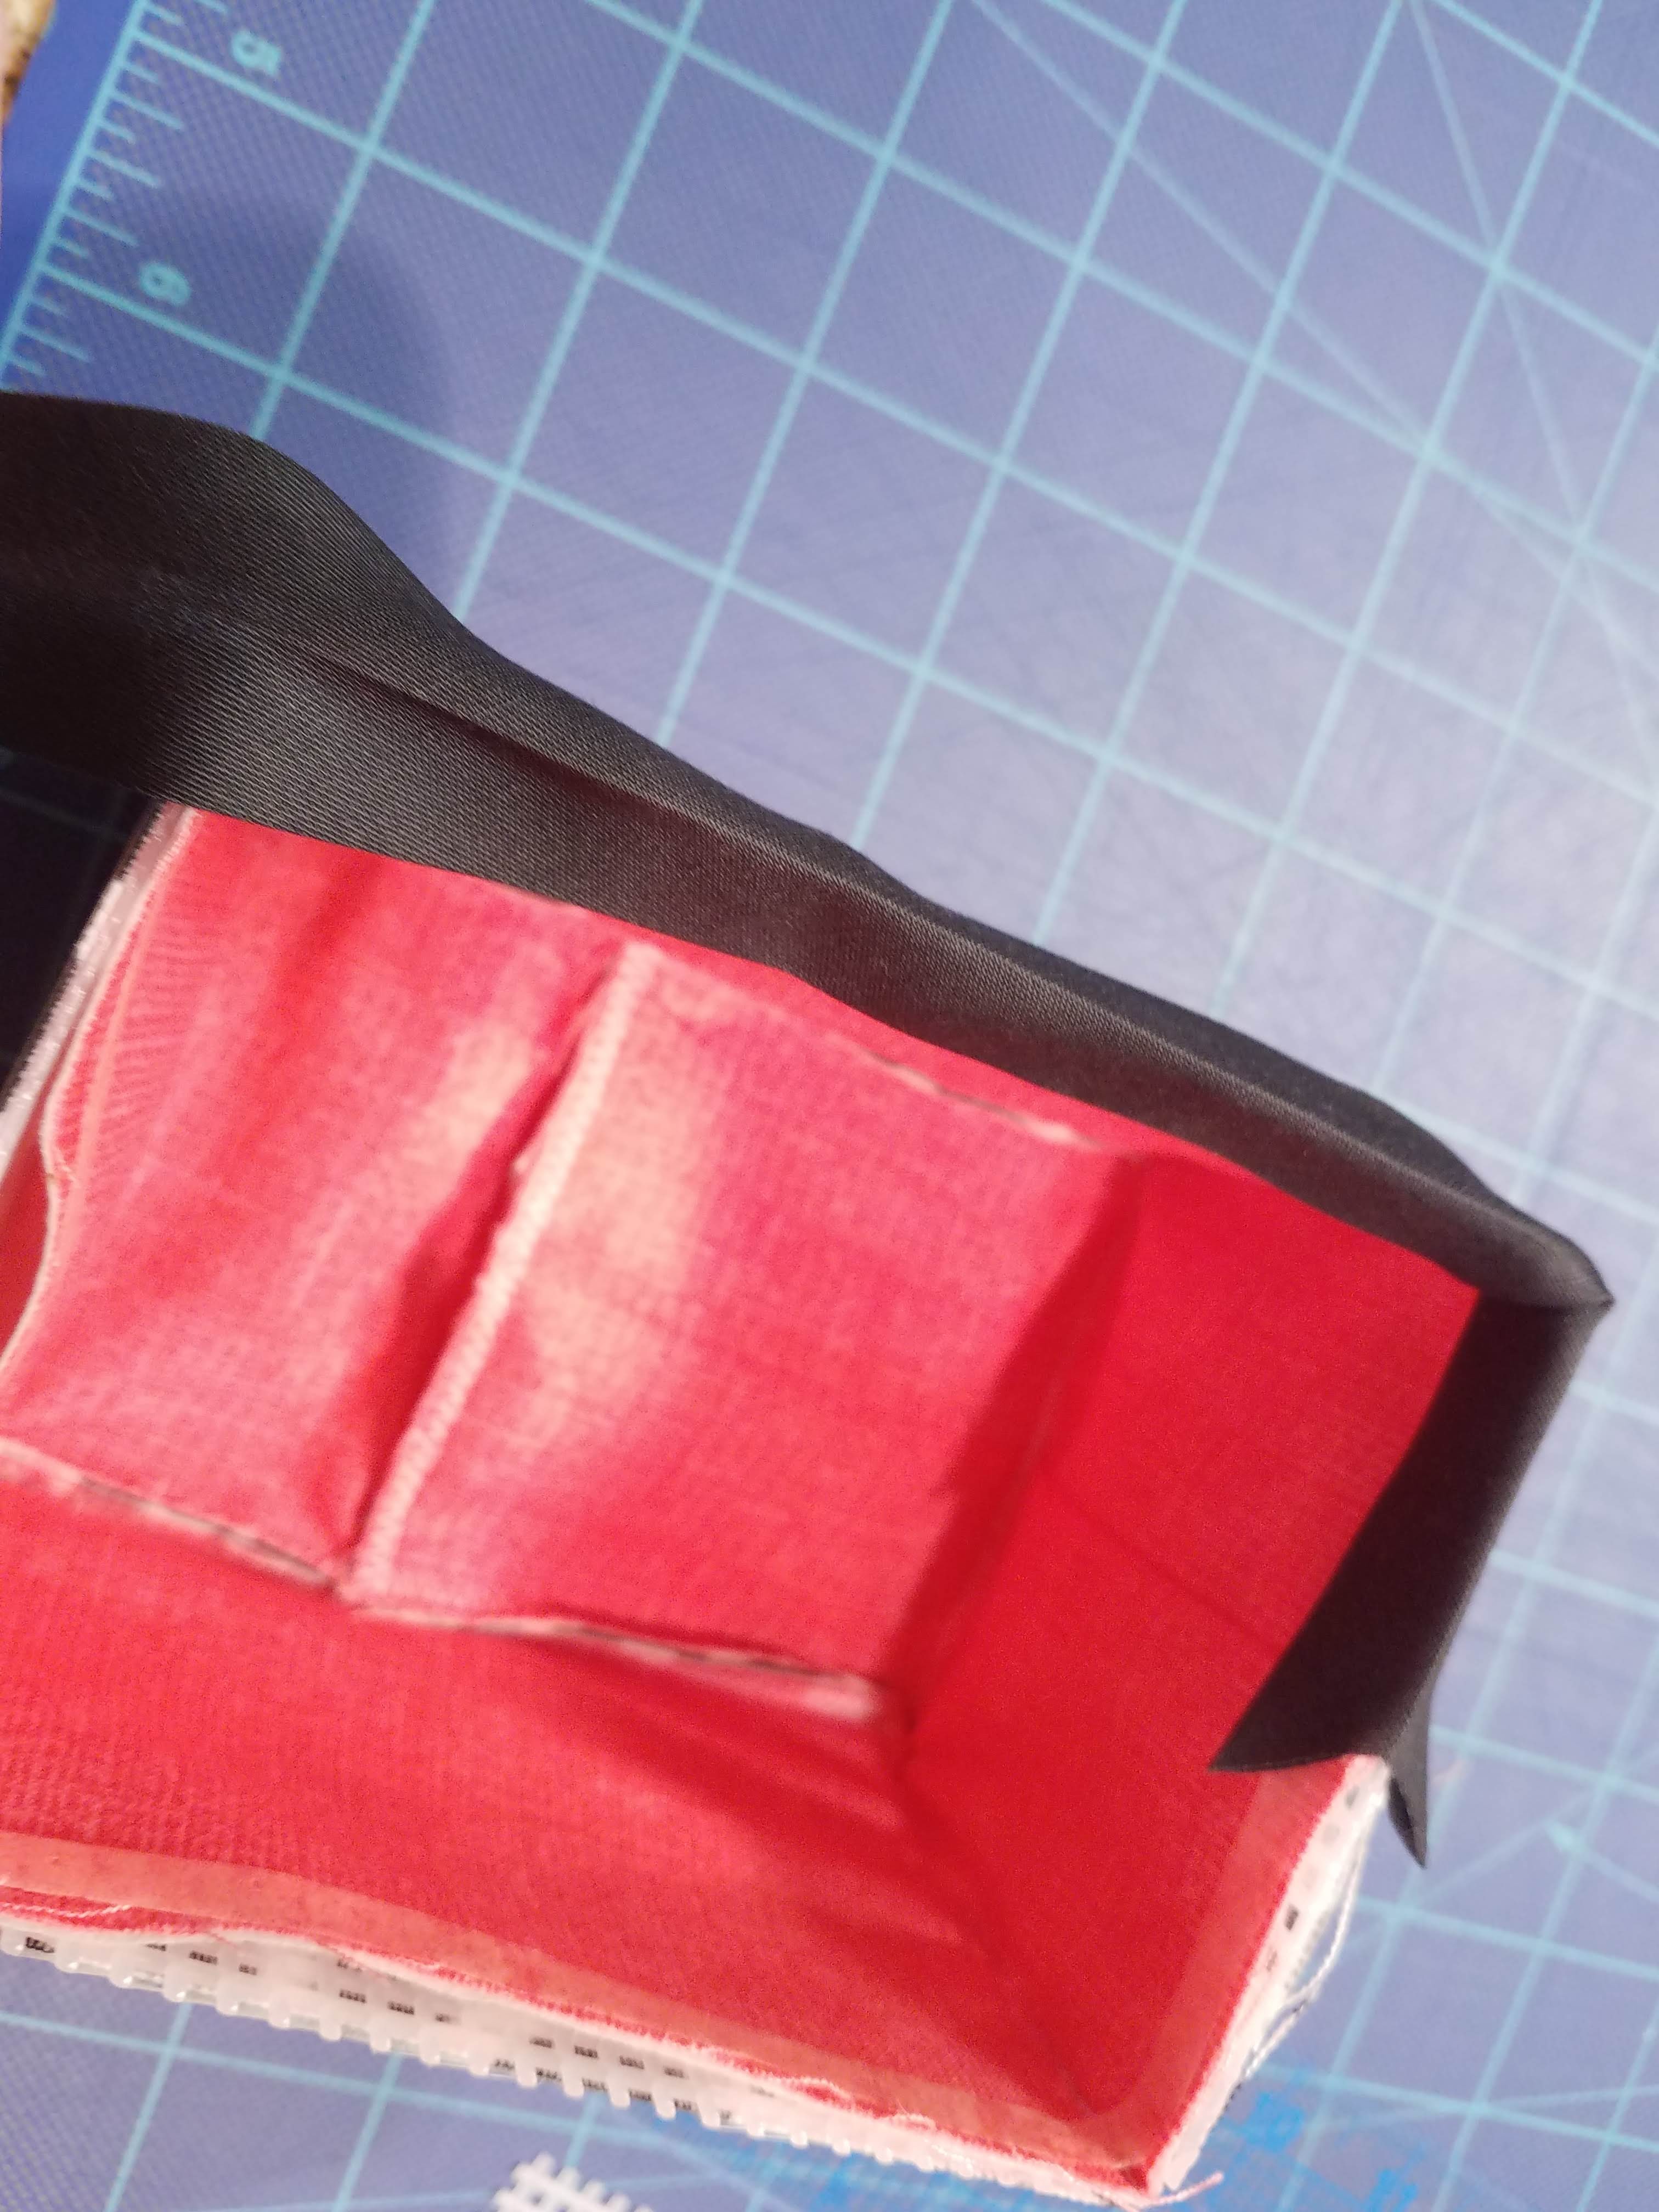
Lay the tube flat so the back seam (made in step #6) is centered. Then you’re going to line up the other vertical seams and stab some pins through all the fabric to keep them lined up. Like so:
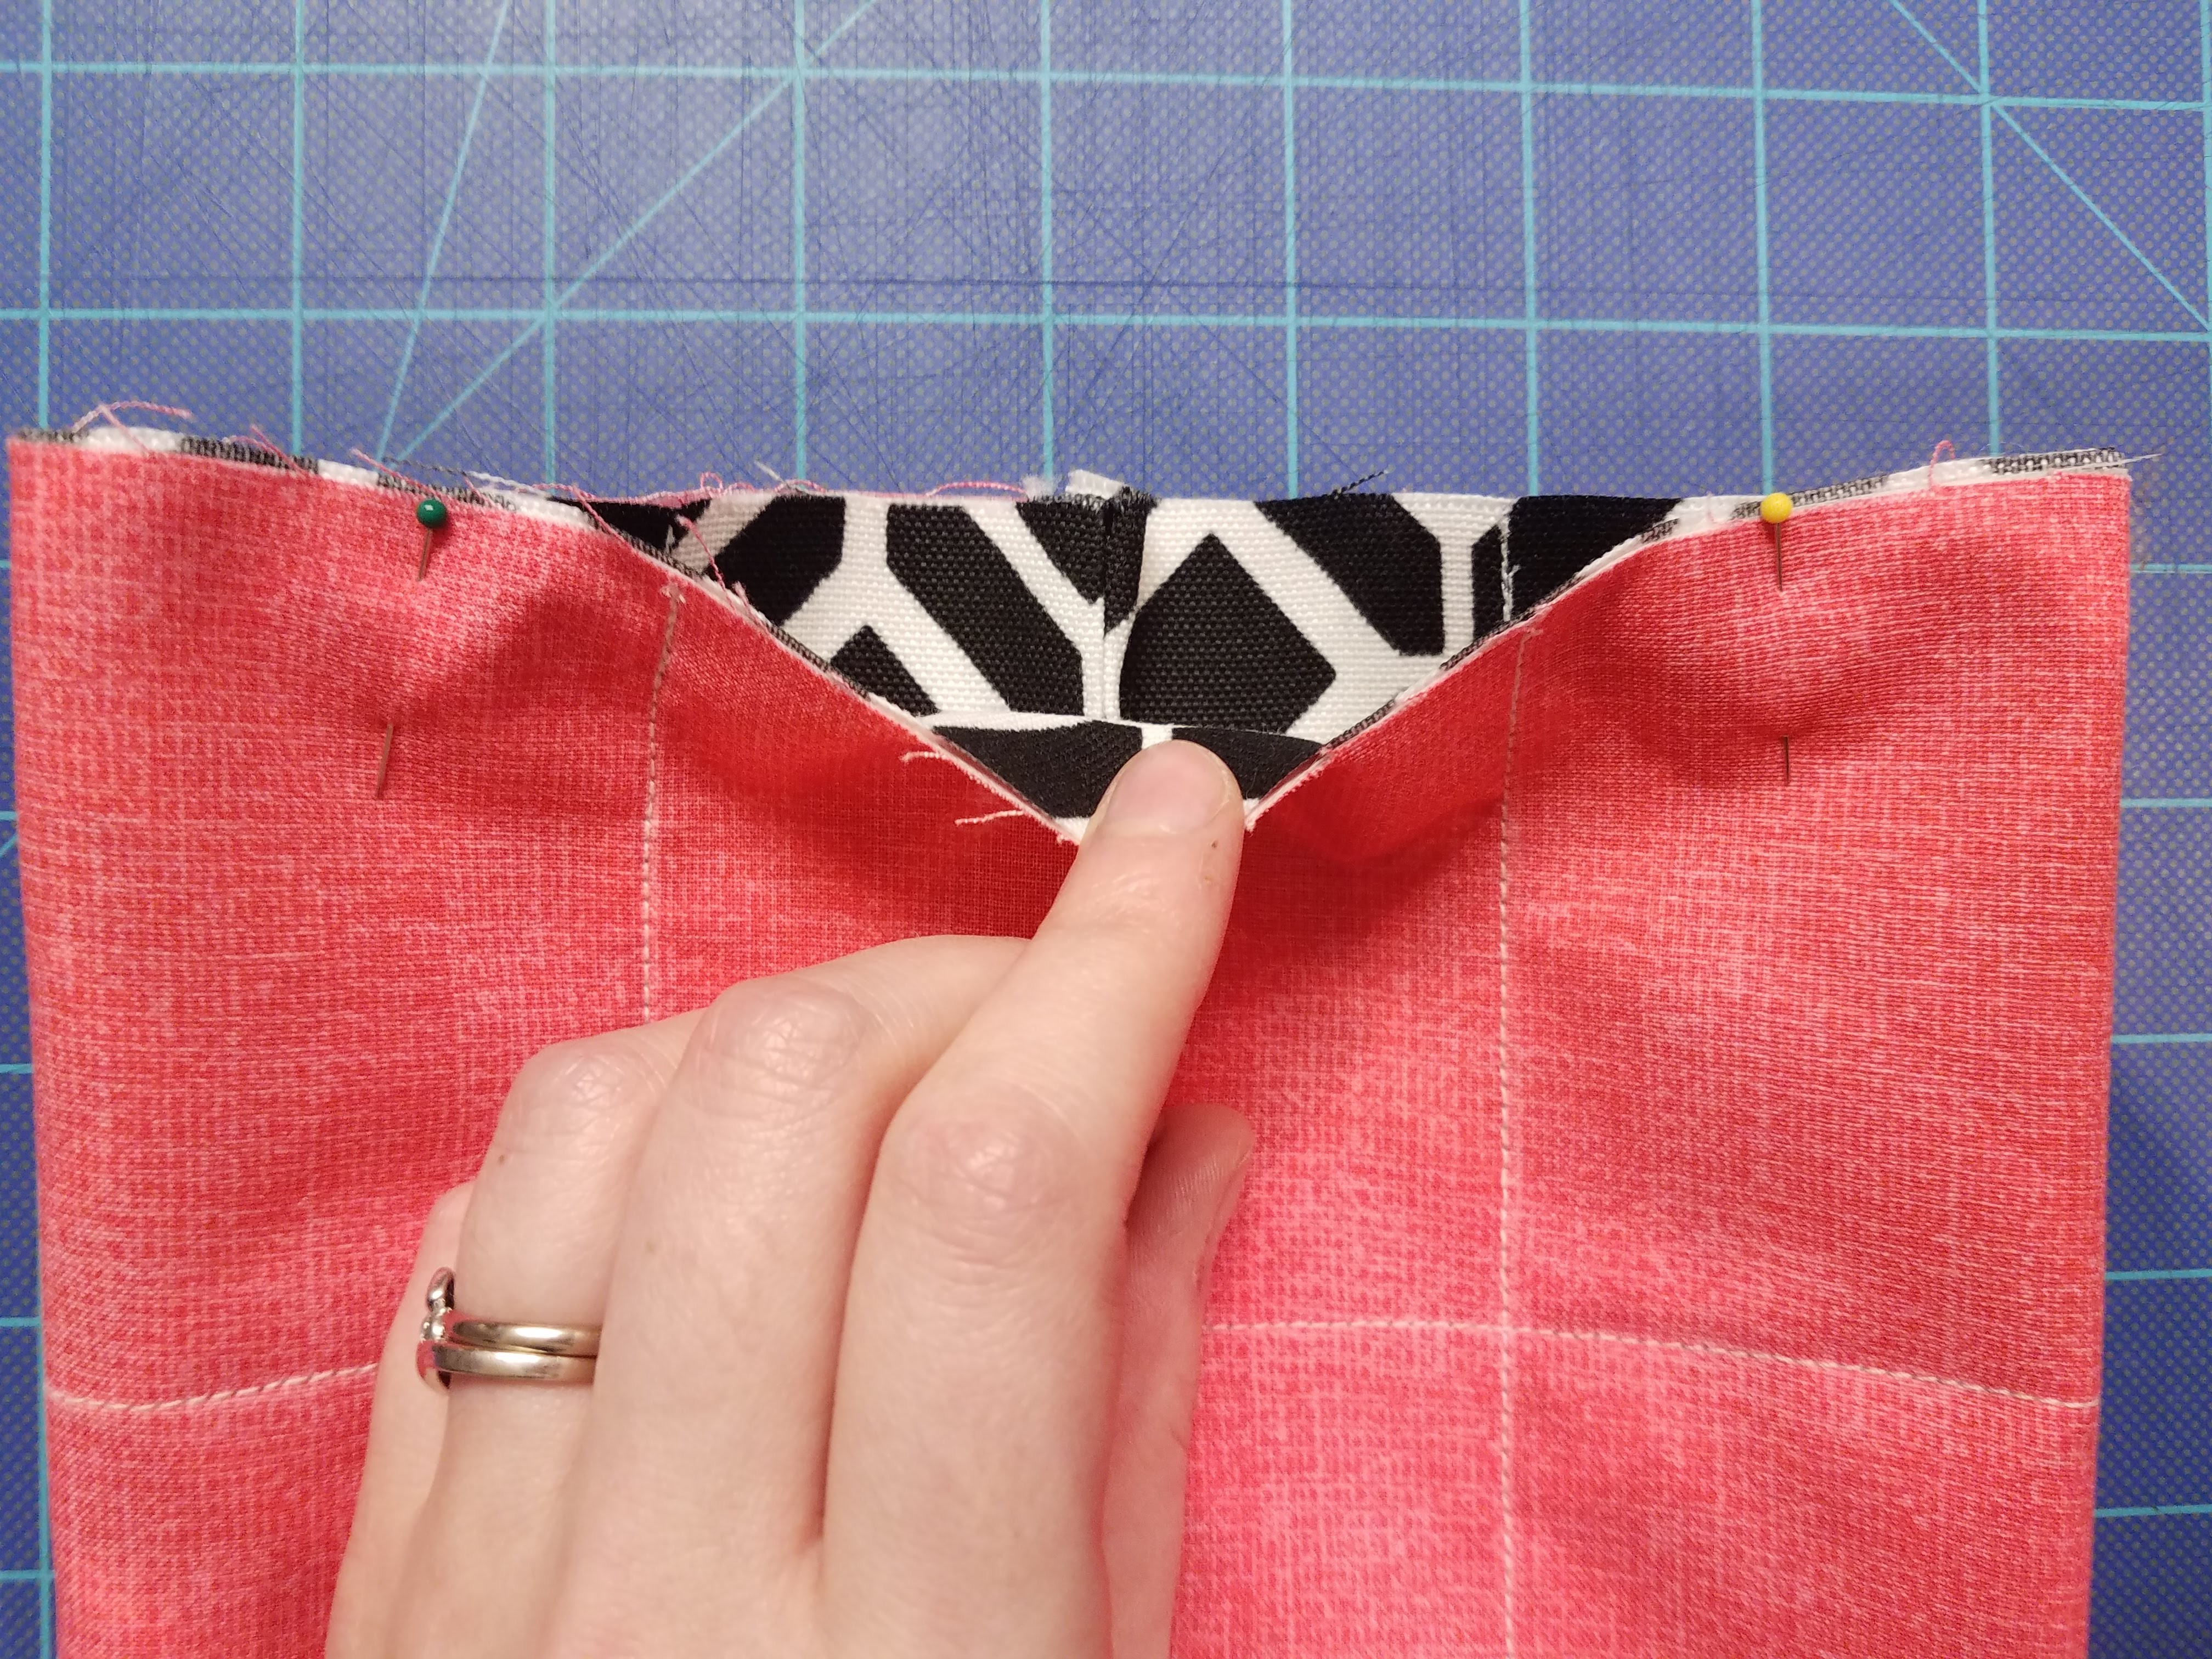
See how the vertical white seams line up with each other, and the back seam is centered? That’s what we want.
Toss a few more pins in for good measure. I usually pin the bottom edge that we’re sewing, and the top edge. I want these seams to line up as best as I can because this is what makes the sides of your box nice and even.
More pins, please.
SOMETHING TO NOTE:
If you’re making a narrow box (one side a lot shorter than the other side), make sure the 2 seams you line up in the photo above are the ones for the longer side of the box. This means your back seam might not be in the middle. That’s fine.
We do this because, otherwise, when you go to sew and cut off the triangles in a later step, they won’t line up correctly, your box sides will get thrown all out of whack, and the whole experience turns to crap.
Double-check that you’re about to sew the bottom edge closed. When you measure from the middle horizontal seam to check, it should be the edge whose measurement is NOT the finished height of the box.
Using a zig-zag stitch (width:3, length: 1), sew along the bottom through all the layers of fabric using a 1/2″ seam allowance, removing the pins as you go:

Maybe you caught that I have a straight stitch along this seam too. The original tutorial I followed had me make the straight stitch first, and then zigzag to “finish off the seam.” Turns out, everything is fine if you skip that straight stitch first and go right to the zig-zag stitch. You could also choose to do just a straight stitch along here and I think it’d be fine. I think I’m going to start doing that in the future. This edge ends up along the bottom inside of the box, which is covered by the insert we’re going to make later, so I wasn’t very concerned with wrapping the raw edge in a zigzag stitch to finish it off.
Trim close to the bottom edge you’ve just sewn. I used regular scissors instead of pinking shears because I didn’t want the extra fabric left behind by the pinking shears. Since this seam is along the bottom of the box, I want the bottom insert to be able to lay flat.
9. Shape and pin the box.

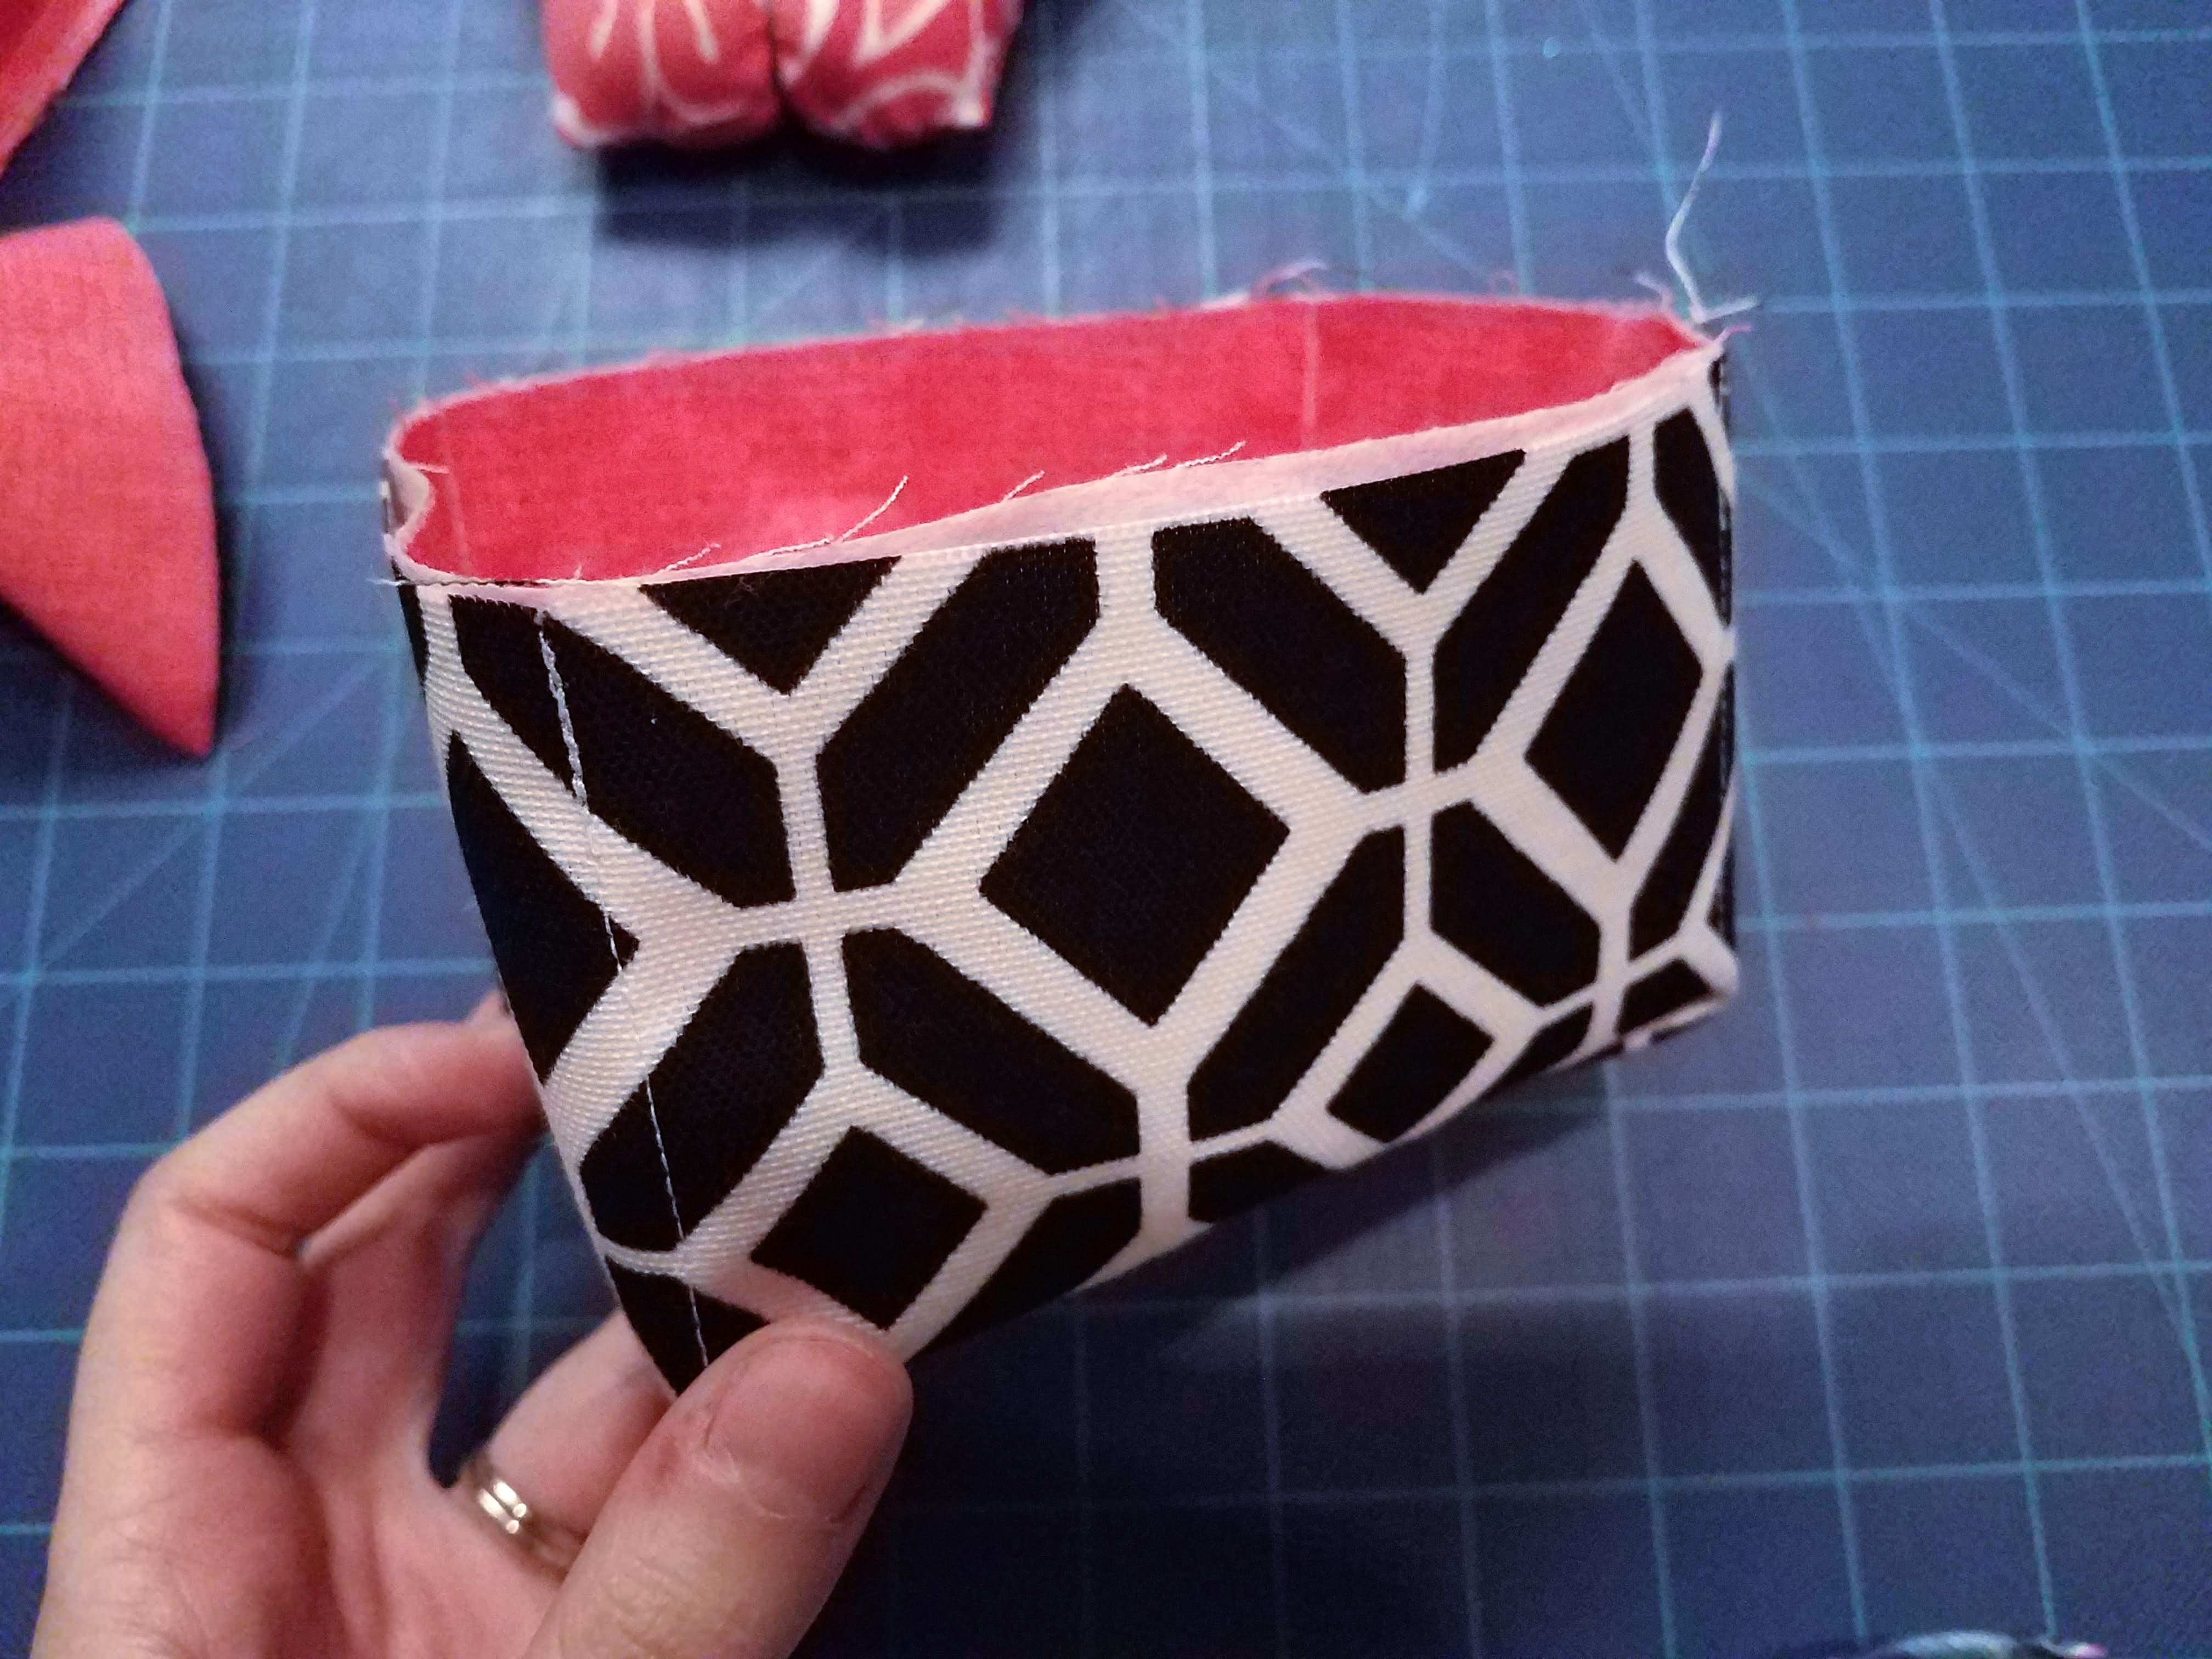
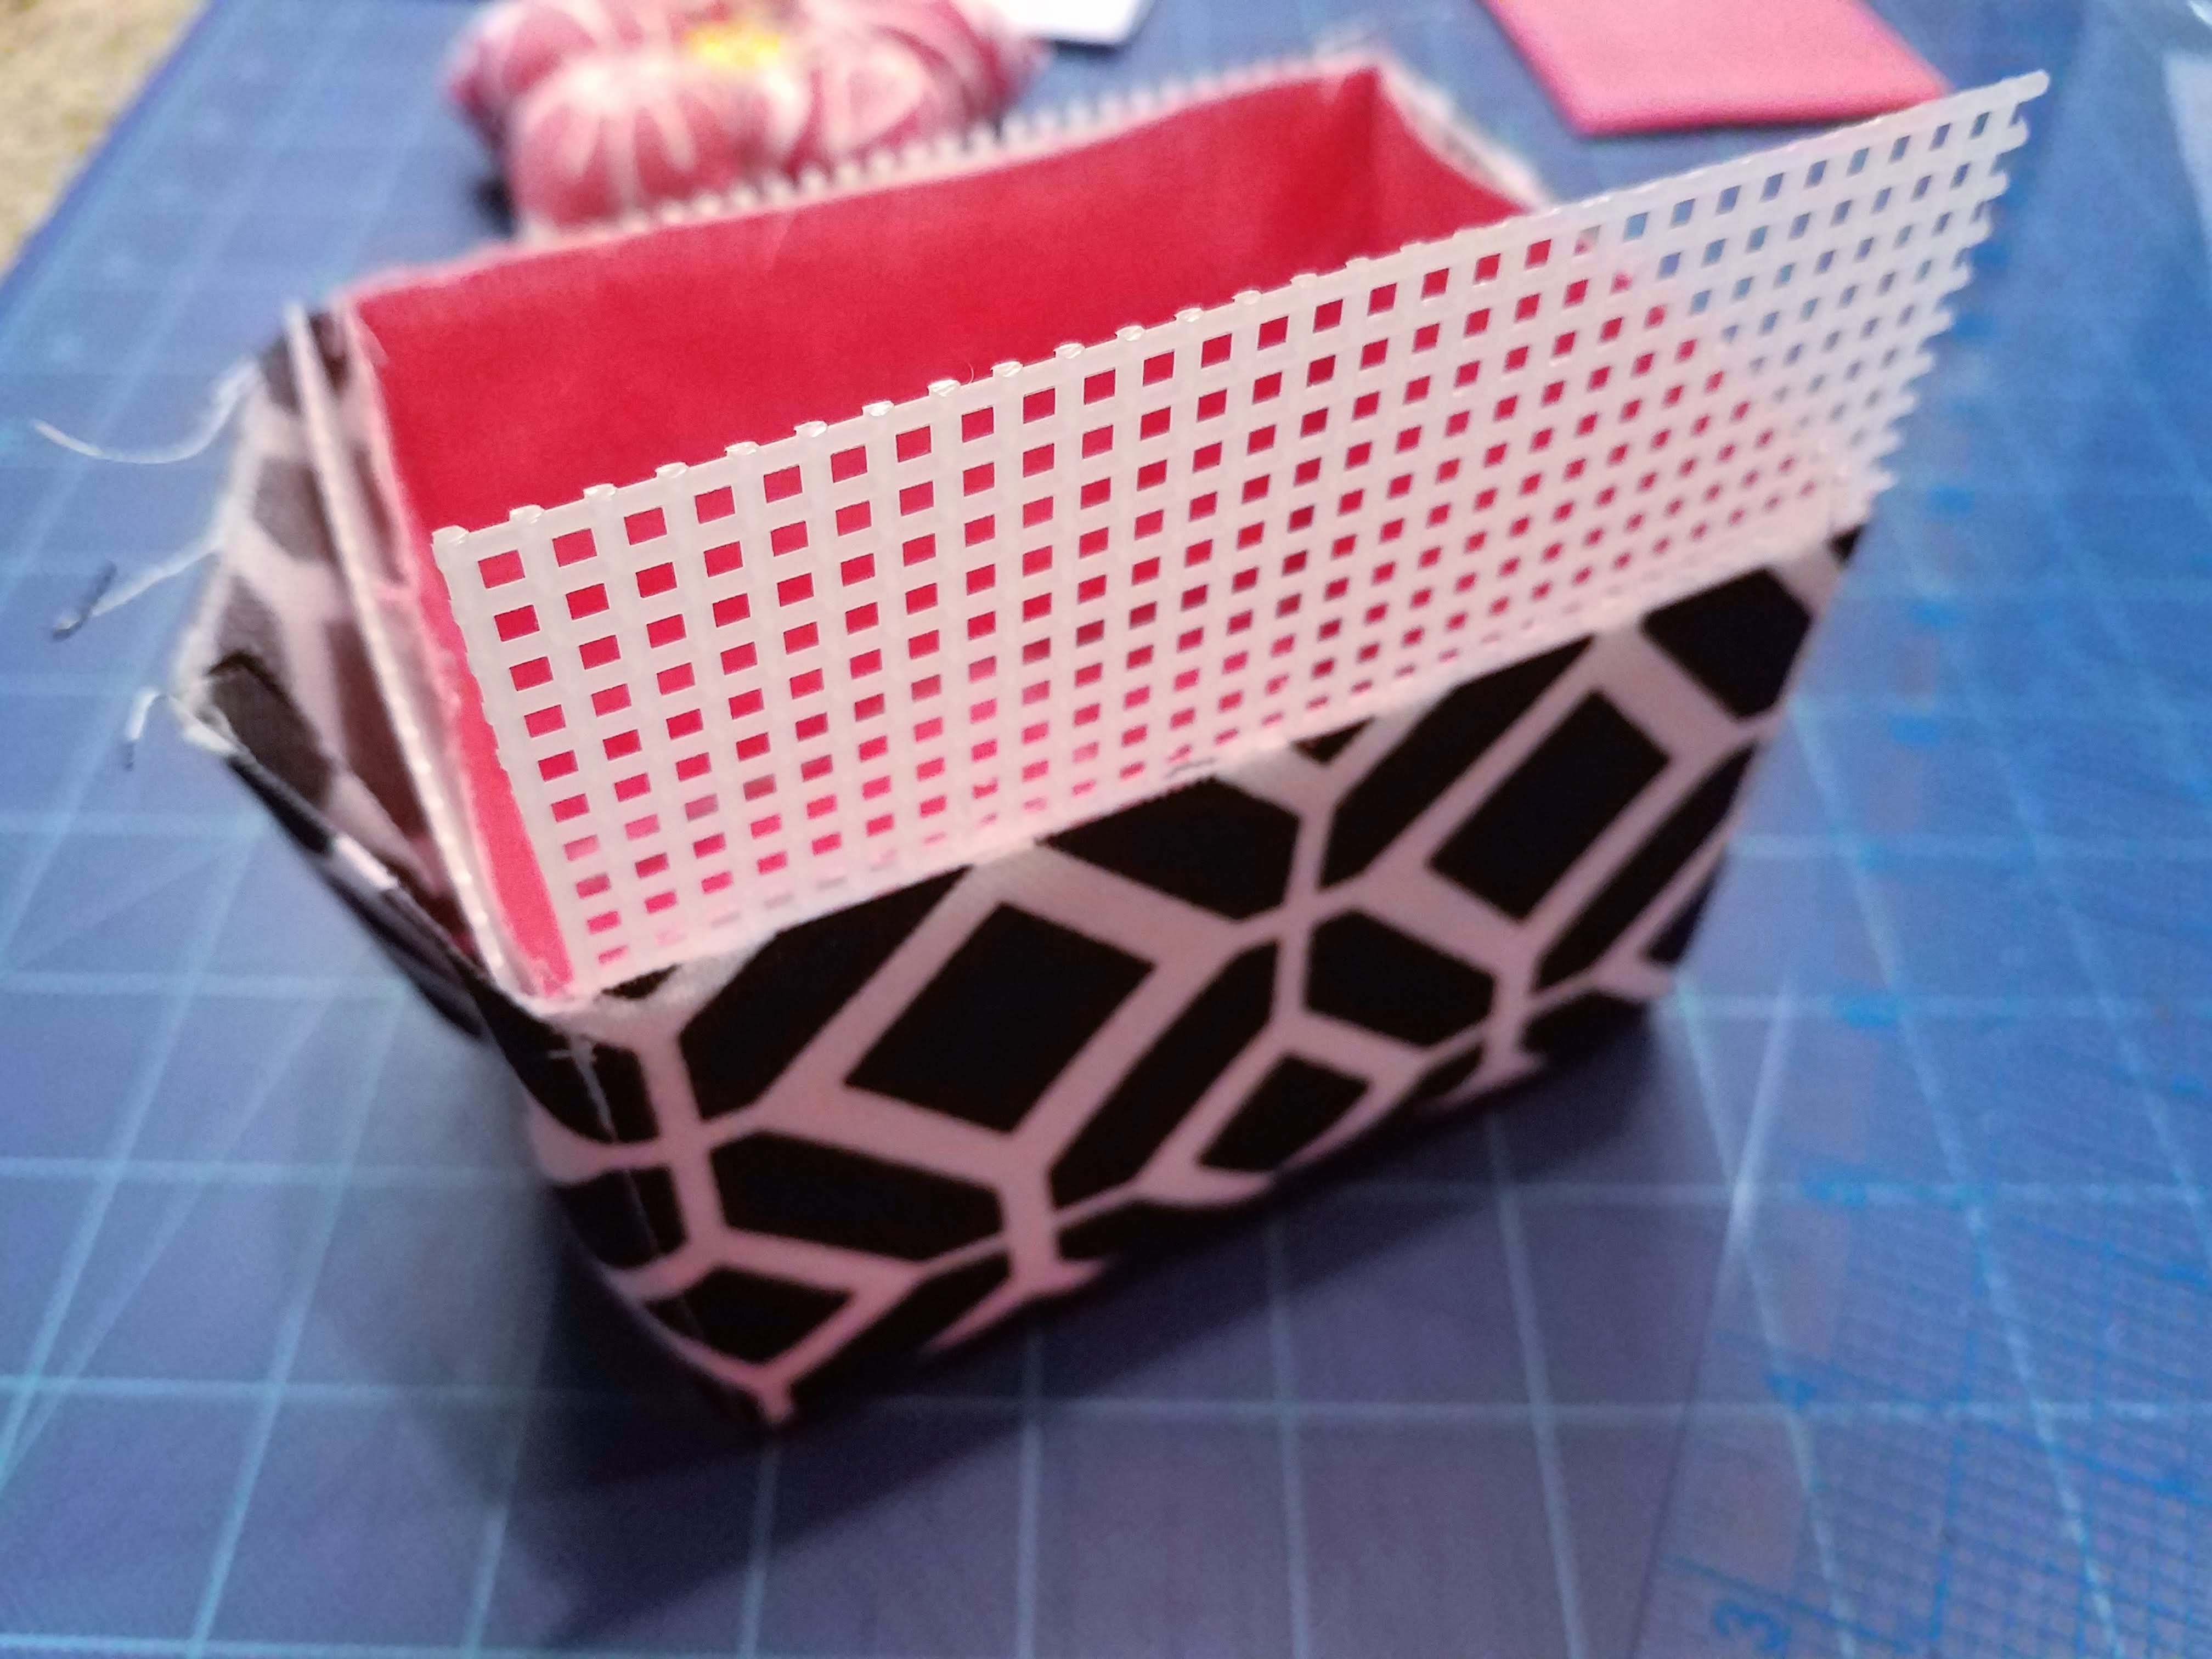
10. Cut your plastic canvas.
I like to slide my ruler into the compartments to gauge what size I need to cut my canvas pieces. Err on cutting your pieces a little larger since you can always trim them bit by bit. The handy thing about the plastic canvas is that it’s constructed in a 1/8″ grid, so if your piece is a little too large you can just trim one row off and you should be good to go. They should fit snugly, but not bend, and you can have the top of the canvas pieces go right up to the edge of your fabric (if you’re not sewing the bias tape later. If you are sewing the bias tape on, make the canvas inserts 1/4″ to 1/2″ shorter than your fabric.)
11. Add bias tape.
If you want to attempt sewing bias tape on, more power to you, but I can’t help you with that. I chose to avoid that struggle bus, even on my 12x12x12 box. What I do is attach it with some fusible tape. If you bought the Steam-a-Seam brand, you might be able to skip a lot of this. I haven’t used that brand yet so I’m not sure what it’s like. If you have the lousier EZ Steam brand, the following technique worked well for me.
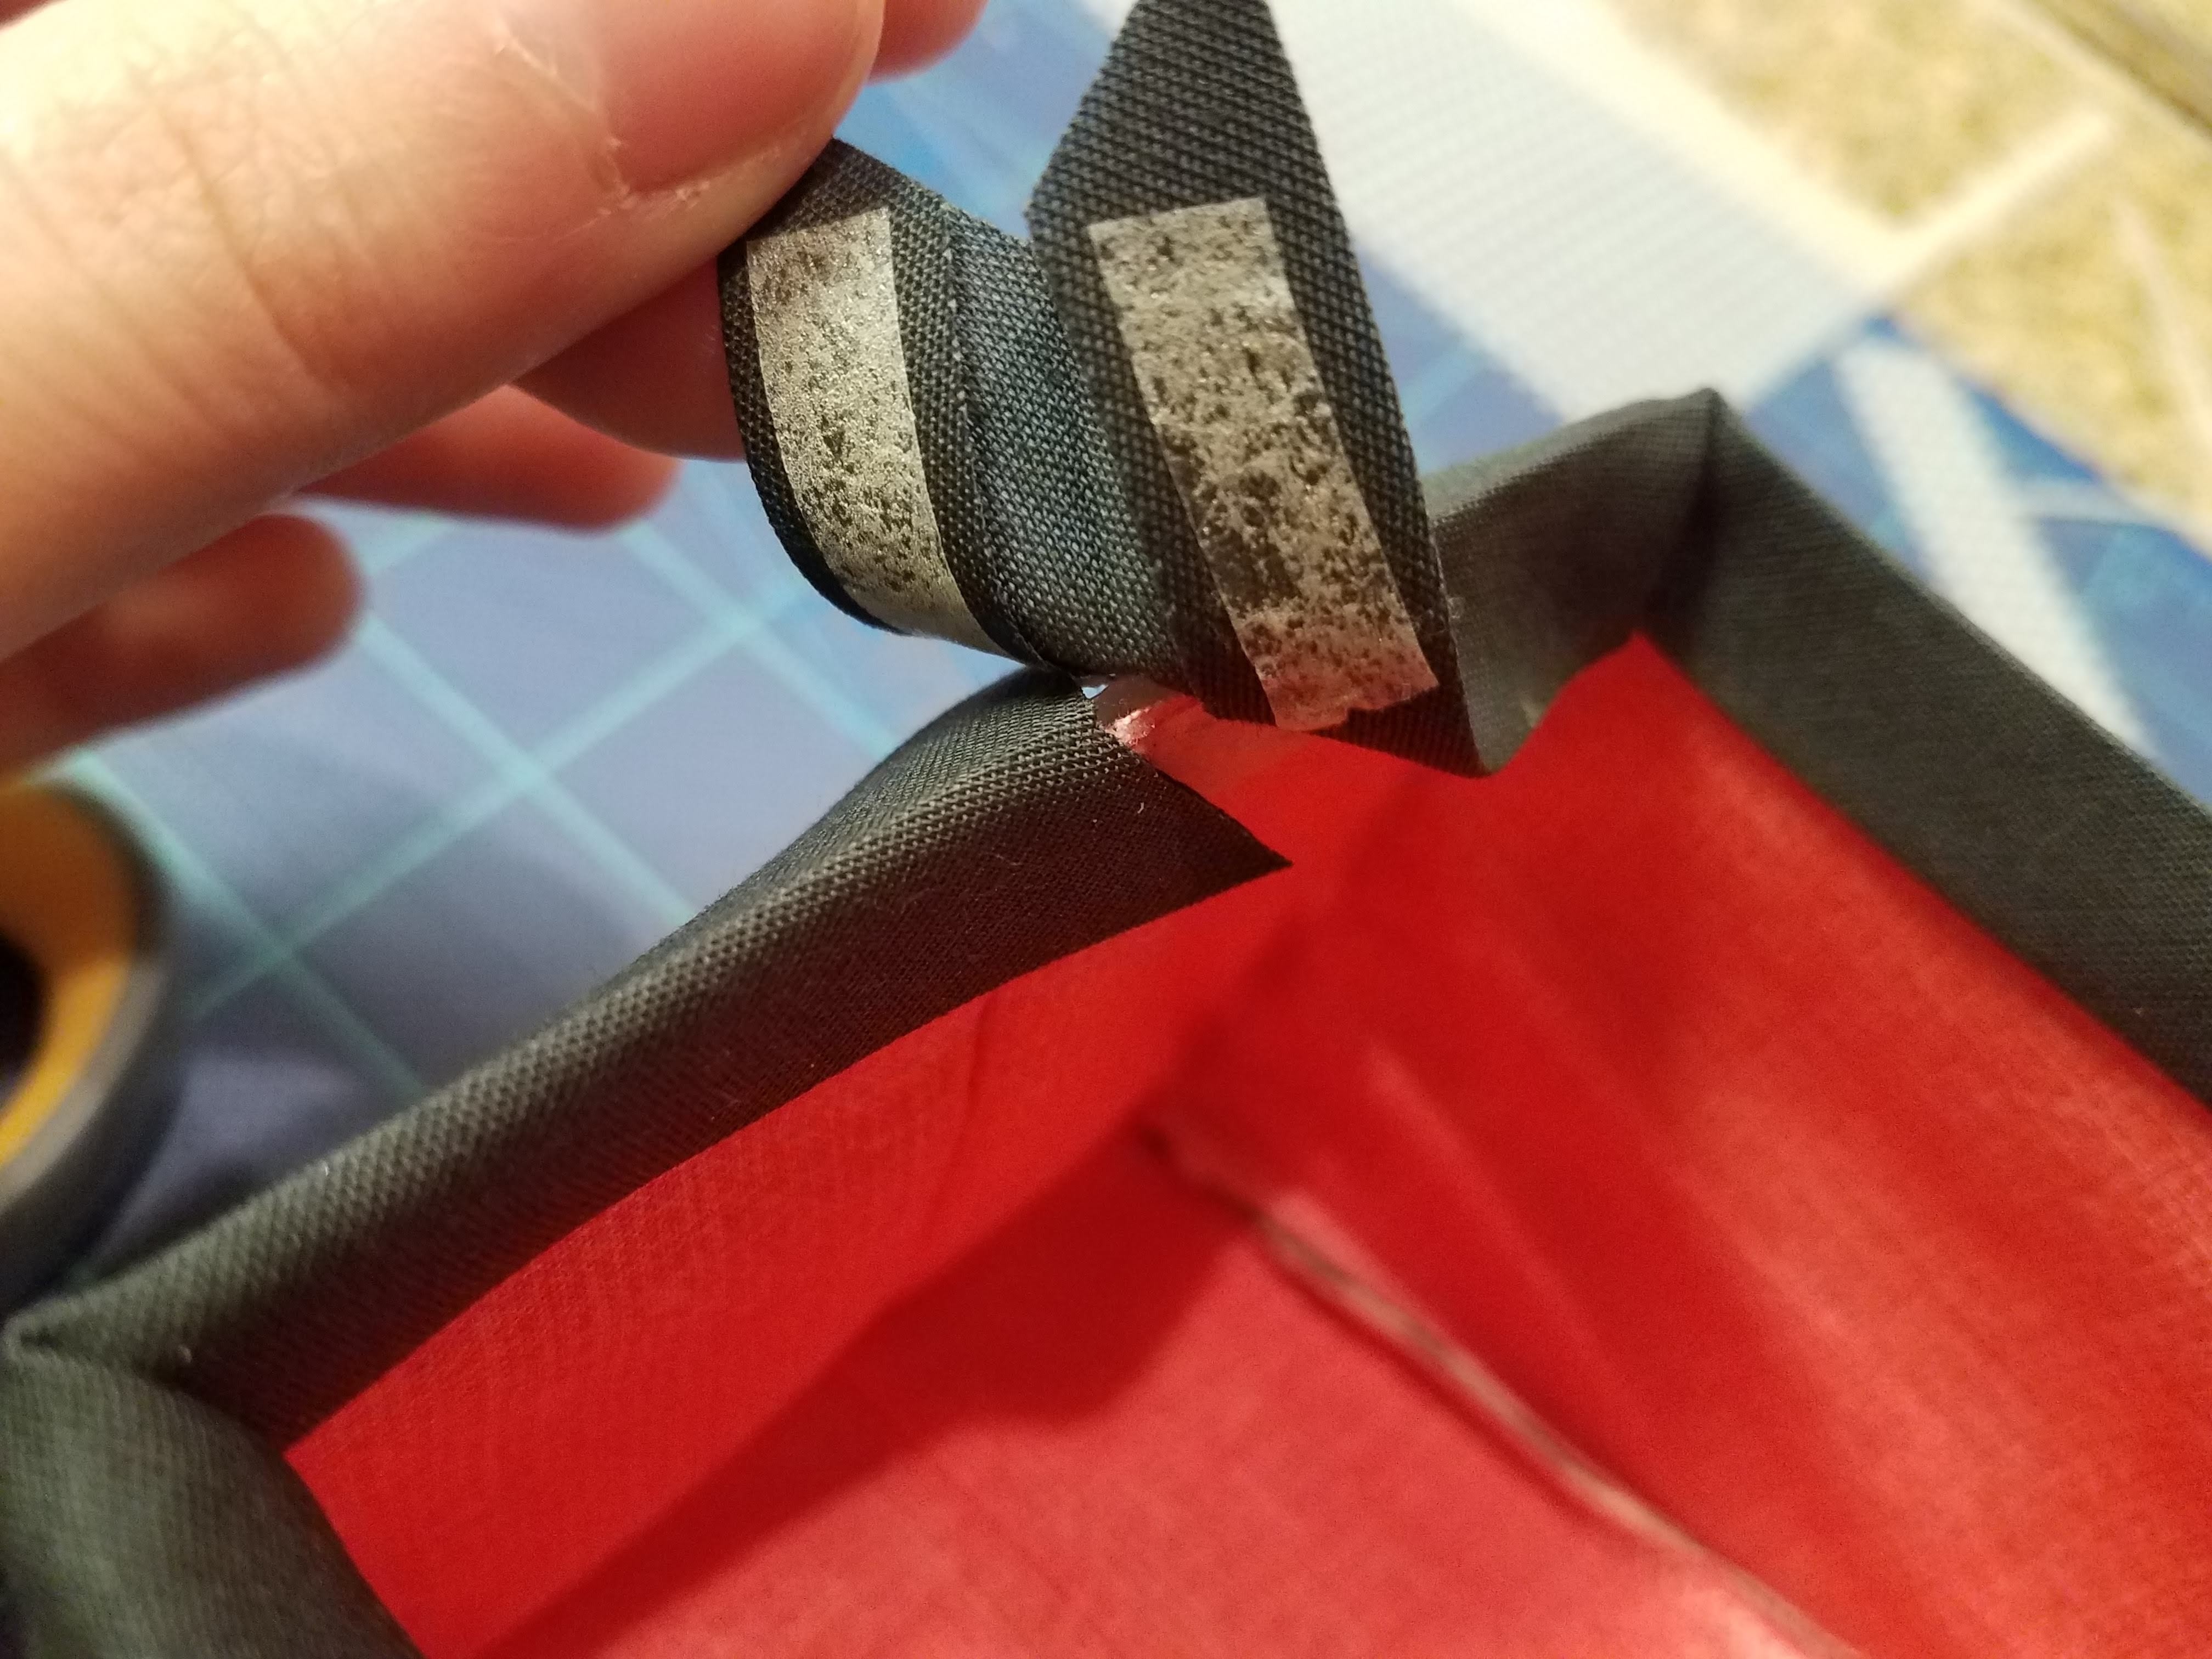
Using my Fabri-Tac glue and starting with the inside top edge, I place the smallest of dots at the corners and middles of each side, working on one side at a time. Then I press the fusible tape to these dots for a few seconds. This holds the tape in place until I can iron it, and also holds it really well for the battle of removing the backing.
Once I’ve lined the entire inside top, I do the same around the outside. Once the outside is done, I use my seam ripper to help peel the backing off all the fusible tape. In the end, it will look like this:
Now take your bias tape. You’ll notice that one side is slightly shorter than the other. I put the shorter side along the inside of the box.
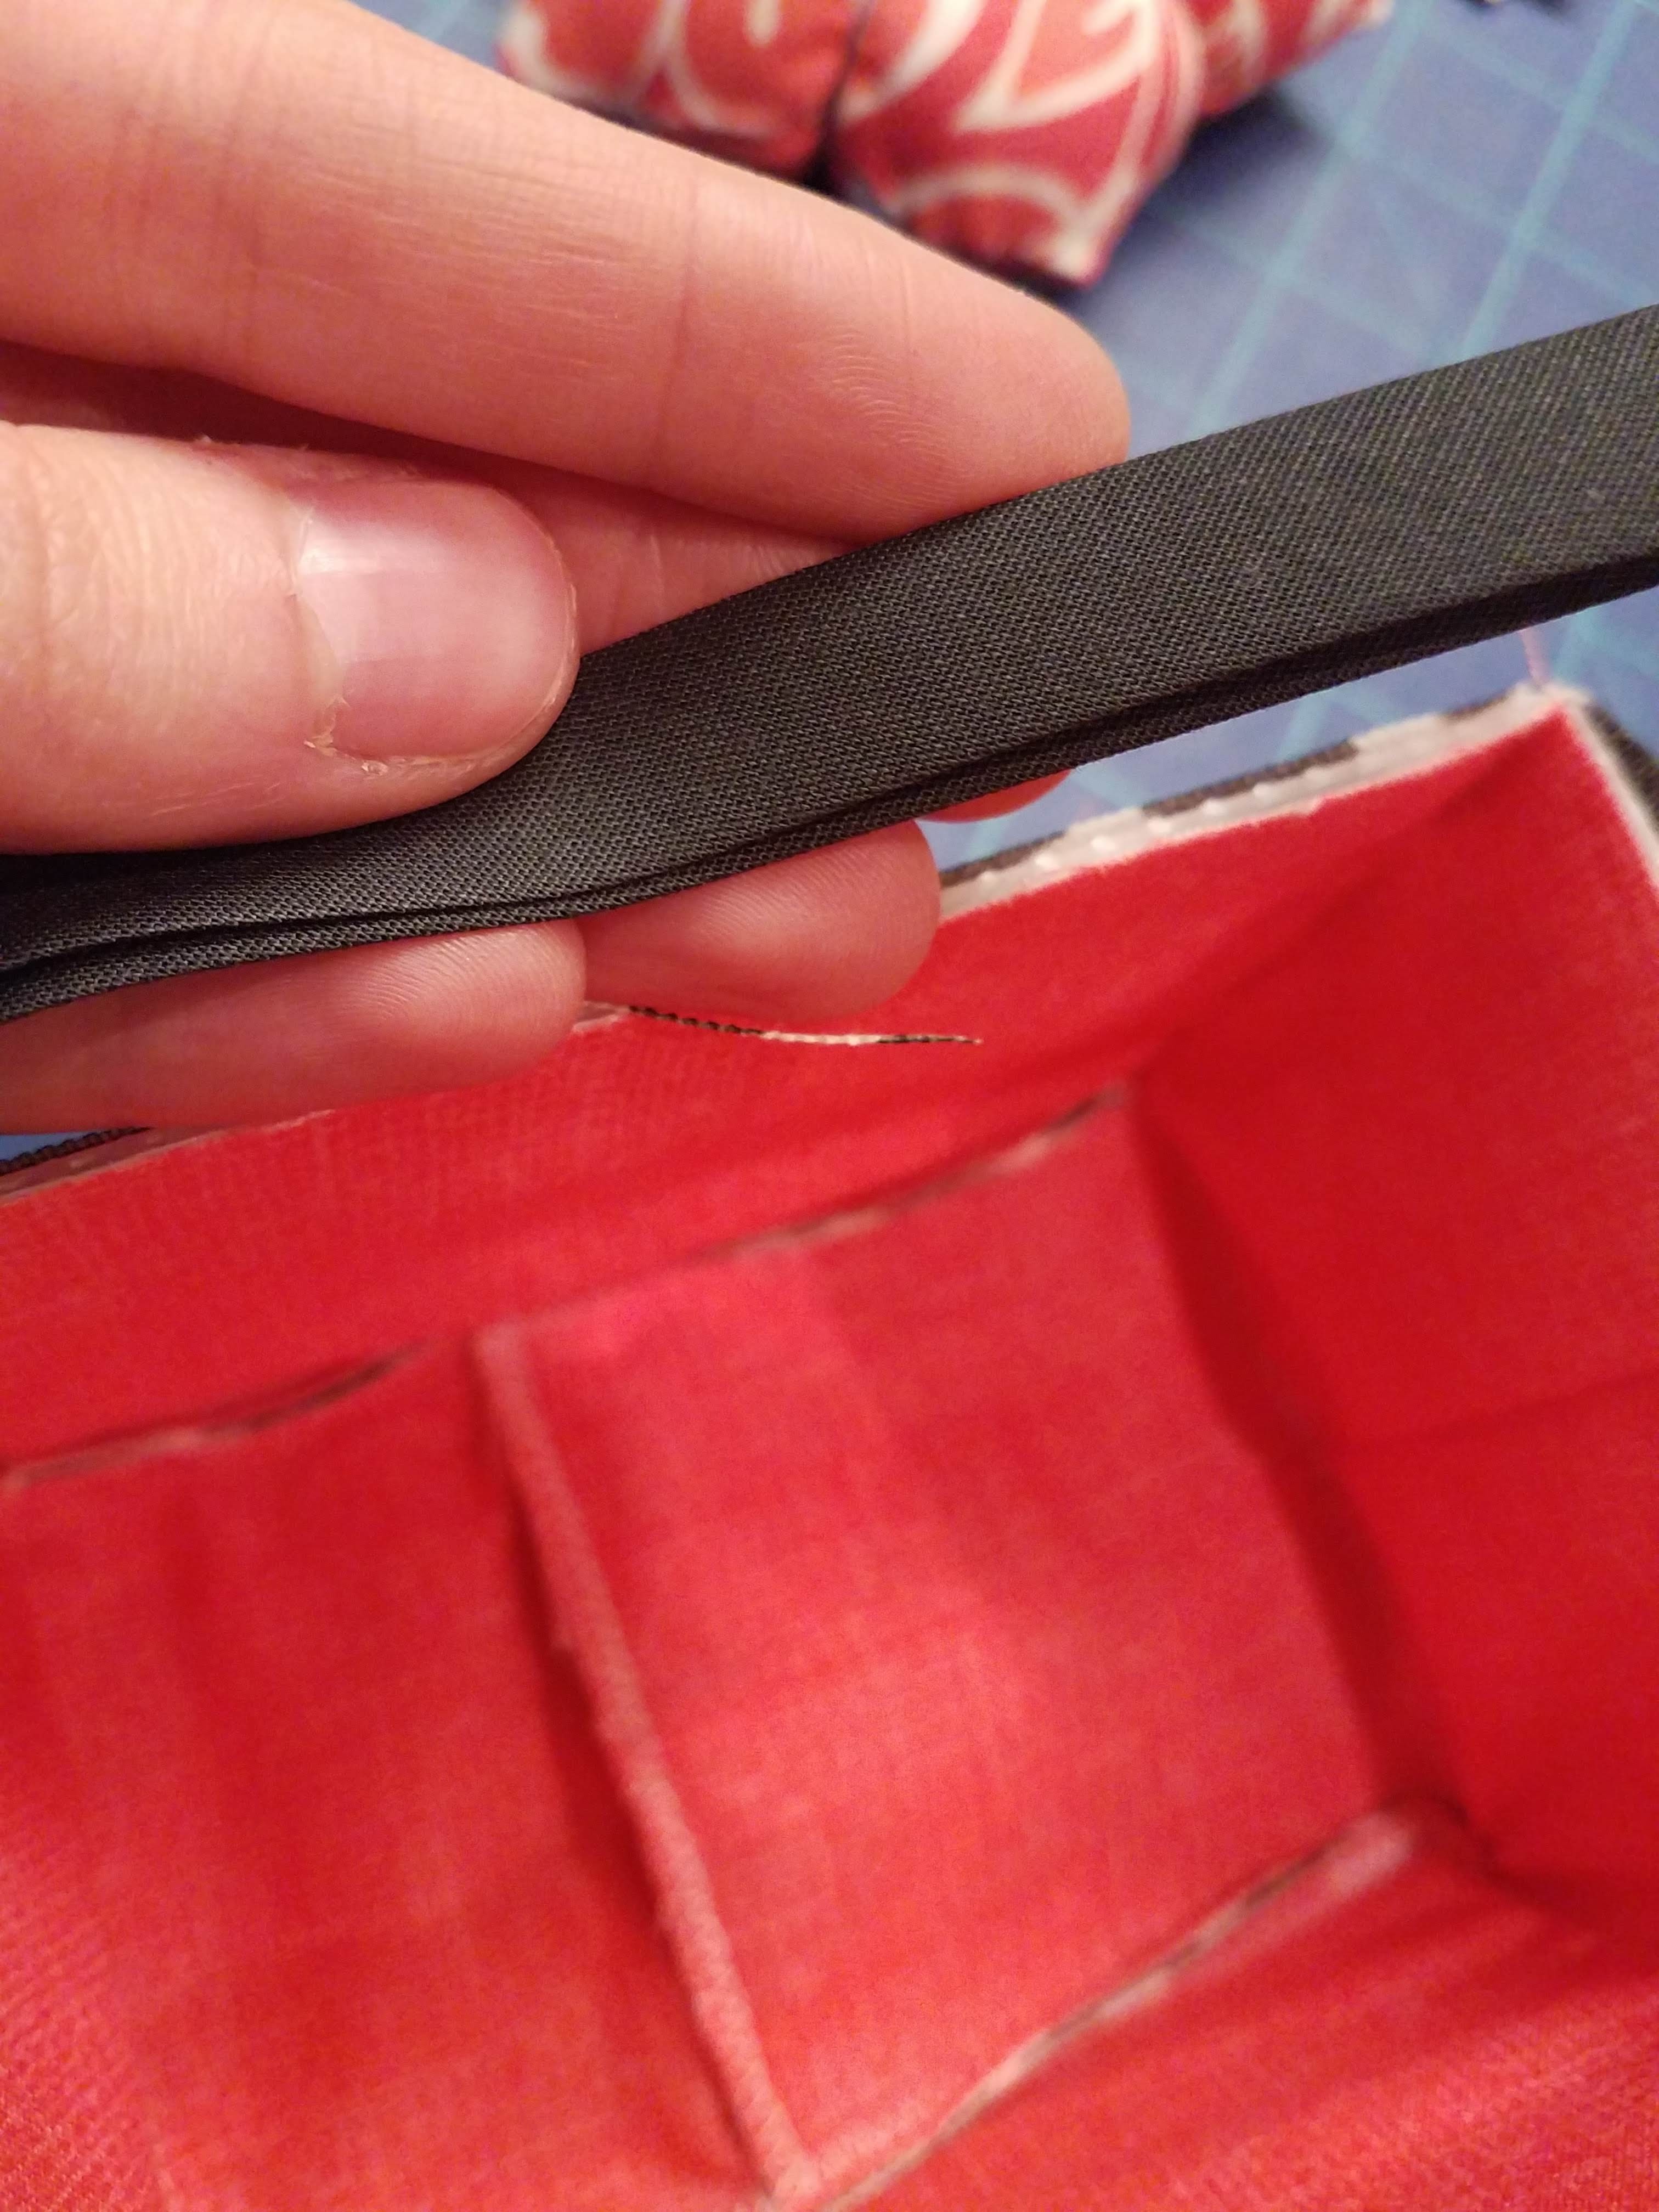
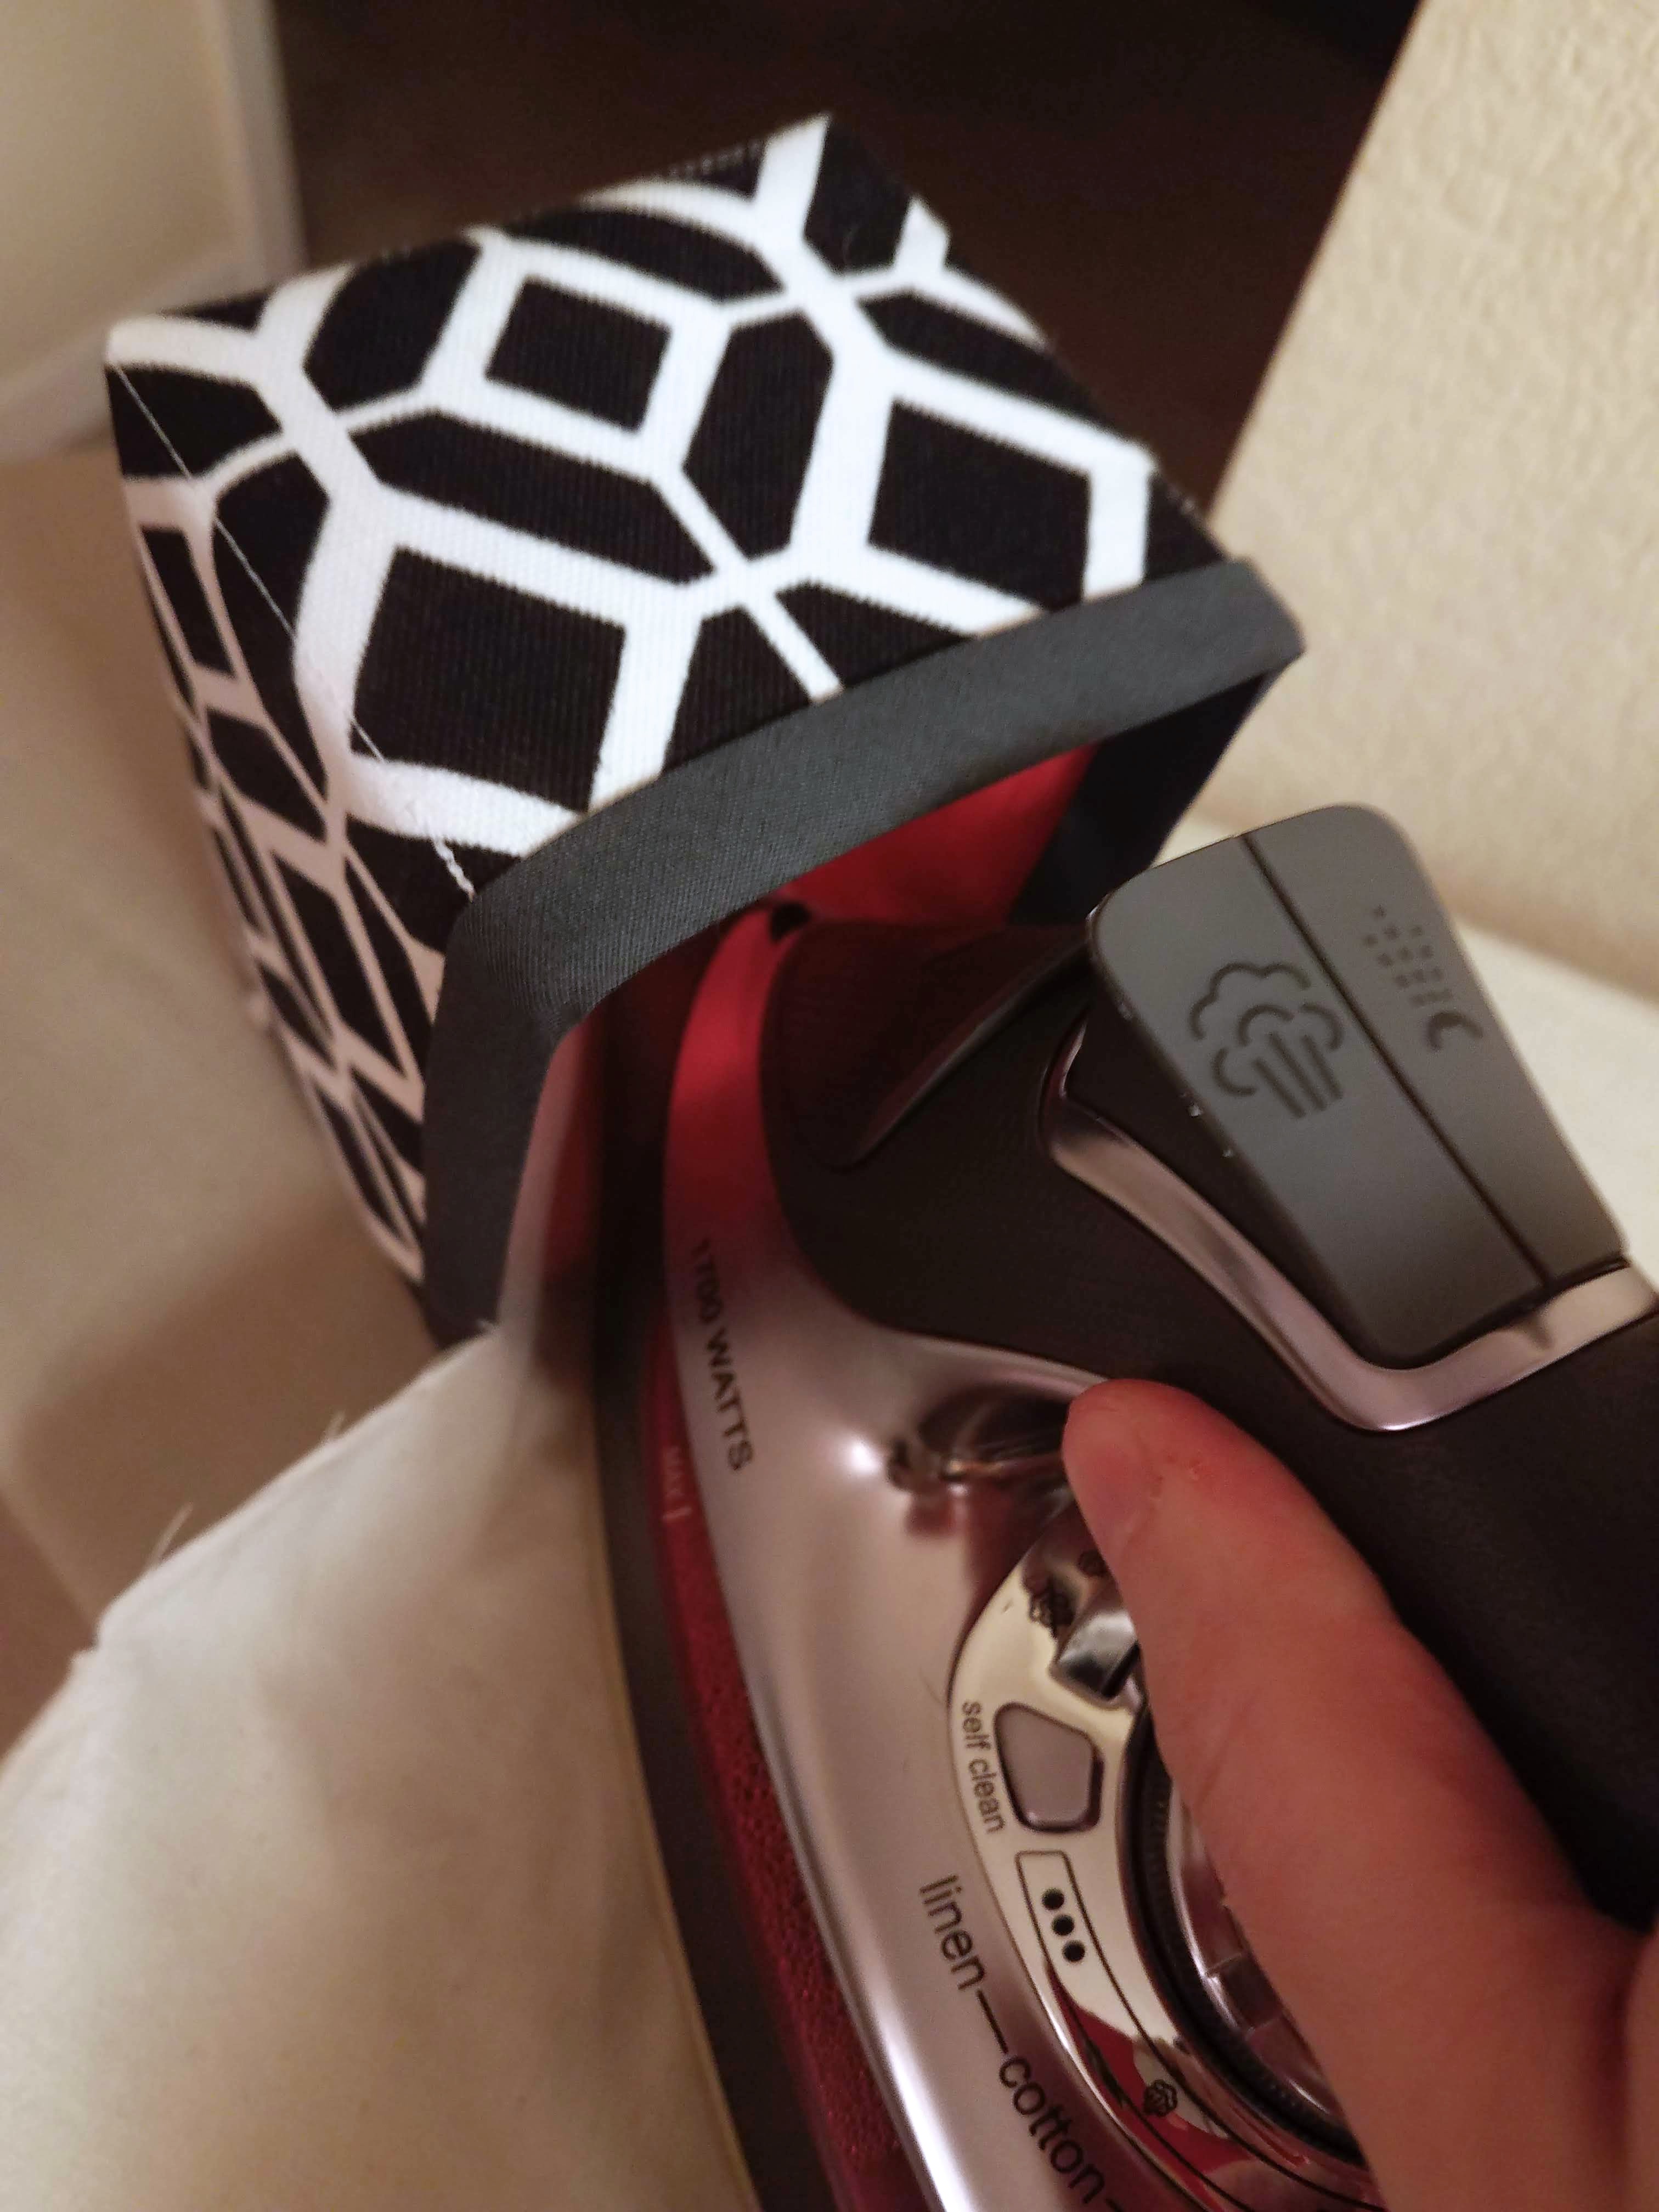
Start wrapping it around the top of the box, beginning with the back seam and working your way around, pinching it over the top edge of your box on either side. It might not stick overly well, but that’s ok. As long as it’s in place enough for you to be able to iron it soon.
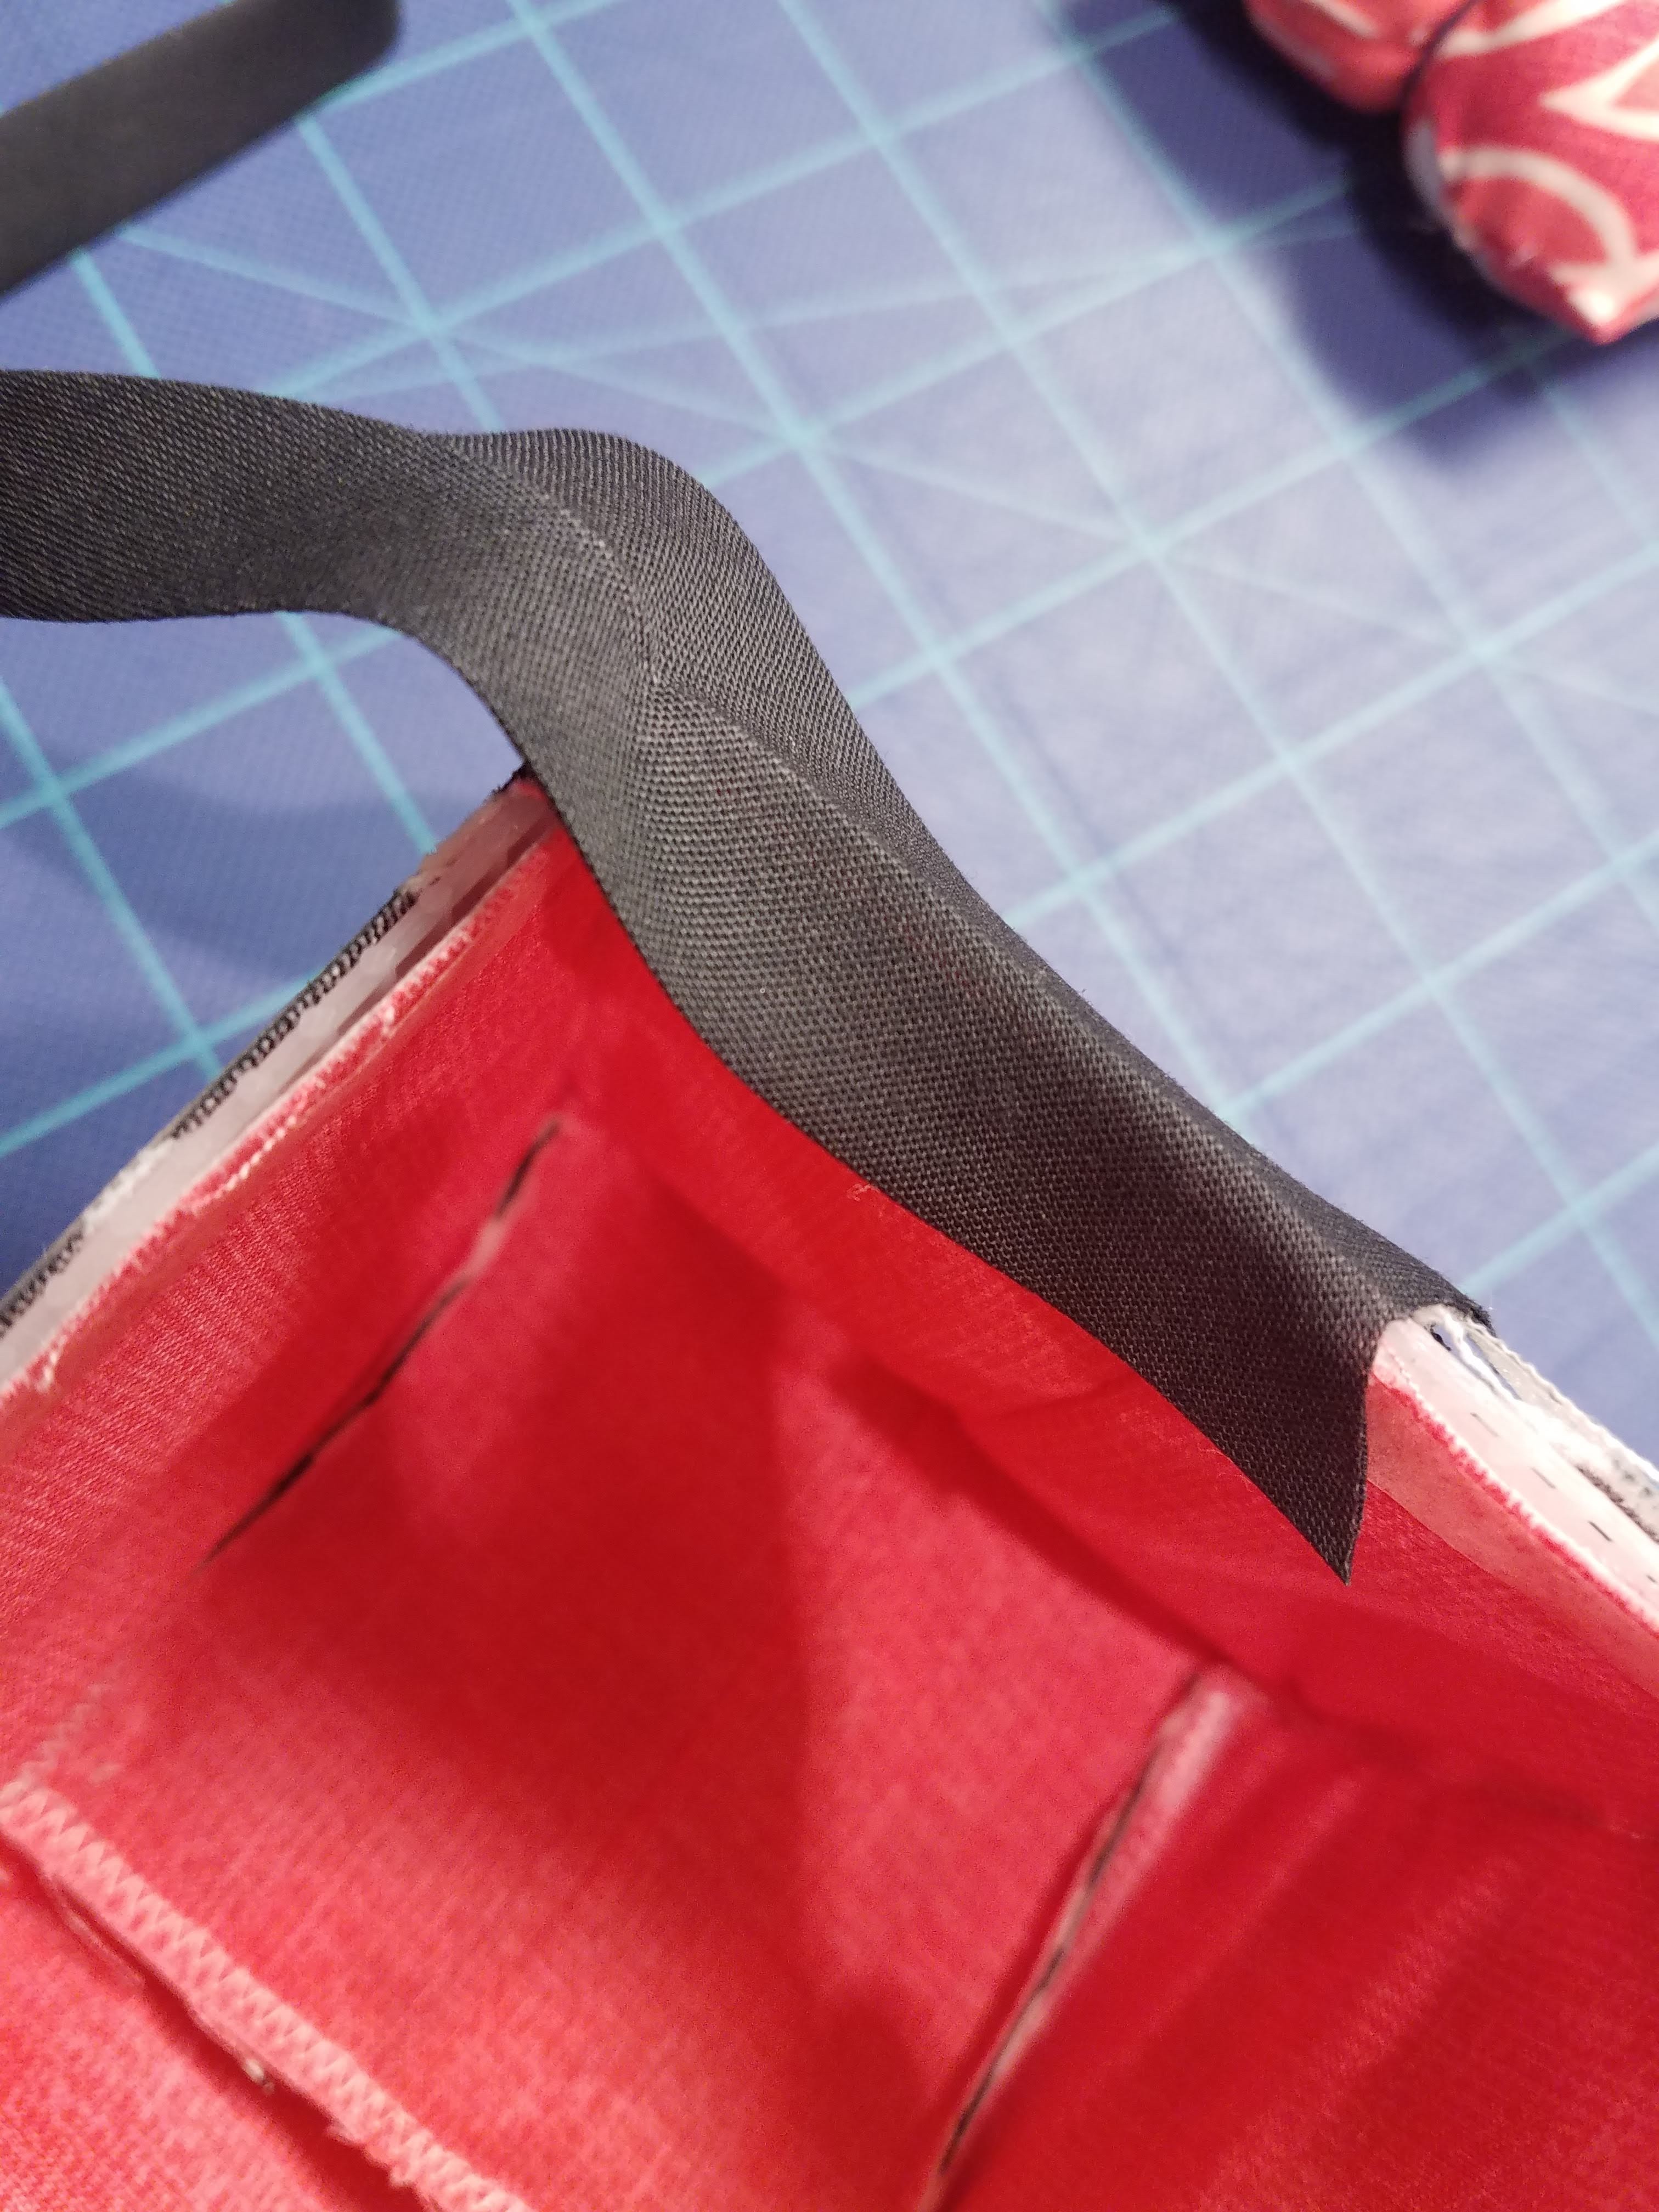
Cut the bias tape so the end overlaps the beginning a bit, and apply two more strips of fusible tape to the overlap:
Follow the instructions for ironing it. (The EZ Steam brand should involve a damp press cloth, and pressing on cotton setting for about 10 seconds with steam.) I press along the inside, and then I use the narrow end of my ironing board to press along the outside too.
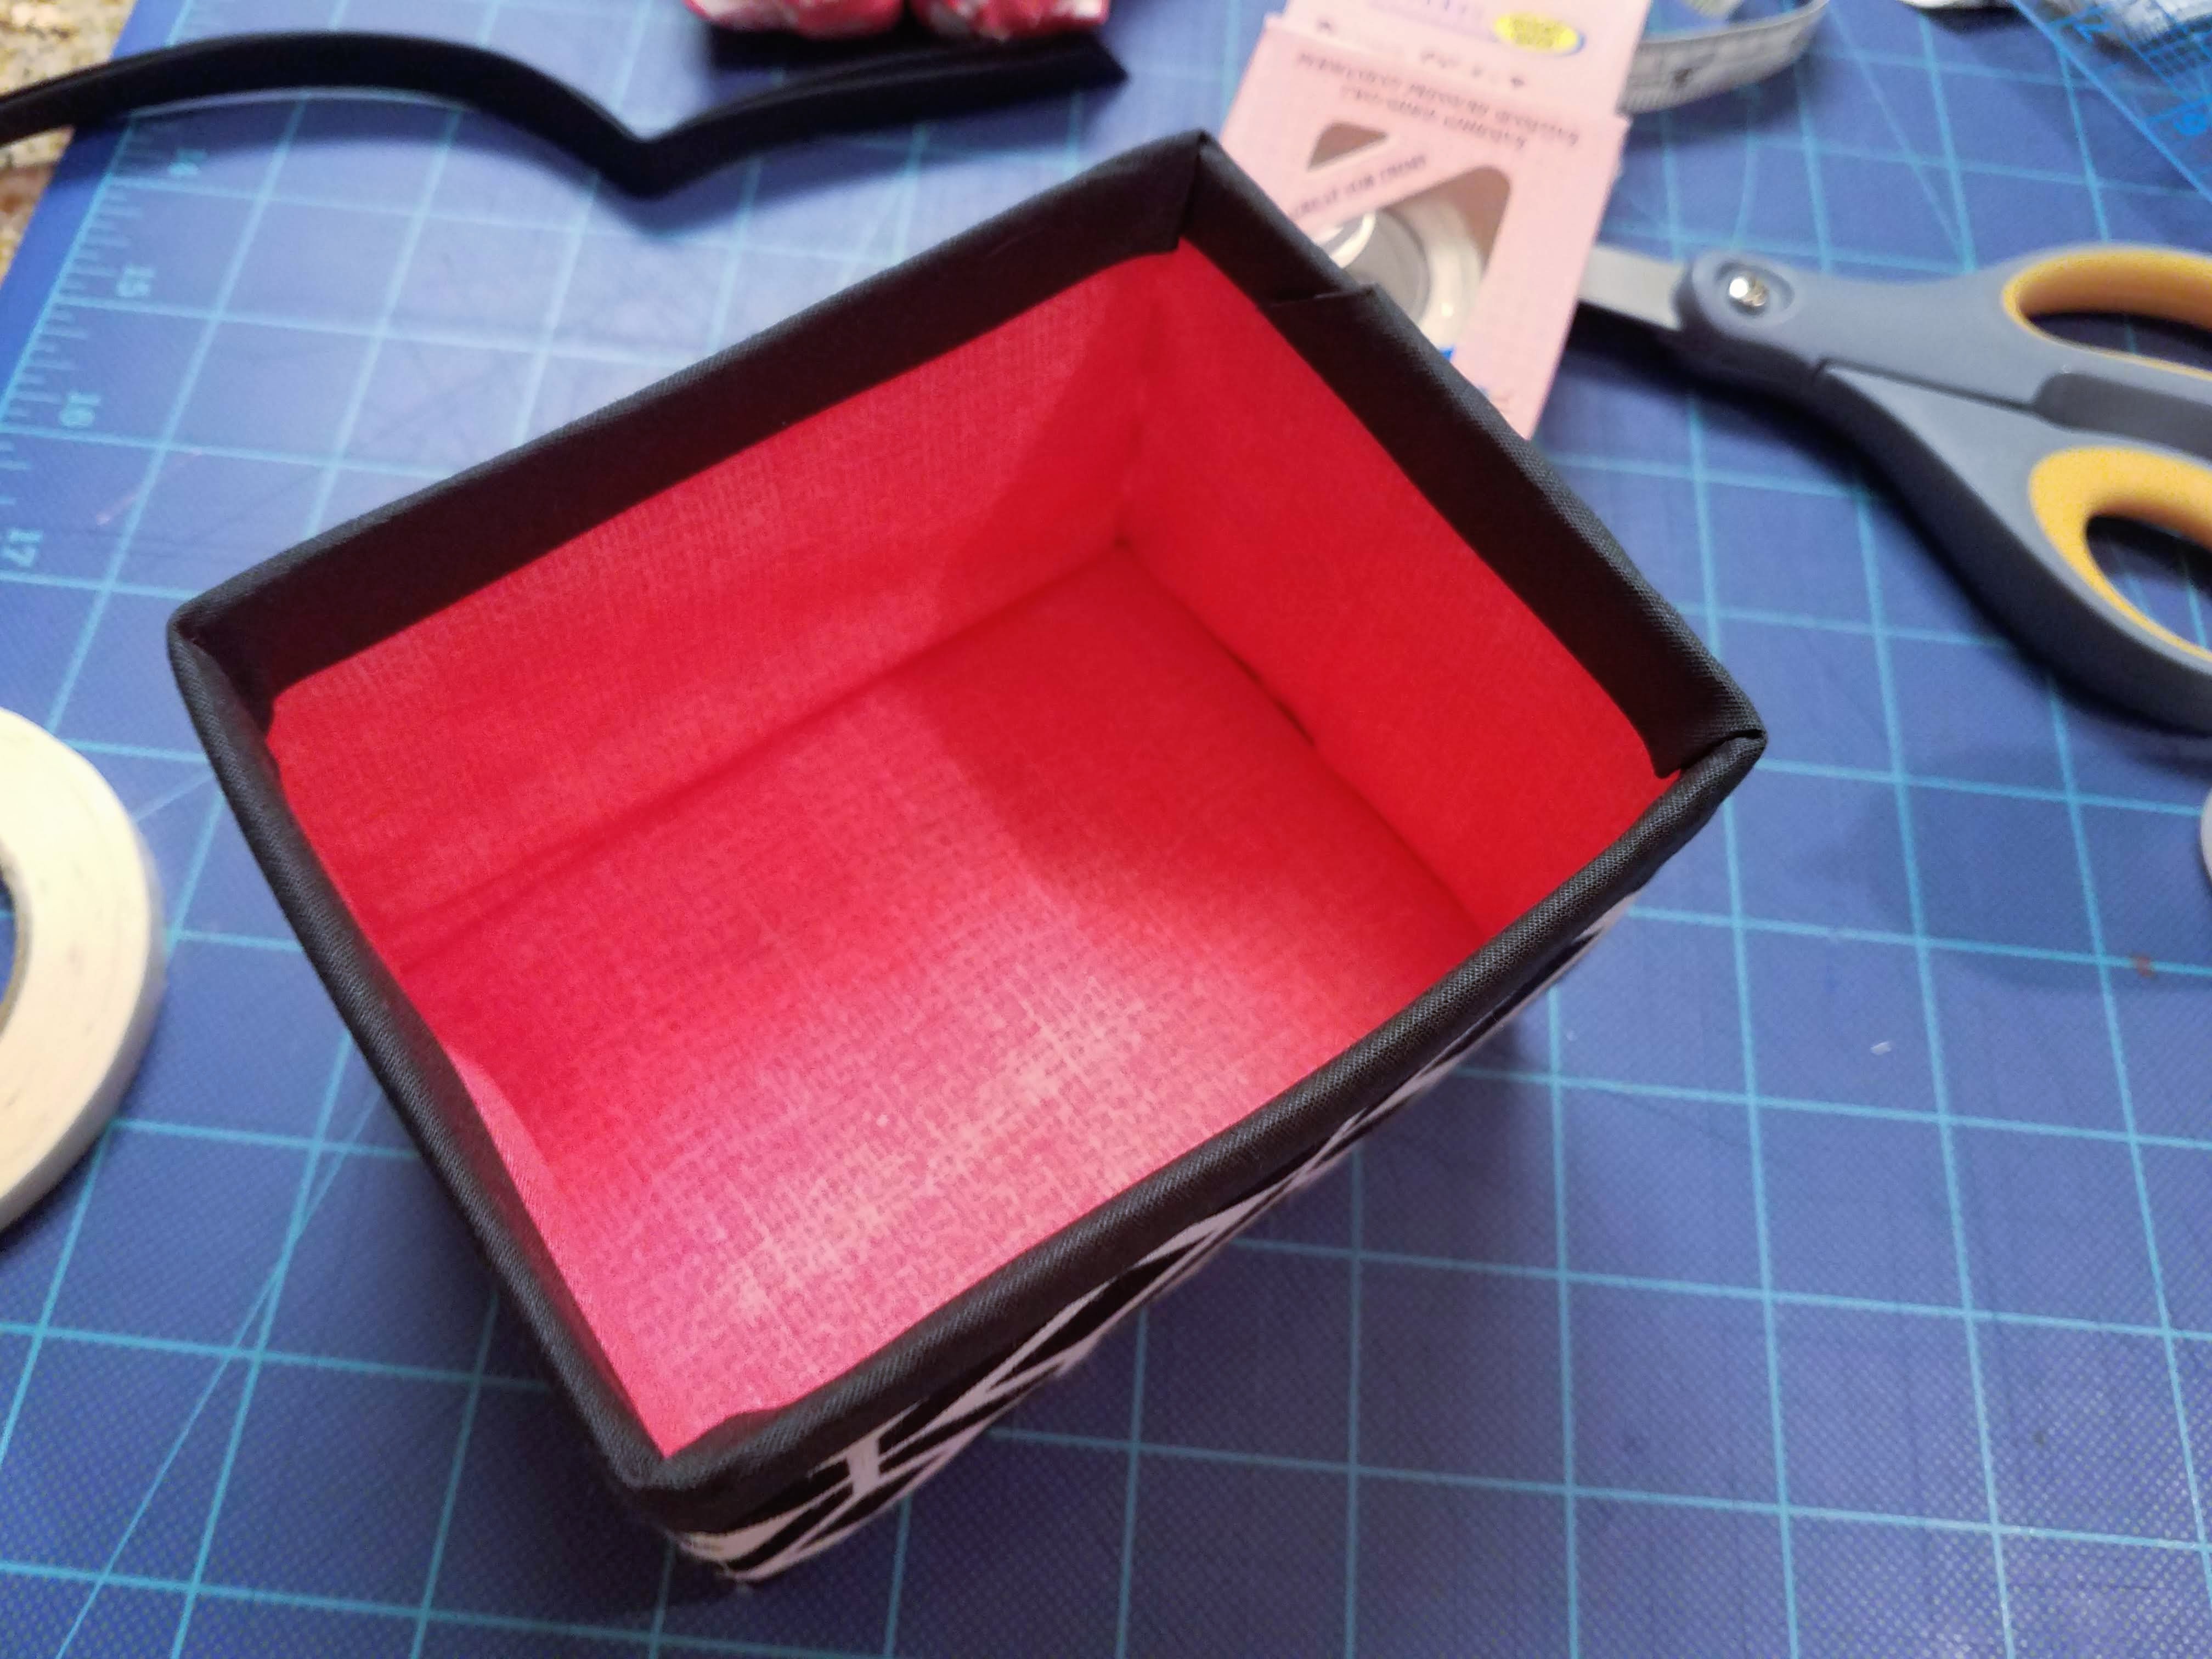
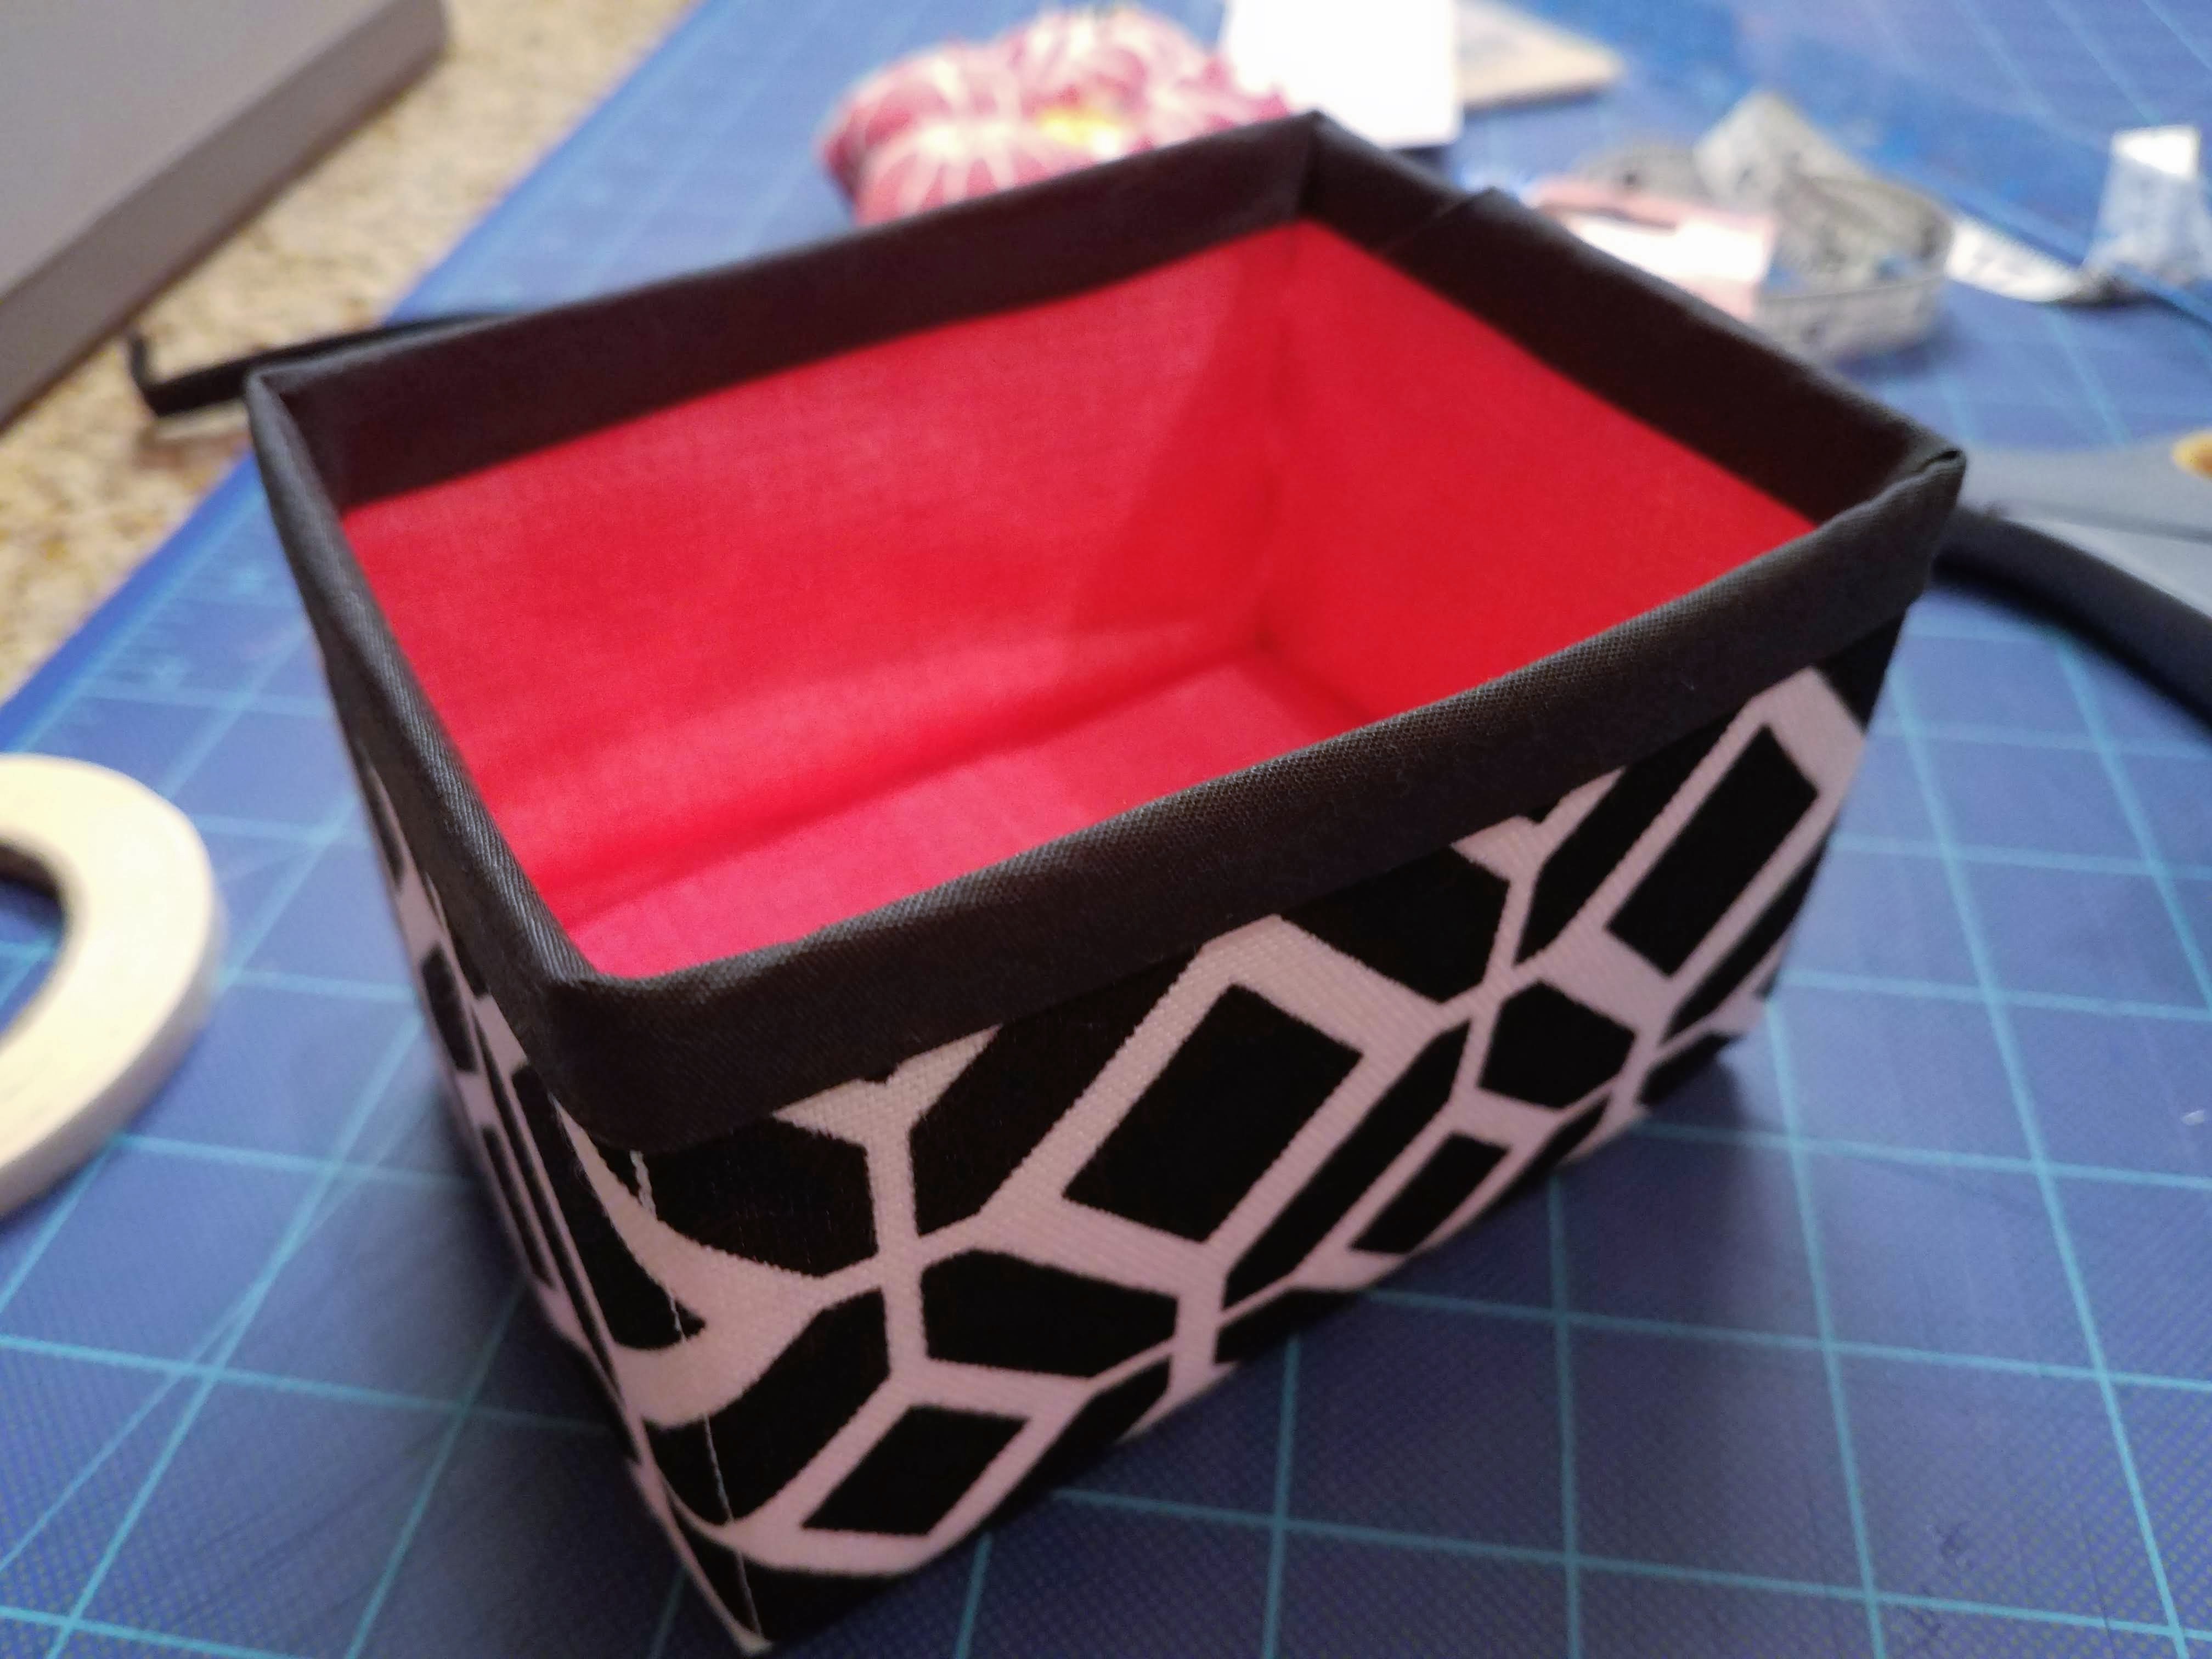
12. Almost there! Throw together the bottom insert.
Nothing overly fancy here. Measure and trim your canvas to fit snugly in the bottom of the box. Again, it shouldn’t bend. Then wrap it in some fabric. I’ve used Perma-stick tape for some of mine, and others I’ve used my Fabri-Tac glue. Your choice. You don’t even have to wrap the entire thing, so long as you end up with one pretty side and the fabric attached reasonably well:

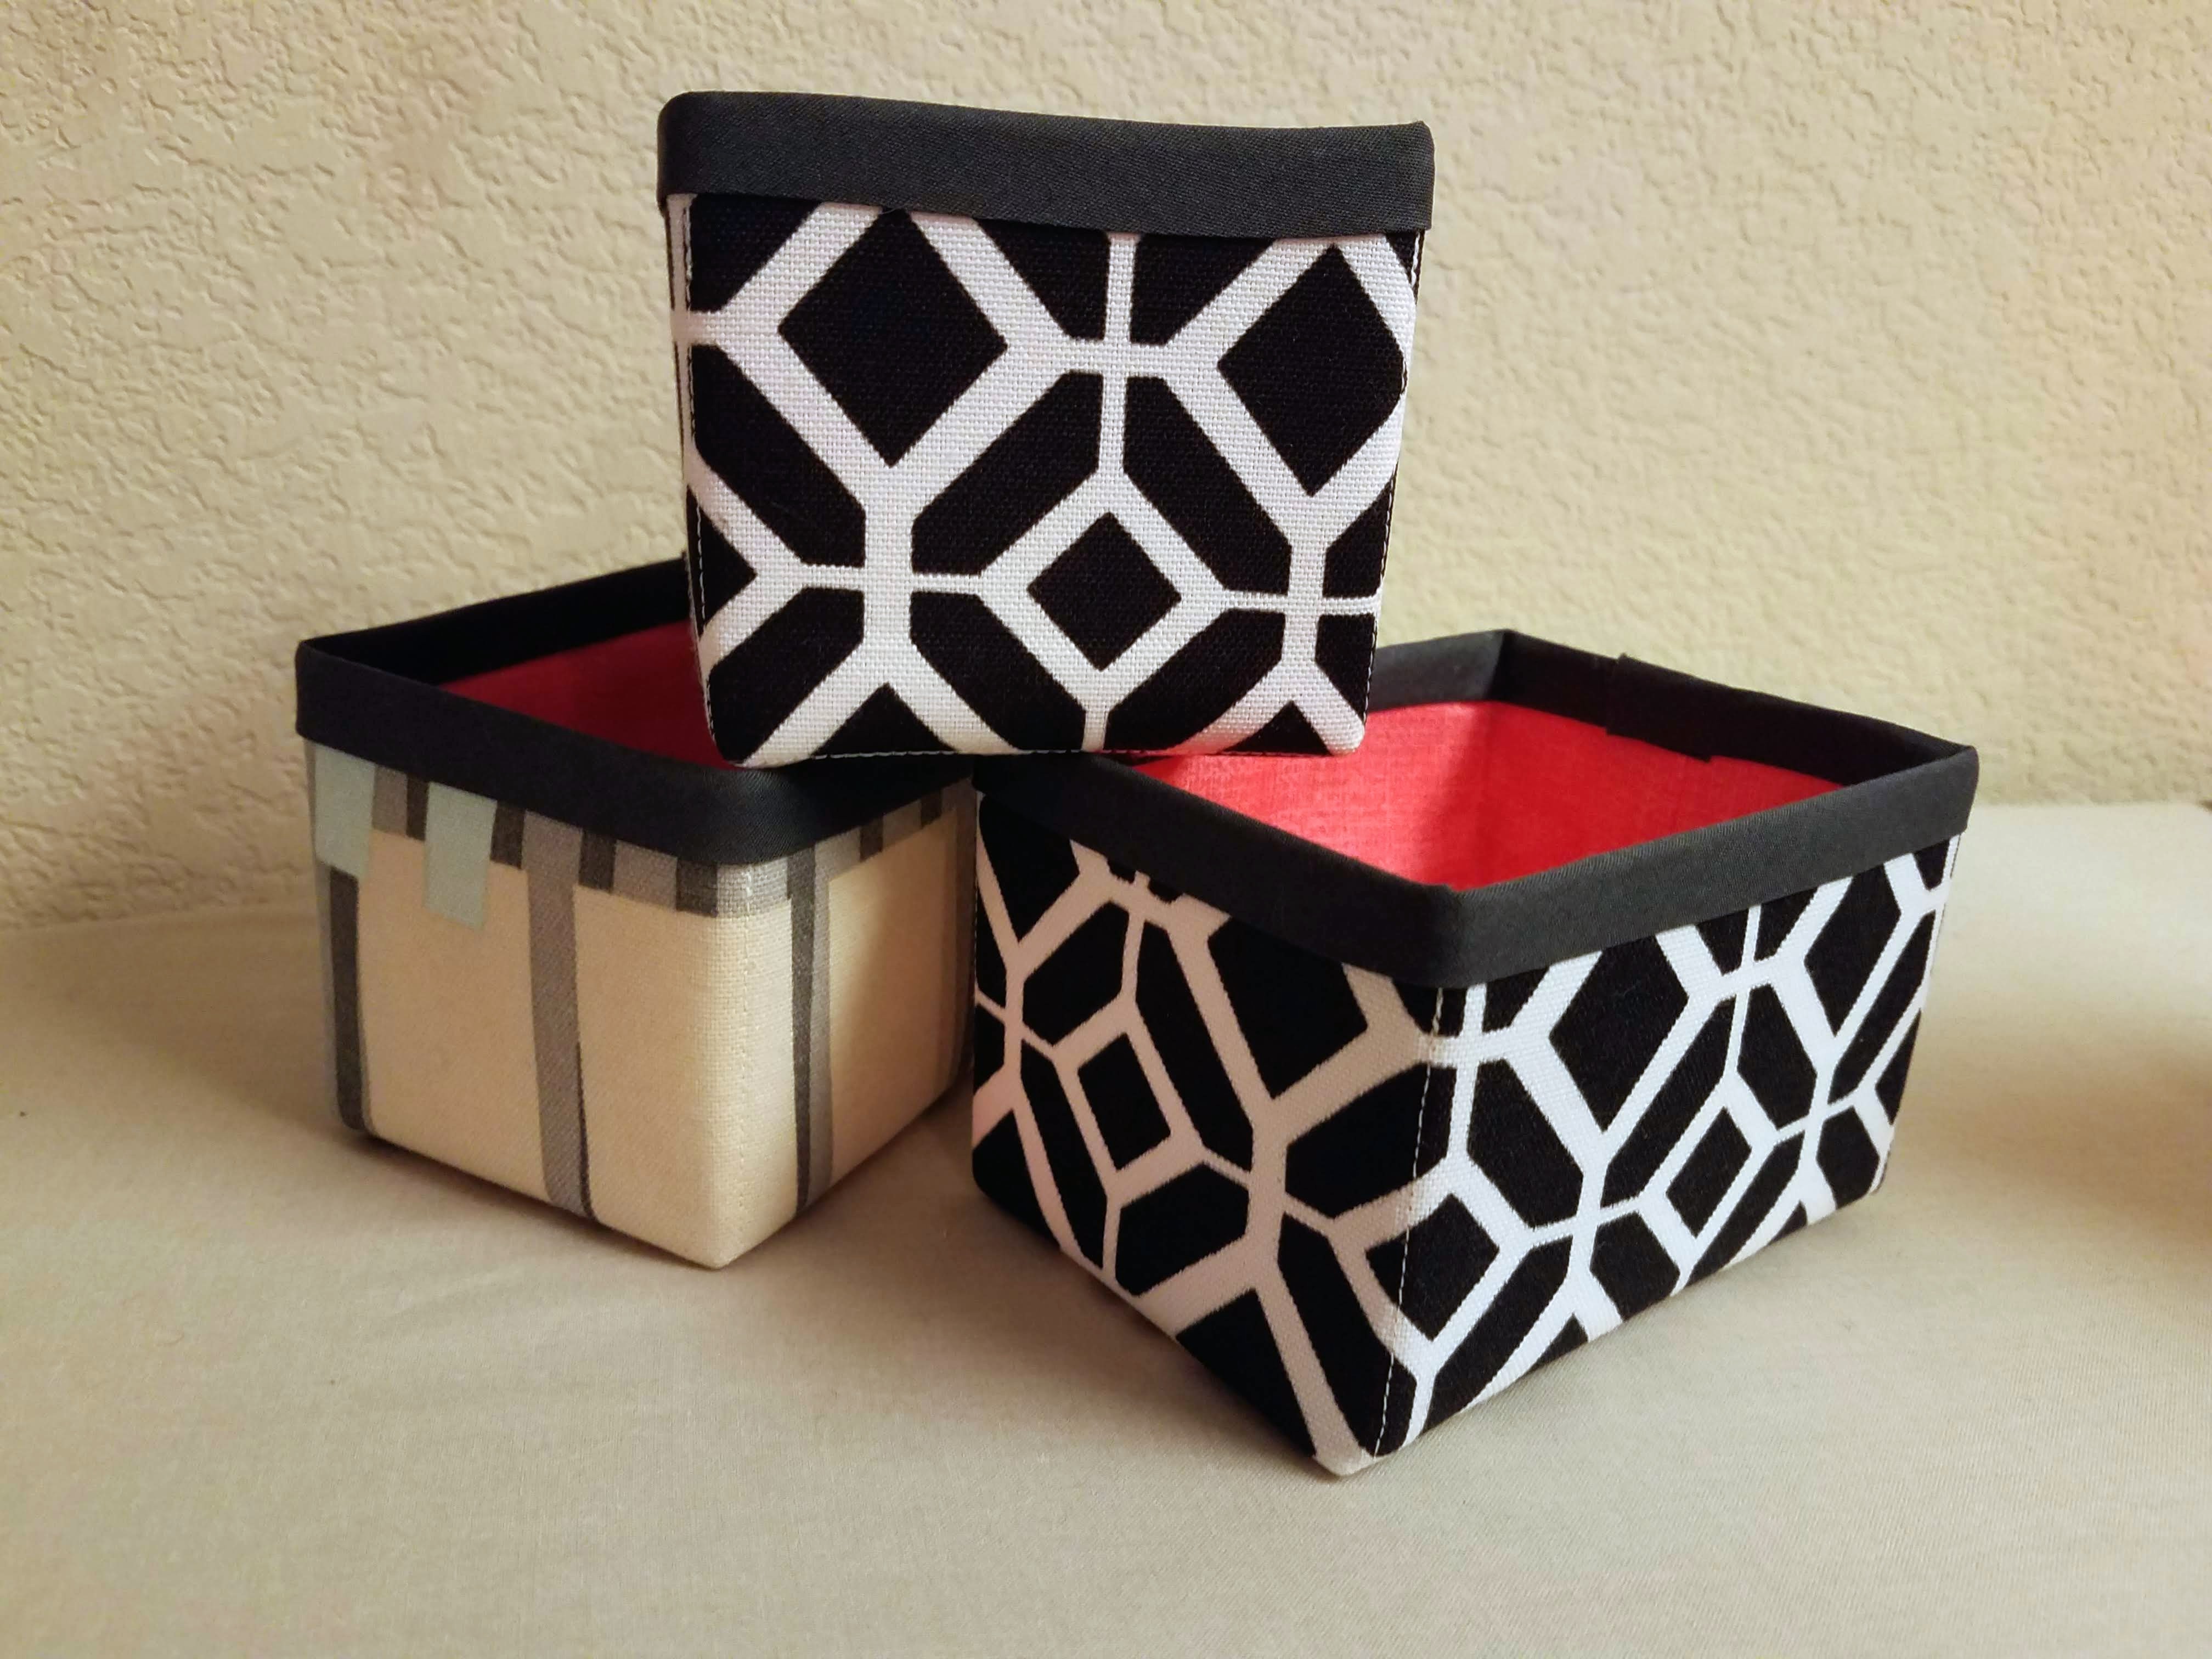
Slide the bottom into your box, et voila! You’re done!
Here’s the tutorial that spurred me to write one more suitable for beginners.
HI Deb, can you please send me some measurements for the fabric boxes, and also measurements for the bottom of the box, I would really appreciate it.
Thank you for your time
Millie
Hi Millie. Thanks for the comment. You can find the measurements I used detailed in the article above, along with how to calculate your own.