If you ask me, big-box paper patterns are kind of the worst for several reasons:
- They’re typically more expensive.
- They’re often divided into multiple packages by size. So you can get XS, S, and M for $20, and for $20 more you can get L, XL, and XXL. If you want S, M, and L to grade between, well you’ll have to dish out for both packages.
- The tissue paper they’re printed on. Sweet heavens. It feels like you’re handling ancient documents. Careful! Don’t rip it!
- They also can’t manage to fold that tissue paper in any logical way. So when you open it up, you literally have to iron all kinds of random creases out of it.
- The instructions. I’ve whined about this before and it’s worthy to be whined about again. They make you do all kinds of nonsensical, unnecessary steps and manage to turn an “easy” sew into a “not as easy as it could’ve been” sew.
So each time I fall for the look of a pattern from the “big 4”, I know to expect a certain level of annoyance and extra time reading and reorganizing their instructions to streamline them. Sure enough, all of this held true with the Vogue Jumpsuit #V1807.
About the Fabric
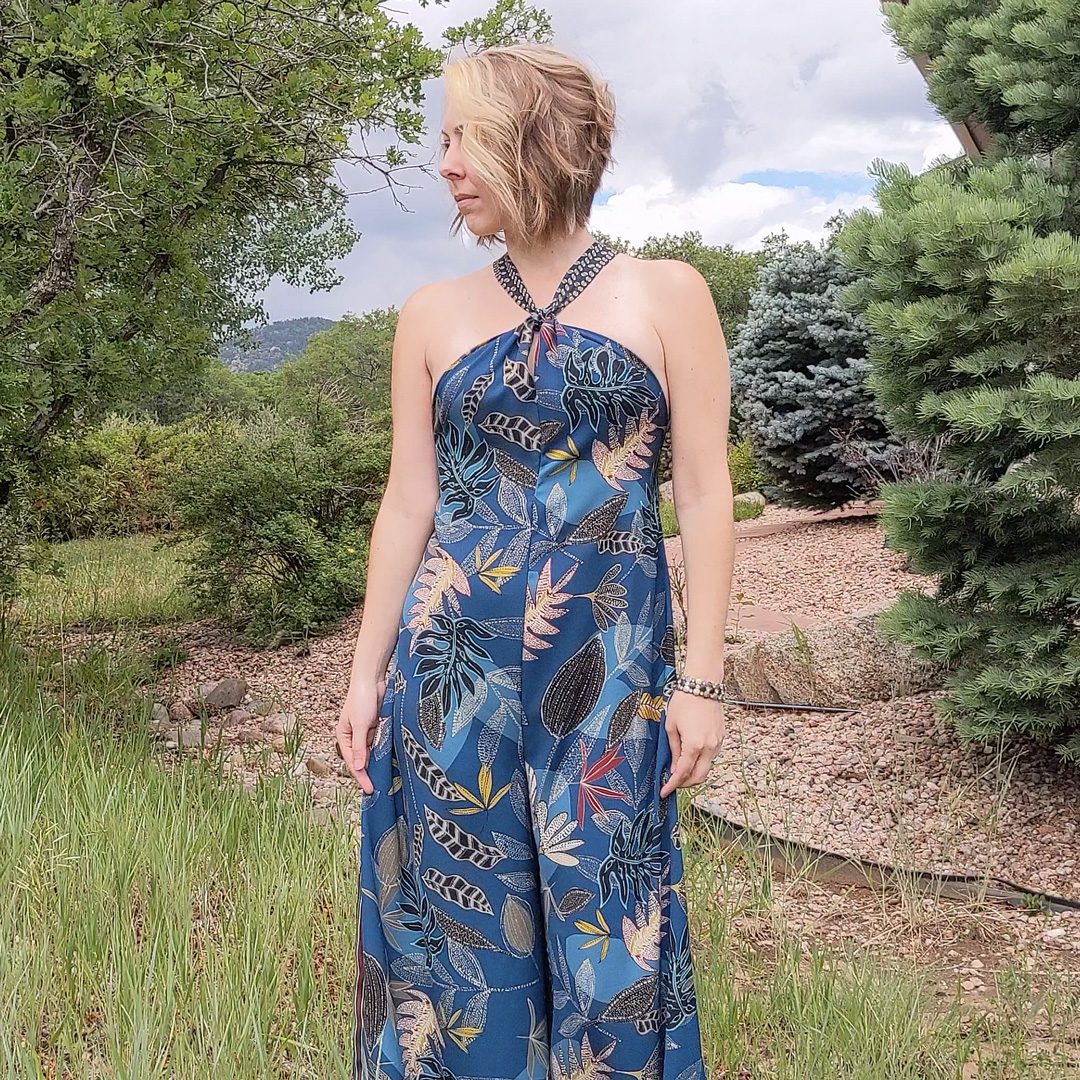
4 yards of Teal Island Border Print Crepe De Chine from Cali Fabrics
- FABRIC CONTENT: Polyester
- WEIGHT: Light Midweight
- STRETCH: none
I’ve never worked with crepe de chine before, but the pattern recommends rayon challis, crepe, and linen blends. I’m pleasantly surprised with this fabric!
Though it feels substantial and has a grainy texture, it’s cool and comfortable against the skin with a wonderful drape. It can be a little shifty to work with, but it presses well and sews well. I like it.
About the Pattern
I saw this pattern on Instagram and I was drawn by the balance of comfort and style. My current pants crisis was a big factor, too.
I call it a crisis, but it’s more an ongoing annoyance that I never seem to have a pair of bottoms I want to wear. Yes, even after a bajillion pairs of Peg Legs. I need to move away from leggings.
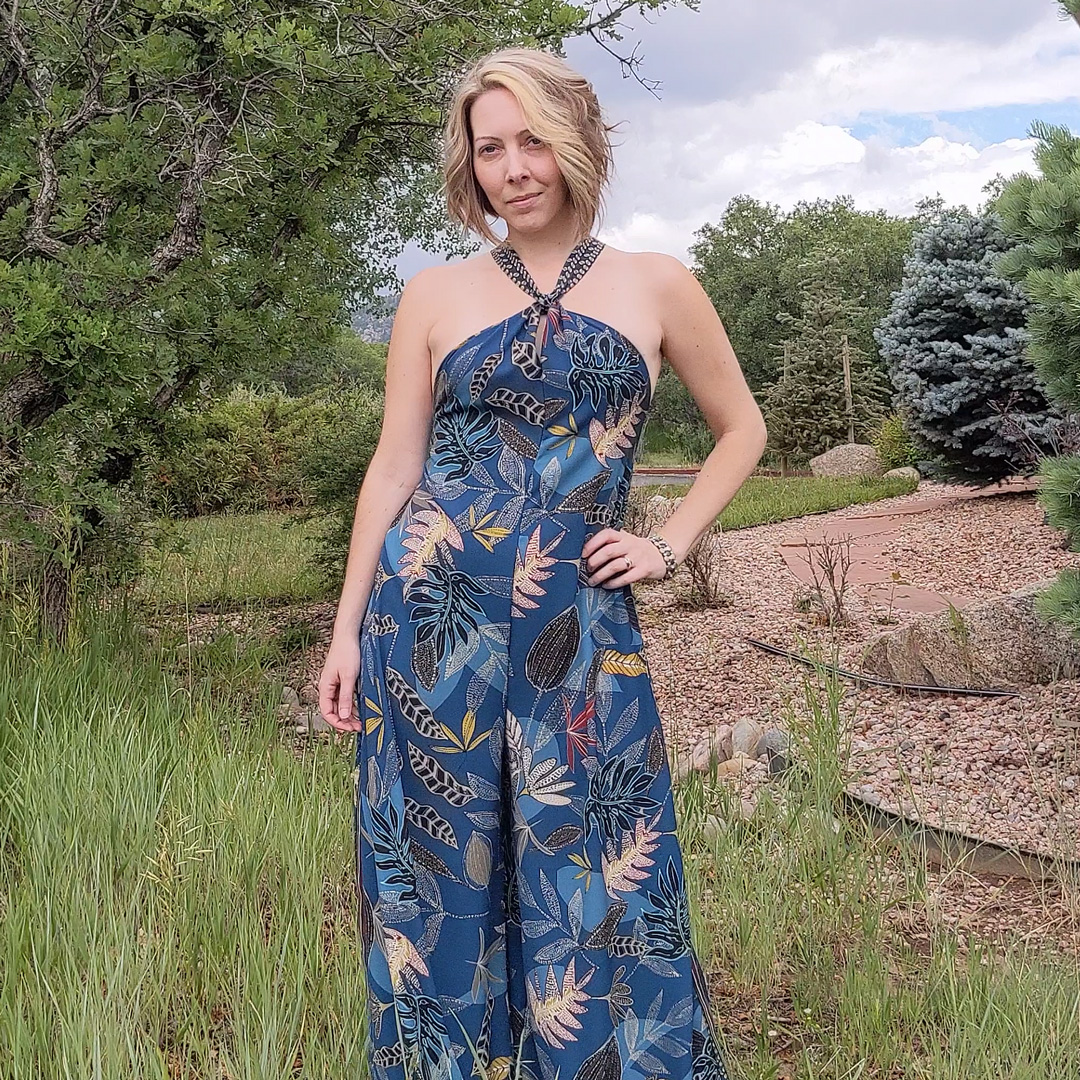
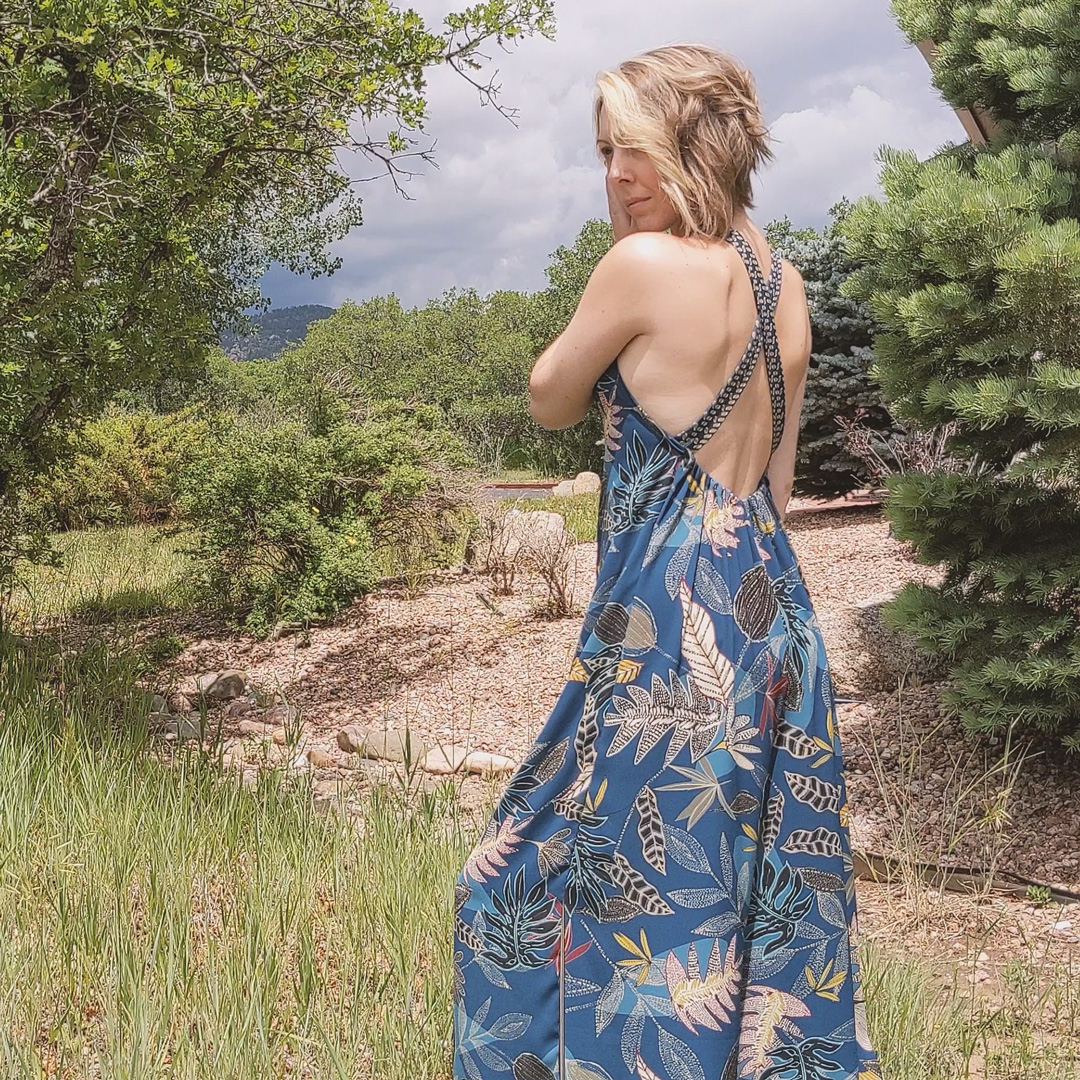
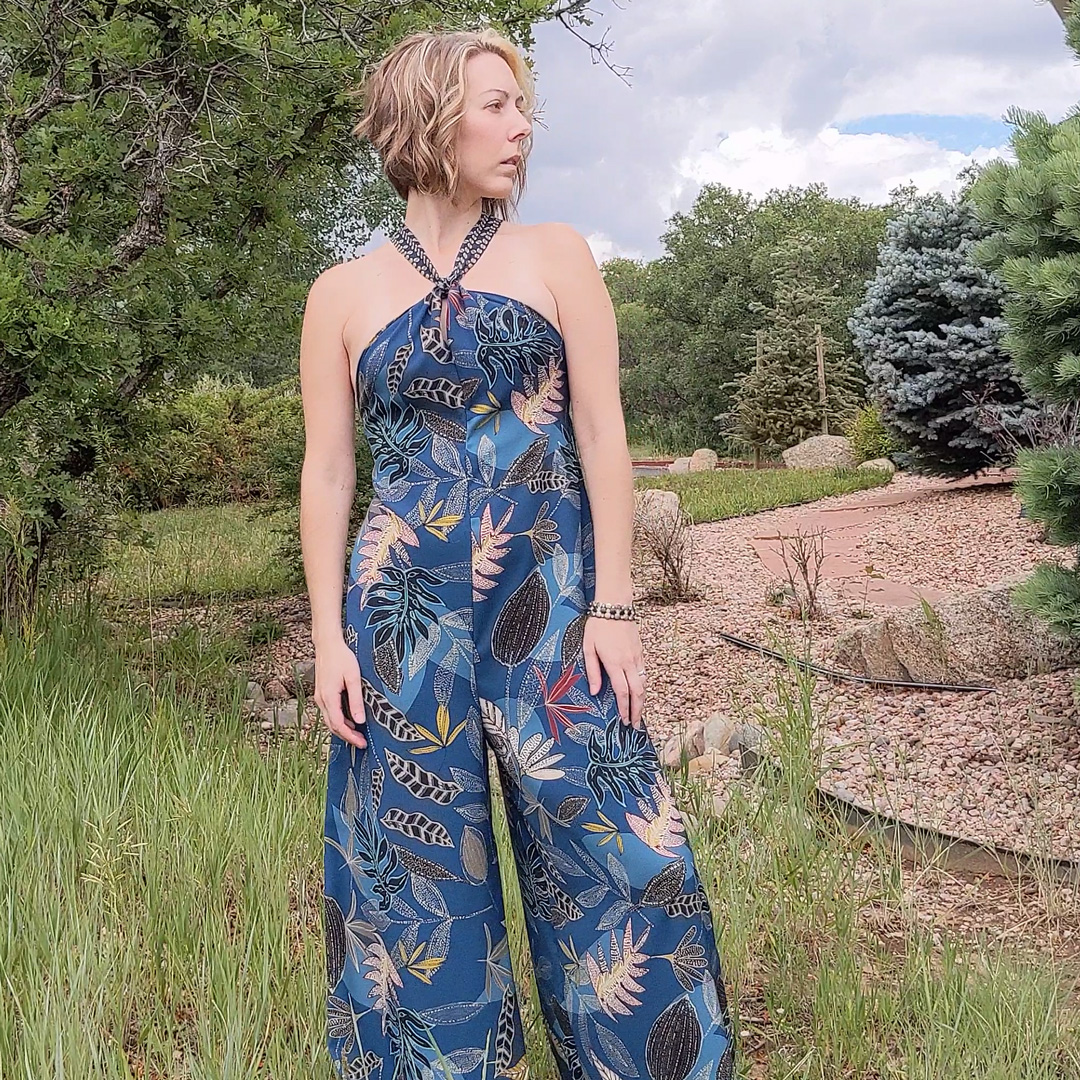
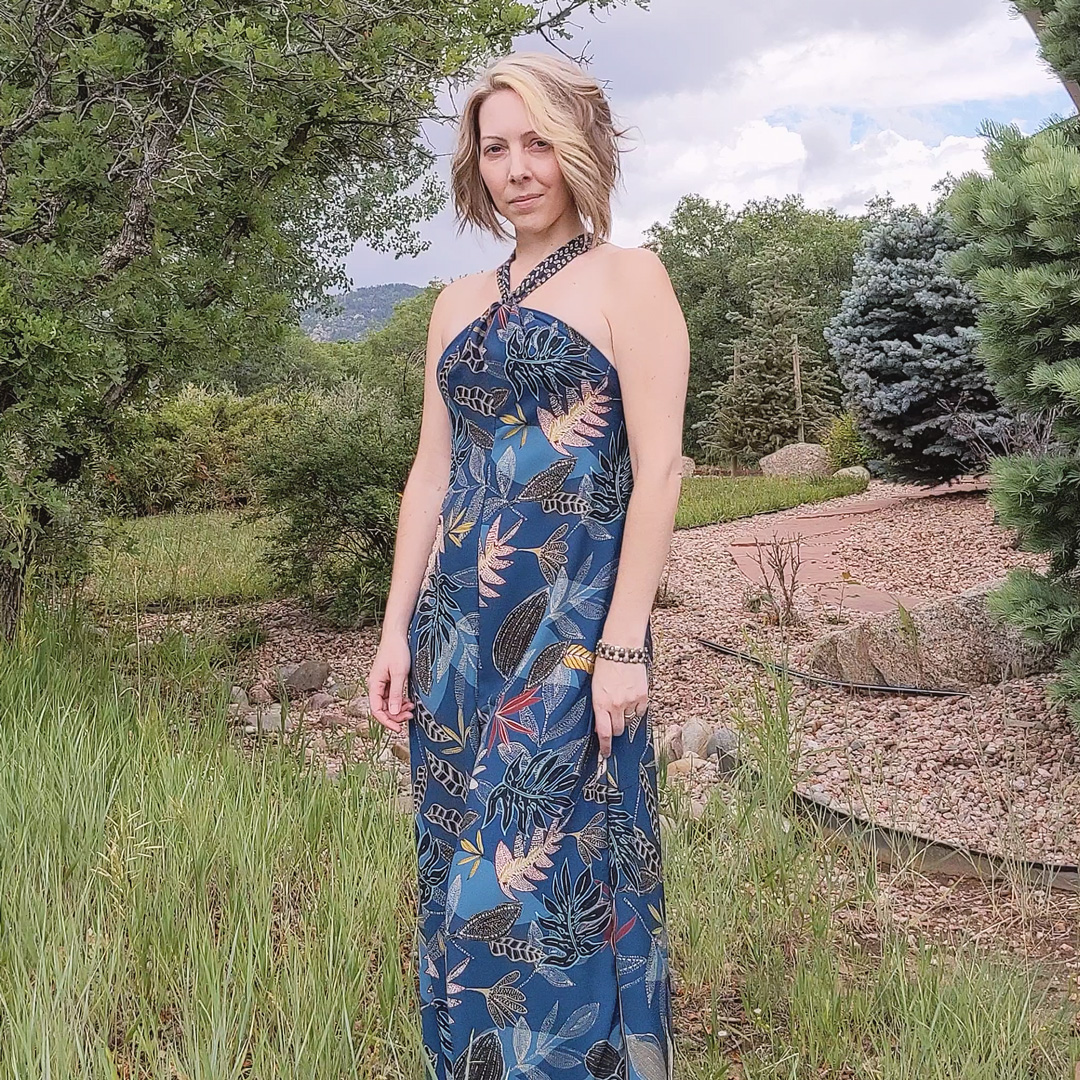
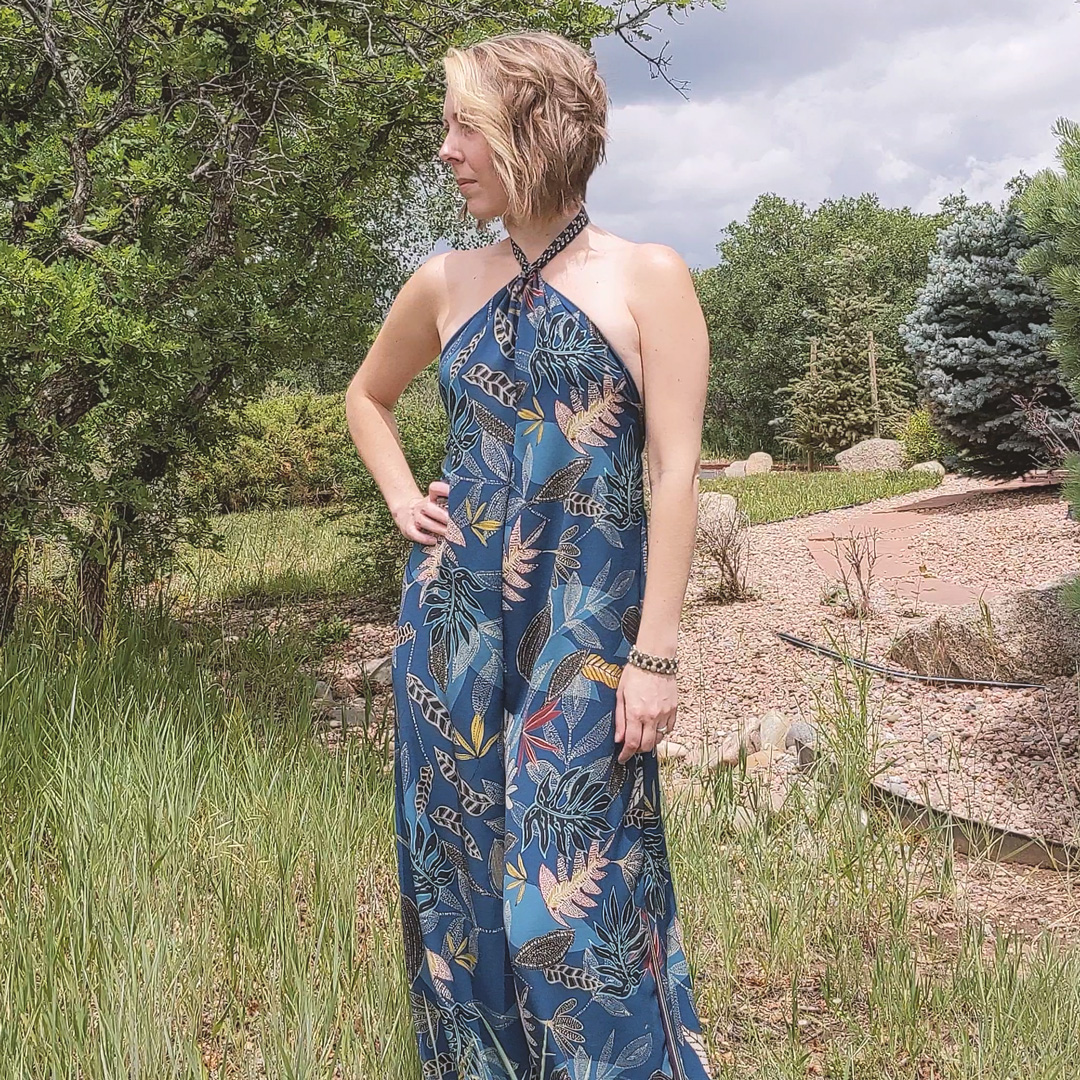
A “loose-fitting halter-neck jumpsuit” is something I never made, never bought, and never wore. I tend to avoid anything that can be classified as an adult onesie; I just never felt they flattered my body and I wouldn’t feel amazing wearing them. So I don’t know what happened exactly to change my perception on that. Could be the halter-neck and the appeal of an entire outfit in one garment. Probably the loose-fitting silhouette and the flowy legs, too. Very forgiving for those fat days.
Rated as a “very easy” sew, I can say with only 7 pattern pieces (11 with pockets), it truly is an easy garment to construct. The instructions—as I’ve said—do ruin that experience the first time you go through them. But the second time around will be way easier as I made notes the entire way to fix all the stupid I ran into.
What I Did Differently
- I skipped the pockets, which makes it even easier and quicker.
- I did step 7 before I did step 6. Sewing a rolled hem around a narrow circle was a dumb thing to do when I could just do it on the flat before sewing the top seam along the front.
- I didn’t mark where the elastic was to be anchored. That was unintentional at first, but worked in my favor when it came to adding the elastic because then I went straight to fitting without caring where the pattern suggested I anchor it.
- I did not baste the elastic before fitting. I used sewing clips to hold the ends in place, which made adjusting and gauging the fit WAY easier than sewing/removing basting stitches over and over again. Turns out, I anchored my elastic all the way at the side seams.
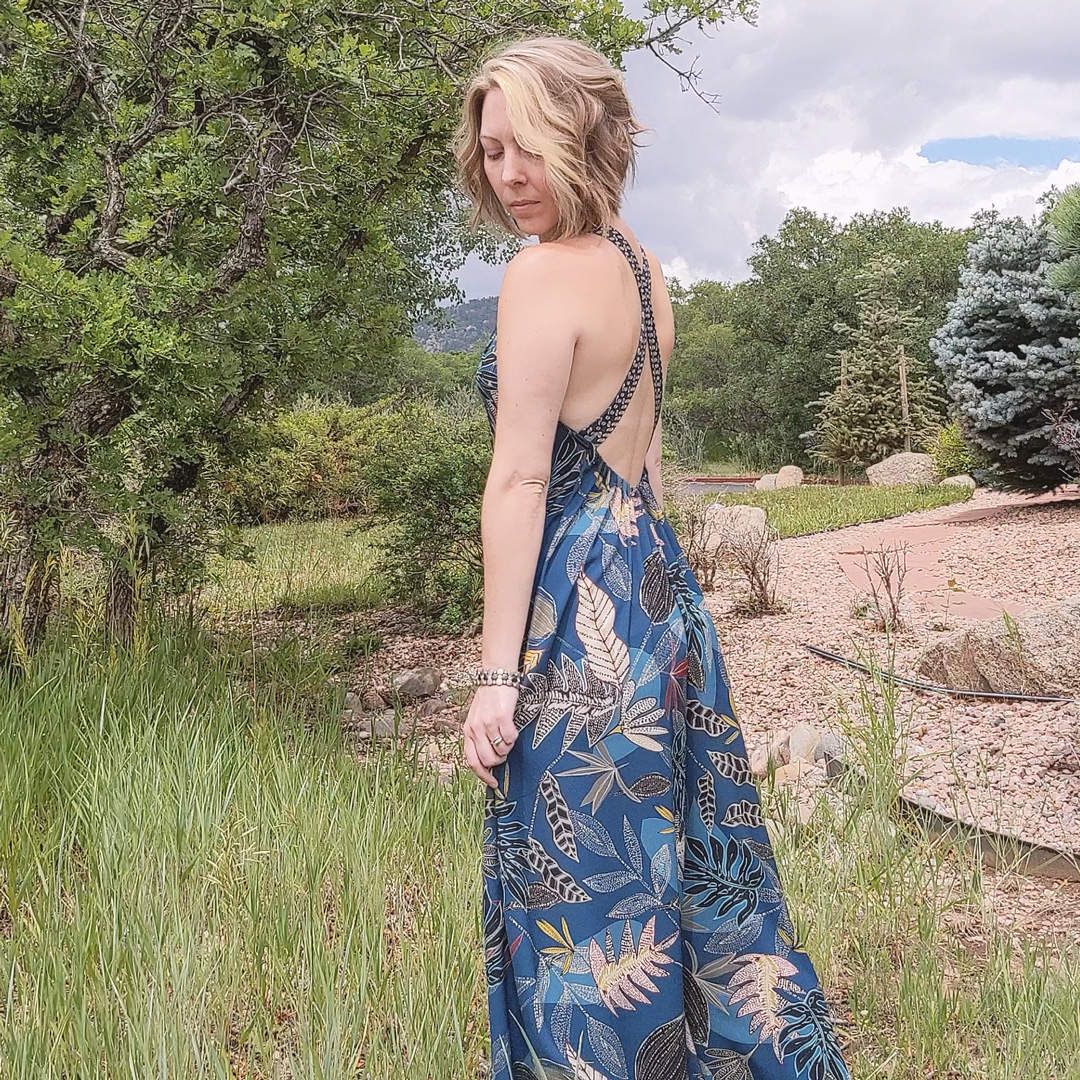
- When I finished and tried it on, I discovered it was not optimized for any kind of movement. Definitely don’t bend over in this thing with that front slit. All kinds of boob will be on display—like, all the boob. So I sewed the front slit several inches higher.
- I also hated the knot. The way they have you construct it is so weird and the thing is too small and creates this solid chunk of fabric right over your collar bone. Not comfortable. So I drafted a different knot that was a bit wider at the top and tapered at the bottom.
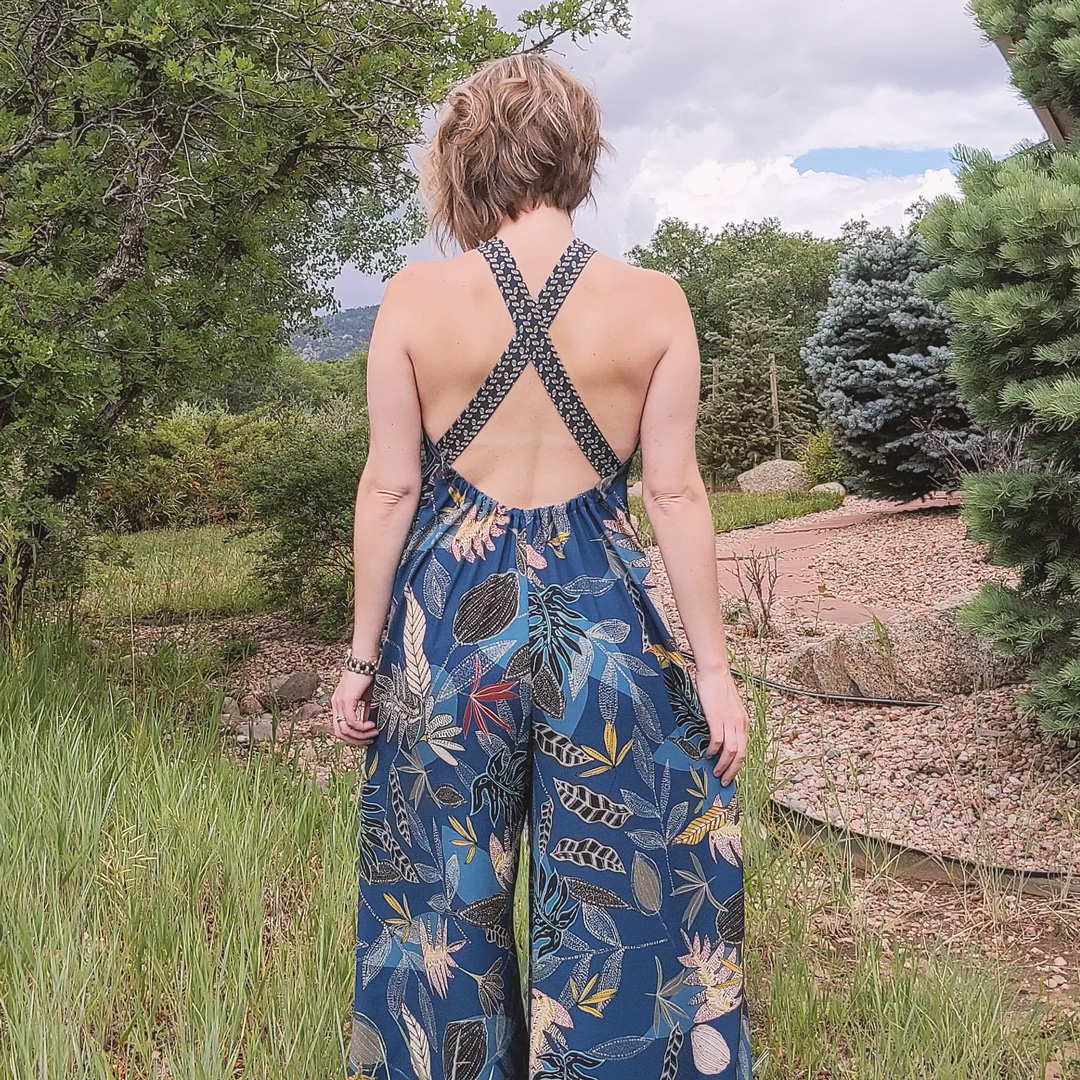
- I also didn’t like how tight I had to tie the halter around my neck for the jumpsuit to not lay too low around my chest. So I played with the ties in front of the mirror and realized they looked pretty fantastic crossed over each other. And I thought, buttons. So I added a button to the inside along the casing near each side seam and sewed a button hole in each tie. This lets me still wear the thing as a halter if I ever want to, but I’m pretty sure I’ll always prefer the comfort of the cross straps. It also adds some shaping to the silhouette, and I can move in the thing without it traveling out of place.
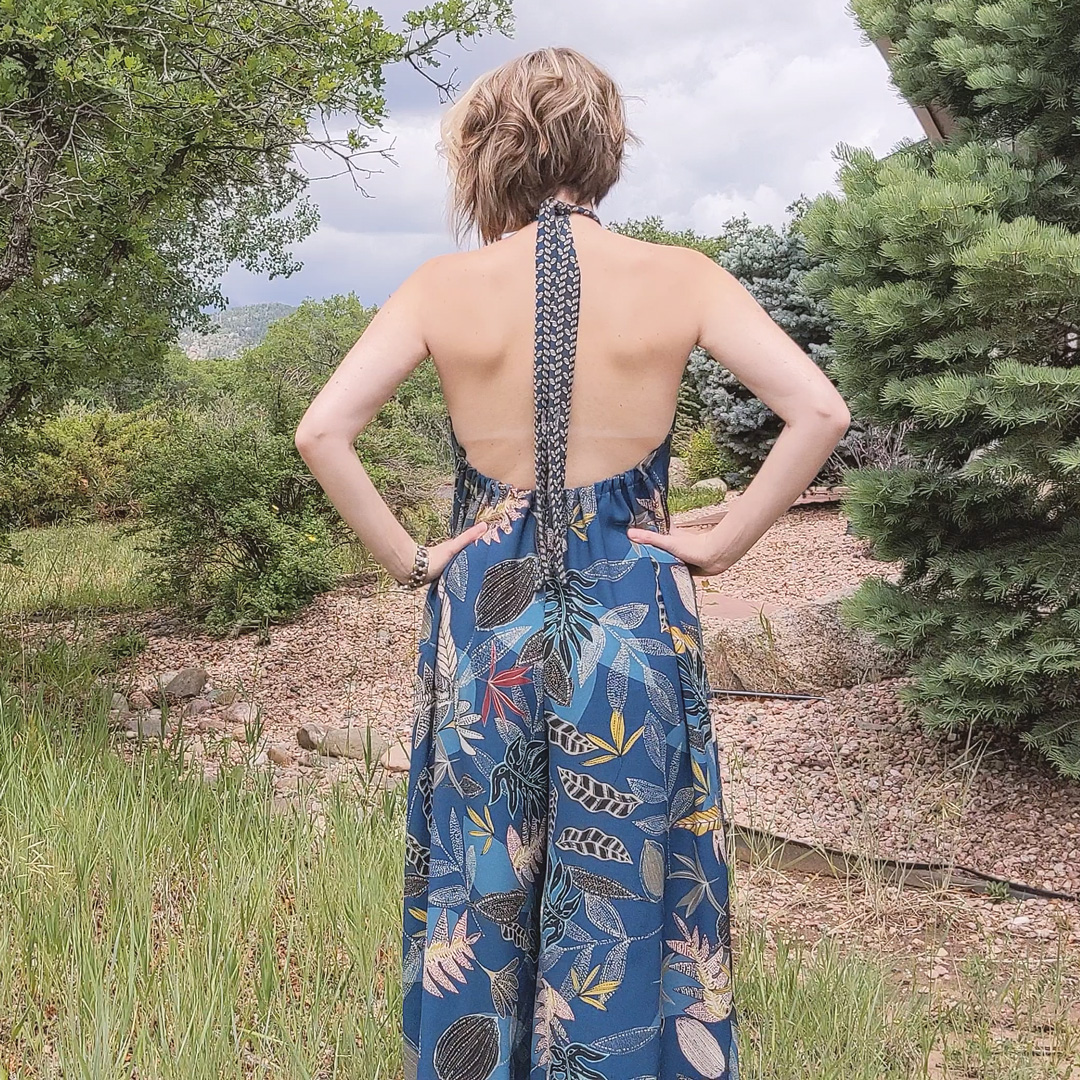
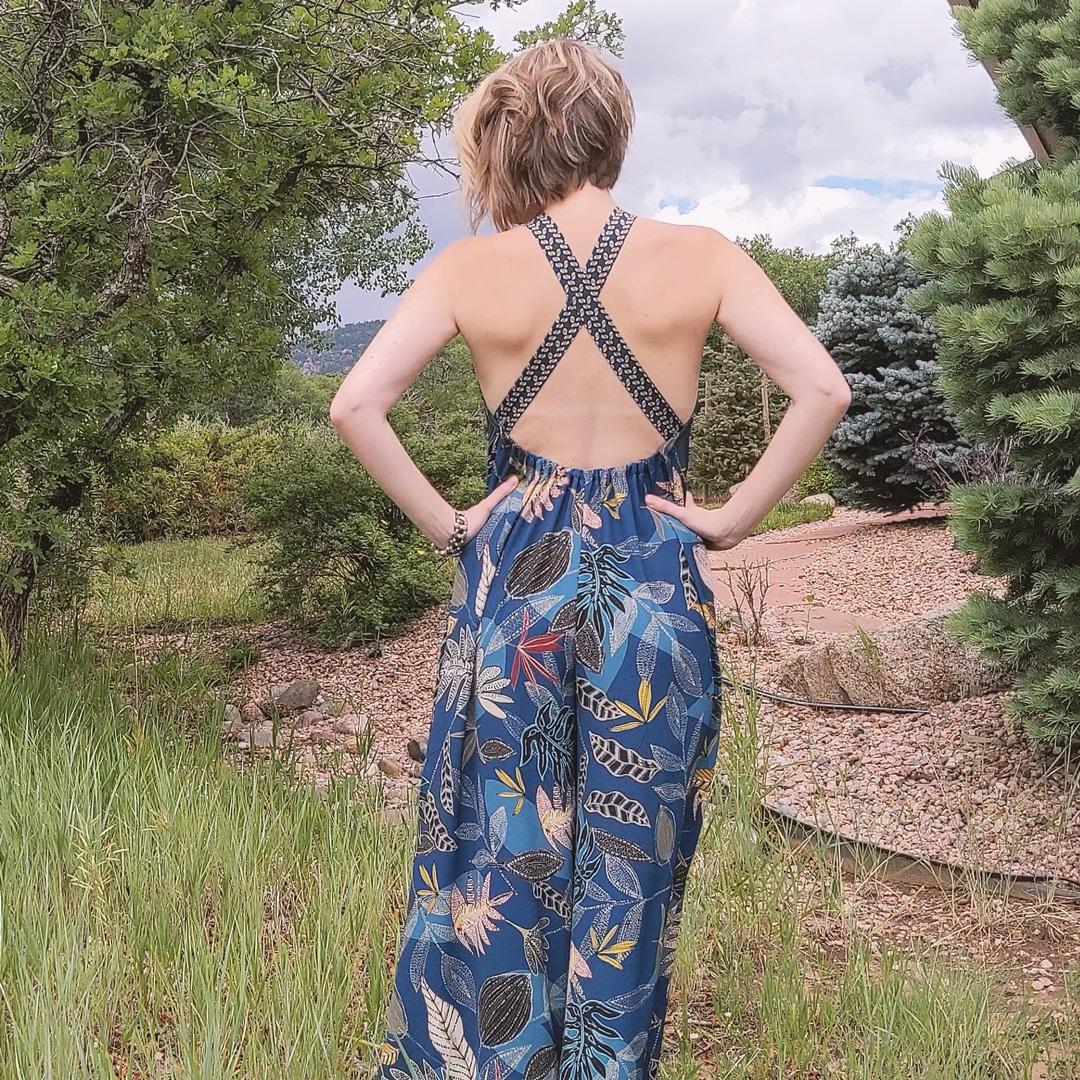
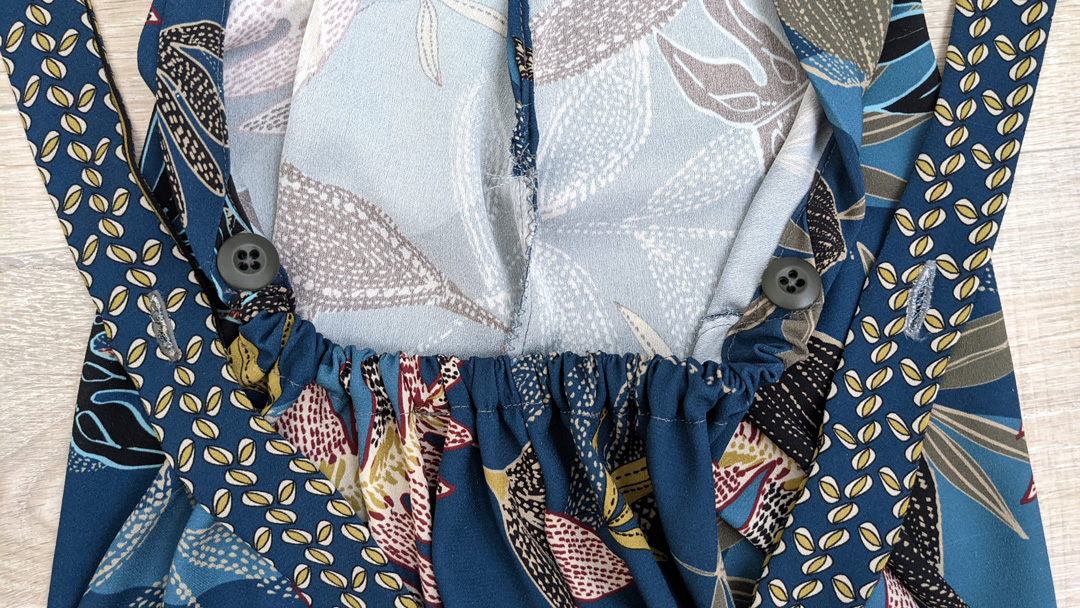
A button sewn along the inside of the casing at each side seam plus some buttonholes added to the straps makes this pattern infinitely more satisfying.
Notes for Next Time
- Try a size Small with leg length from Medium. Their size charts always land me in a medium, but the same thing happened with my McCall’s Blazer. Small fit so much better.
- Move front seam up at least 3.5″.
- Use self-drafted knot.
- Finish seams where I noted on the pattern.
- Make sure to do step 7 before step 6.
- Maybe include pockets.
 I’m really looking forward to my next one which will be made from a Rayon Challis from Cali Fabrics. It’s going to be so light and airy and that print is so fun. It may also lay a little better than this one because the fabric is lighter. Here’s hoping. I’m still going to hack it for the cross straps, though.

Project Settings
Presser Foot |
Stitch# |
Width |
Length |
Needle |
Top Thread Tension |
Application |
|---|---|---|---|---|---|---|
standard zig-zag (A) |
1 |
3.5 |
3.5 |
90/14 sharp |
4 |
seams |
overedge (C) |
6 |
5.5 |
3.0 |
90/14 sharp |
4 |
edge finish |
overedge (C) |
2 |
0 |
3.5 |
90/14 sharp |
4 |
front rolled hem |
overedge (C) |
1 |
3.5 |
3.5 |
90/14 sharp |
4 |
casing |
adjustable edge (SE) #9 |
1 |
0 |
3.5 |
90/14 sharp |
4 |
pant hem |
Loved your teal jumpsuit..what patterns do you suggest..i am a beginner..thanks
Hi Sharon! Thank you!
In my experience, independent pattern designers tend to be much more beginner-friendly. Many of them include tips and tricks for various things like working with certain types of fabric, or common adjustments like lengthening/shortening, full bust adjustments, etc. My personal favorite indie designer is George and Ginger. Others I’m familiar with that I feel are great for beginners: DIBY Club, Itch to Stitch. There are other indie designer patterns I commonly use but I think beginners would be more easily confused by their instructions.